When you first install an application, you can see its size from the Play Store. However, over time, you may notice whenever you look at your Applications list that the app that was previously just 95MB in size now takes up over 150MB on your computer.
This applies to all kinds of apps, regardless of size and functionality. That’s because whenever you use the application, the system automatically generates files for every task you perform. If you have a browser app, for example, whenever you visit a new site, the system generates data files so that site can be loaded more quickly the next time you visit it. Those “data files” are what experts call cache. In the case of applications, they are app cache, and though they don’t consume much space, over time, the cache alone can pile up and consume hundreds of MBs worth of storage space on your computer, and you don’t want that.
Unfortunately, the solution won’t be as simple as just uninstalling the apps. After all, what if you still need them? In that case, you may have to simply clear app cache on Mac, and there are several ways to go about it. But is it safe to do, to begin with?
What Happens When You Clear App Cache on Mac?
What’s important to remember is that the cache only contains the temporary files that the app generates every now and then. It doesn’t contain the files that the app needs to operate. Those are usually inside a different folder. That means if you delete the cache, the worst thing that could happen would be your preferences will be reset. For example, if you clear the cache of your browser, Safari, the most significant impact would be that you’ll get logged out of the websites that you’re already logged in to.
Of course, the extent to which deleting the cache may affect the app will vary according to its type. In some apps, deleting the cache may not even do anything as it contains only temporary files. Regardless, it should be safe to clear app cache on Mac.
With that in mind, let’s go over the three different ways to clear app cache. Let’s start with the simplest method.

Method #1: Use The Built-In Feature in The App
It’s common practice to regularly clear app cache on Mac, or any other computer, for that matter. That’s why certain apps have a specific built-in feature that allows users to do so with just a few clicks. Steam, for example, has a button somewhere in its Settings page that says CLEAR DOWNLOAD CACHE, and it does exactly that—it clears the cache. So, for the first method, you might want to look into the app. Of course, since the interface and settings of each app are different, it’ll be up to you whether you can find that specific feature or not. If you can’t locate that feature, then that’s when you must use the second method.

Method #2: Find And Clear The App Cache Folder
The second method involves Finder—the file management app for macOS computers. It’s the Apple counterpart of Windows PC’s File Explorer. Using Finder, you should be able to navigate to the folder that contains the application’s cache files, and once you’re there, you simply have to delete the cache files. Thankfully, you don’t have to do this manually by jumping from one folder to another. You can use a specific feature in Finder that allows you to go to a certain folder with just a few clicks.
Here’s what you need to do to use that feature:
- Open the Finder app on your computer.
- Click Go from the top menu bar.
- Select Go to Folder… from the resulting dropdown menu.
- A popup window should appear. On the text bar, type in the following text: ~/Library/Caches
- Click the Go button.
- Finder should then take you to the folder of the specified file path. There, you’ll find several folders, and some of them should have a name that corresponds to your existing app. Find the folder of the app that needs its cache cleared.
- Open the app folder.
- Drag and drop the contents of the folder into the Trash.
Once you’ve deleted the cache, you should also make sure you delete the deleted files from Trash. That way, they don’t consume disk space on your computer.

Method #3: Use Mac Cleaner
One thing you may notice about the aforementioned methods is that they cannot fully clean up the cache of certain applications from your computer. You can see this because when you look at your applications list and the App Store, you may notice that even after the cleanup, the size of your apps is still slightly higher than the size of the apps as shown in the App Store. That’s because even if you do manage to clean up the supposed cache folder, there are bound to be other cache files that are lurking outside of the actual app folder. Hence, the cache is never truly gone, but that’s why we suggest using Mac Cleaner.
Mac Cleaner is a cleaning software designed to delete unnecessary files from your computer. Among these files are the app cache, and unlike the previous methods, this software can detect even the cache files outside of the app folder.
For that reason, it’s the perfect app for your purposes. With that said, here’s how to clear app cache on Mac using the software:
Step #1: Set up Mac Cleaner on Your Computer/Laptop
You need to download the software before anything else. To do that, you must get to the Mac Cleaner download site. You can do so by clicking this link. When you’re on the site, click the Download Now button somewhere on the page. That will prompt the download of a DMG-type file, which you must open once the download finishes. The installer should open, and you have to follow the instructions carefully. The application will open automatically once its installation is finished.

Step #2: Pick Clean up Junk
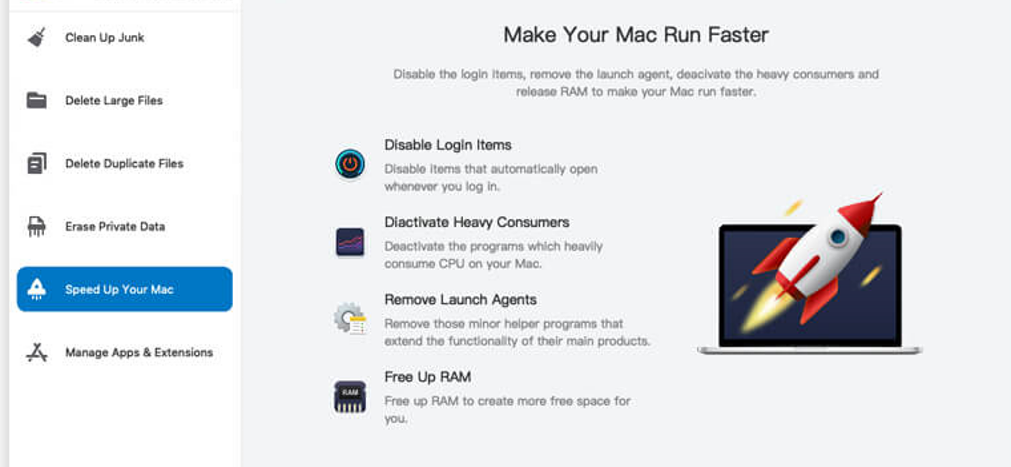
On the first page of the interface, you’ll find a list on the left side which consists of six options. These options correspond to the modules that Mac Cleaner currently has, and these include (1) Clean Up Junk, (2) Delete Large Files, (3) Delete Duplicate Files, (4) Erase Private Data, (5) Speed Up Your Mac, and (6) Manage Apps & Extensions. For your purposes, you only need to select the Clean Up Junk module as it allows you to get rid of junk files. These include System Junk, Trash Bin, iOS Junk, iTunes Junk, Unused Disk Images, and most importantly, App Junk, which should include the app cache files.

Step #3: Click the Scan Button
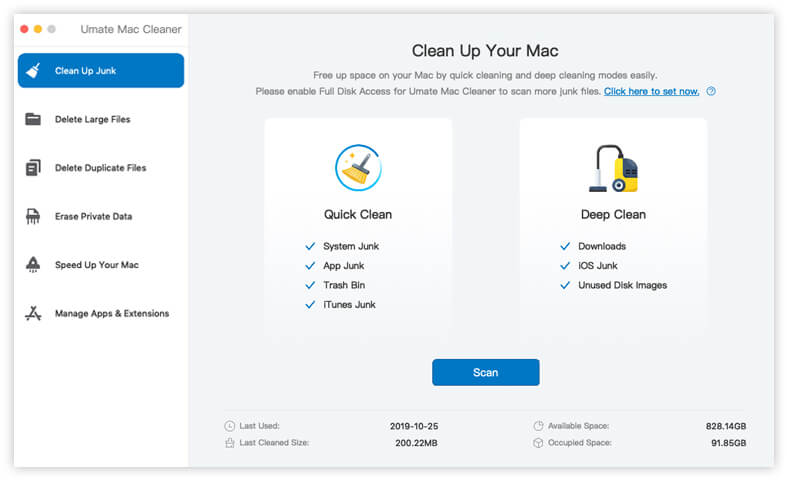
Once you select the module, the software will respond by displaying information about the module’s features. In the case of Clean Up Junk, the interface will split into two parts. The left side says Quick Clean while the right side says Deep Clean. You can choose Quick Clean to scan for the following: System Junk, App Junk, Trash Bin, and iTunes Junk. Meanwhile, Deep Clean scans for those as well in addition to three more: Downloads, iOS Junk, and Unused Disk Images. Select the one you want to use. You can pick either one since both scans are for App Junk. Click the Scan button once you’re done choosing.

Step #4: Choose a File Category and File/s
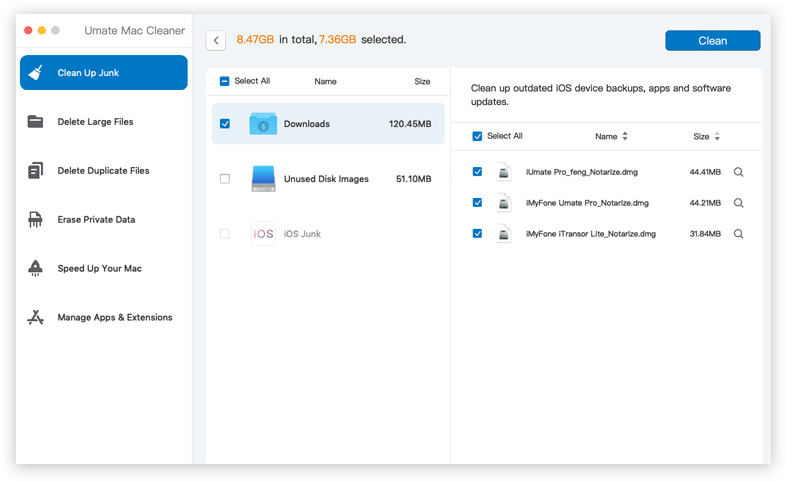
Once the scan is complete, the next page will show you a list of file categories, such as System Junk, Downloads, Trash Bin, and Unused Disk Images. Simply select App Junk from this list since your goal is to clear app cache on Mac. After doing so, a new list will appear on the right side of the interface which should consist of files belonging to the selected category. Select the files you want to delete by clicking their corresponding checkboxes. You can also click Select All if you want to delete all items.

Step #5: Clear App Cache on Mac
Upon selecting the files that correspond to your app cache, you must click the blue button at the top-right corner of the window that says Clean. It may take a few minutes or even seconds to finish, but that should be the last thing you need to do.
With this method, you should be able to reduce the size of your applications to the max, which isn’t something you can normally do with just a few clicks. Usually, you need to jump from one folder to another looking for any remaining traces of the application, so software like Mac Cleaner is quite handy as it allows you to do all that in one sitting.

Final Words
It’s not uncommon for an application on macOS computers to have a cache that’s considerably larger than the size of the app itself. Of course, the cache doesn’t consume much disk space at first. It takes time for the folder to inflate. But when the app cache does become large enough, you may notice that it negatively affects the performance of not only the app but the entirety of your computer. With this guide, you should be able to prevent that very easily as long as you clear app cache on Mac.
Latest Articles