If you’re a Mac user, you know how important it is to keep your digital photo library organized. Over time, duplicate photos can take up a lot of storage space and make it difficult to find the photos you want to keep. Luckily, there are a number of excellent duplicate photo finder apps available for Mac that can help you reclaim space and streamline your photo collection.
Part 1: Why Do I Have So Many Duplicate Photos on My Mac?
There are a number of reasons why you might have duplicate photos on your Mac. Some of the most common causes include:
- Importing photos multiple times: If you’ve imported photos from a camera or SD card more than once, you may end up with duplicate copies.
- Syncing with multiple devices: If you use iCloud or another cloud storage service to sync your photos across multiple devices, you may end up with duplicate copies of photos that were already on your Mac.
- Editing and saving photos: If you edit a photo in a photo editing app and then save it as a new file, you may end up with duplicate copies of the original photo.
- Backing up your photos: If you back up your photos to an external hard drive or another storage device, you may accidentally create duplicate copies of your photos.
- Sharing photos with others: If you share photos with friends and family, you may end up with duplicate copies of those photos in your photo library.
To avoid having duplicate photos on your Mac, it’s important to be mindful of these common causes and take steps to prevent them. For example, you can make sure to only import photos from your camera or SD card once, and use a cloud storage service that automatically removes duplicates. Additionally, you can use a duplicate photo finder app to scan your photo library and remove any duplicate photos that you may already have.

Part 2: How to Delete Duplicate Photos on iPhone?
Deleting duplicate photos on an iPhone can be done manually or by using a third-party app. Here are the steps to delete duplicate photos manually:
- Open the Photos app on your iPhone.
- Go to the Albums tab and scroll down to find the Recently Deleted album.
- Open the album and delete any duplicate photos that you find.
- You can also use the Search bar in the Photos app to search for specific duplicates based on the file name or location.

Part 3: What Is the Best Duplicate Photo Finder for Mac?
There are several good duplicate photo finder apps for Mac, but the best one for you will depend on your specific needs and preferences. Here are a few options to consider:
One of the best duplicate photo finder apps for Mac is Gemini 2. This powerful app uses advanced algorithms to identify and remove duplicate photos, as well as similar images that might be taking up unnecessary space. With Gemini 2, you can quickly scan your entire photo library and free up valuable storage space with just a few clicks.
Another great option is PhotoSweeper X. This app allows you to compare photos side-by-side and quickly identify duplicates, similar photos, and even photos with similar names. With PhotoSweeper X, you can easily mark the duplicates you want to delete and then remove them with a single click.
Photos Duplicate Cleaner: This app is specifically designed to find and remove duplicate photos in the Mac Photos app. It can scan your library quickly and efficiently and lets you preview and delete duplicates with ease.
Duplicate Photos Fixer Pro: This app uses advanced algorithms to find and remove duplicate photos from your Mac. It can detect both exact and similar duplicates, and lets you review and delete duplicates in a few clicks.
Easy Duplicate Finder: This is a powerful and versatile duplicate file finder app that can also find and remove duplicate photos. It offers a wide range of customization options, so you can tailor the scan to your specific needs.
For Mac users who prefer a free option, Duplicate Cleaner For iPhoto is a great choice. This app scans your iPhoto library and identifies duplicates, giving you the option to delete them individually or in bulk. While it may not be as feature-rich as some of the paid options, it’s a solid choice for Mac users who want a simple and effective way to remove duplicate photos.
Regardless of which app you choose, using a duplicate photo finder is an essential part of maintaining an organized photo library on your Mac. With just a few clicks, you can reclaim valuable storage space and make it easier to find the photos you want to keep. So why wait? Download a duplicate photo finder today and start organizing your photos like a pro!
To use any of these apps, simply download them from the App Store, open the app, and follow the on-screen instructions to scan and remove duplicates.

Best Duplicate Photo Finder for Mac: Mac Cleaner
Mac Cleaner is a third-party application that can help you free up space on your Mac by removing unwanted files, including duplicate photos in iPhoto. Here are the steps to remove duplicate photos using Mac Cleaner:
Step #1: Open Mac Cleaner On Your Computer/Laptop
First, you will need to install the software by visiting its download site via a provided link. Once there, locate and click on the “Download Now” button to download the corresponding DMG file, which will serve as the installer for the software. Once the download is complete, open the file promptly to initiate the installation process, following the onscreen instructions thereafter. After the installation is finished, the software should start automatically.
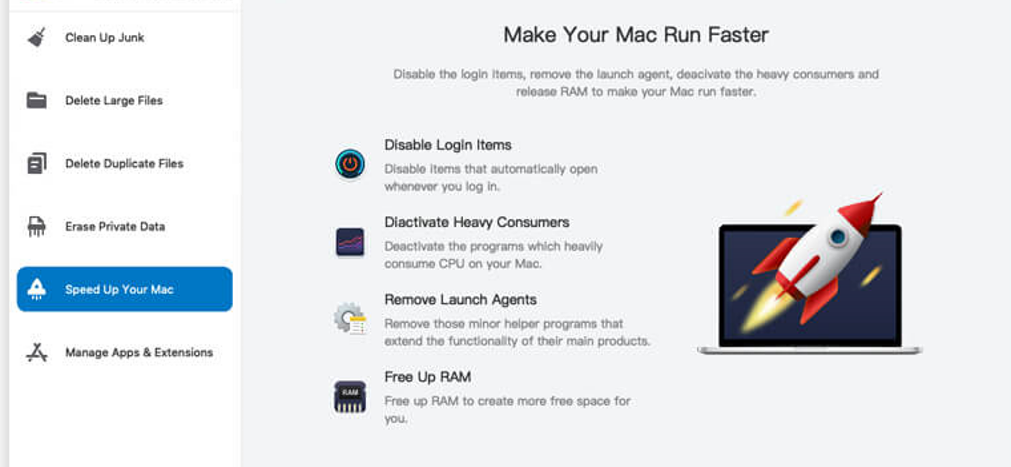
Step #2: Select from Six Modules
The software interface offers six distinct modules, all located on the left-hand side of the screen. Each module provides unique functionalities and features. To proceed, select the module that will be most useful for your needs. The six modules available in Mac Cleaner are as follows:
- Clean Up Junk
- Delete Large Files
- Delete Duplicate Files
- Erase Private Data
- Speed Up Your Mac
- Manage Apps & Extensions
After choosing the appropriate module, select it from the left side of the interface.
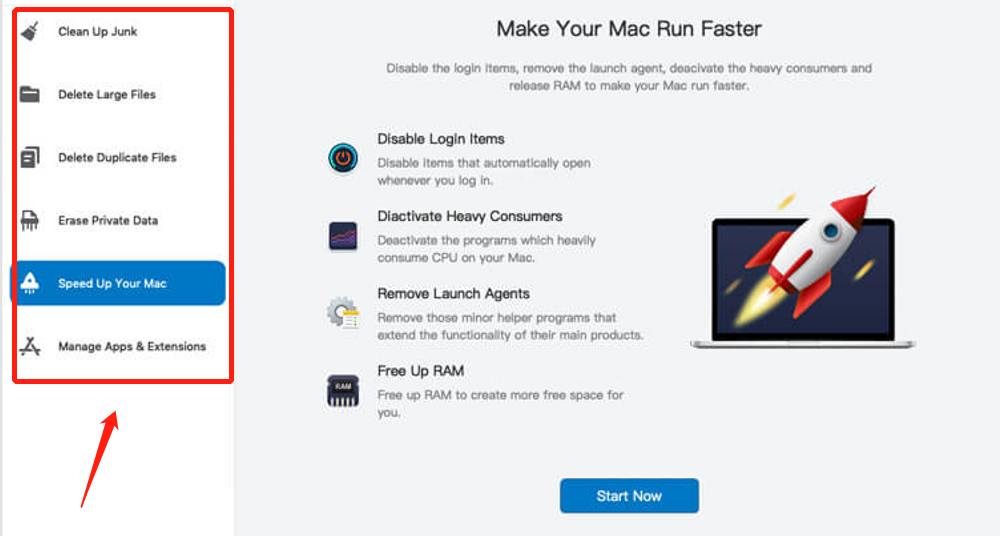
Step #3: Click Scan/Start Now/View Items
For the third step, you’ll need to search for files, programs, or anything else that needs attention. Here are the steps to follow for each module, as the process varies slightly for each one:
- Clean Up Junk: Select Clean Up Junk from the left-hand side of the window. You’ll see two options – Quick Clean and Deep Clean. Quick Clean is the best choice if you want to get rid of unnecessary files quickly. However, if you’re looking for specific file types, Deep Clean is more suitable as it provides more accurate search results. Once you’ve made your selection, click the Scan button at the bottom of the interface.
- Delete Large Files: Click the Scan button.
- Delete Duplicate Files: Choose the Delete Duplicate Files module, and you’ll see a field in the center of the interface labeled Select a File Directory. To the left of that is a Browse button. Click on it, and use the popup window to navigate to the directory or folder you want to scan for duplicate files. Once you’ve found the folder, select it and click Open. Click the Scan button to start the process.
- Erase Private Data: Click the Scan button.
- Speed Up Your Mac: Click the Start Now button.
- Manage Apps & Extensions: Select Manage Apps & Extensions from the left-hand side of the window. You’ll see two options – Uninstall Applications and Remove Extensions. Simply click on the View Items button below the option you want to use.
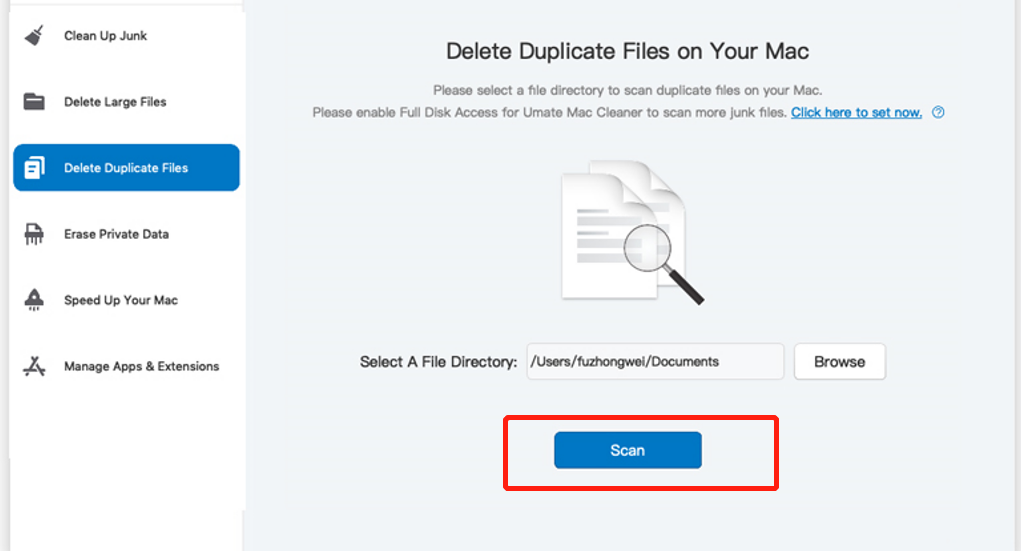
Step #4: Pick Item/s
In the fourth step, you need to choose the files, programs, or apps that you want to delete. The selection process will vary according to the module you selected. Here’s how to select items for each module:
Clean Up Junk: On the next page, you’ll see a list of file categories on the left side of the interface that the module scanned. These categories include items like System Junk, Downloads, Trash Bin, and Unused Disk Images, among others. First, select a category to reveal the list of actual files on the right side of the software. Then, select the files you want to delete by clicking their checkboxes. You can also click the Select All checkbox to delete all files.
Delete Large Files: Select the item you want to delete from the list, such as a file, folder, disk image, or archive.
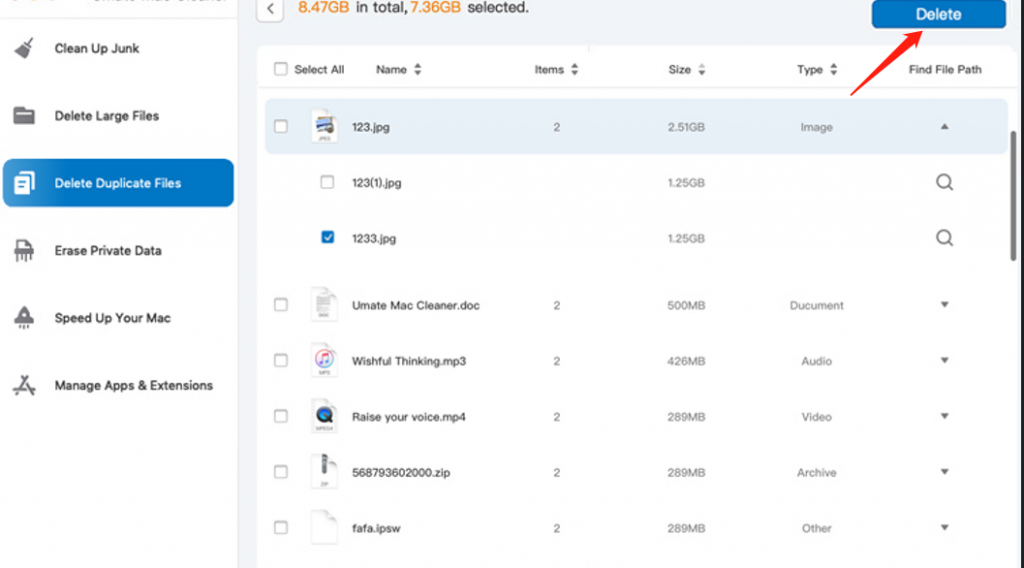
Delete Duplicate Files: Select the items you want to delete from the list, such as images, documents, audio, or video files.
Erase Private Data: First, select a file category from the left side of the interface, which includes five items: Online Traces, Usage Traces, Chat Data, Photo Junk, and Mail Attachment. Then, a new list will appear on the right side of the interface containing actual files that belong to the selected category. Select files from that list by clicking their corresponding checkboxes. You can also click Select All to delete all files in the list.
Speed Up Your Mac: The software will take you to the next page, where you’ll see a list of items that correspond to the actions you can take using the module. The list always includes four items: Disable Login Items, Deactivate Heavy Consumers, Remove Launch Agents, and Free Up RAM. Select an option to reveal another list on the right side of the software, which will contain apps or programs. Select items from that list by clicking their checkboxes. You can also click the Select All checkbox.
Manage Apps & Extensions: The process will depend on the option you selected in the previous step. If you selected Uninstall Application, the software will show you a list of applications. You don’t have to do anything for this step in that case.
However, if you chose Remove Extensions, you’ll see a list on the left side of the interface containing apps with extensions. Select the app that has the extensions you want to remove. Then, a new list will appear on the right side of the interface containing the actual extensions. Select the ones you wish to delete by clicking their boxes. You can also click Select All to delete all the extensions.
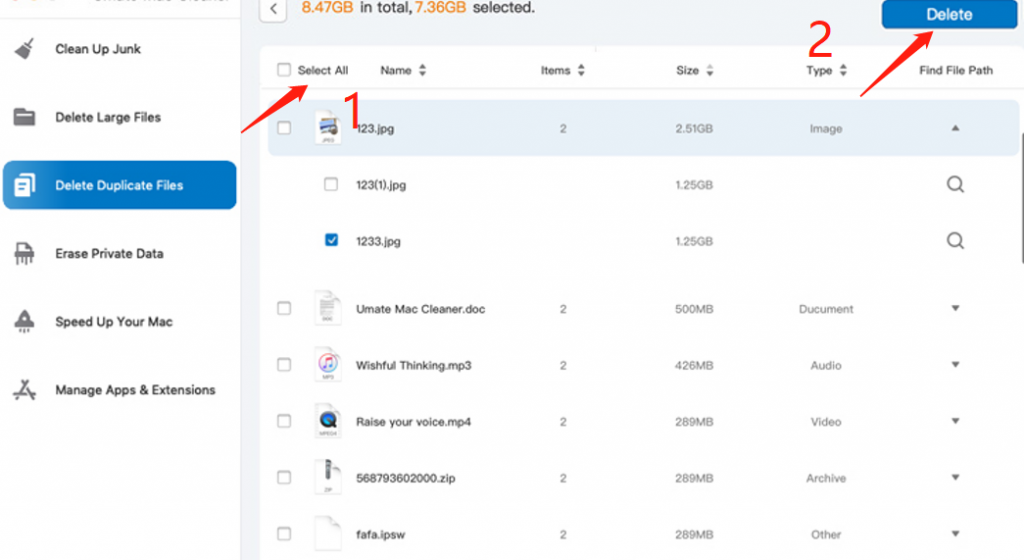
Step #5: Click the Blue Button
To complete the process, simply click on the button located in the top-right corner of the window. This button will be labeled with an action such as Clean, Delete, Erase, Deactivate, Uninstall, or Remove. Please note that it may take a few minutes for the command to be executed, so you will need to wait patiently.
Latest Articles