If you’re an avid music lover, you probably have a vast collection of songs and albums on your computer, and iTunes is undoubtedly your go-to media player. However, over time, your music library may become cluttered with duplicate tracks, which not only take up valuable storage space but also make it harder to find the songs you want to listen to. That’s why it’s essential to regularly delete duplicate songs from your iTunes library.
In this guide, we’ll show you how to use iTunes to delete duplicate tracks, keep your music library organized, and make sure you never have to listen to the same song twice. Say goodbye to duplicate songs on iTunes with ease! Learn how to delete duplicates and free up space on your device today.
Part 1: Why Are There Duplicate Tracks in Your iTunes Library?
There are several reasons why you may end up with duplicate tracks in your iTunes library. The most common is when you import music from different sources or devices, and iTunes doesn’t recognize that the tracks are already in your library. For example, you may have downloaded the same song from multiple sources, such as iTunes, Amazon Music, or Spotify, resulting in duplicate tracks with slightly different names.
Another reason why you may have duplicate tracks in your iTunes library is that you accidentally imported the same music folder twice or copied a folder to a new location without realizing it.

Part 2: Why Should You Delete Duplicate Tracks from Your iTunes Library?
Deleting duplicate tracks from your iTunes library offers several benefits. First, it frees up valuable storage space on your computer, especially if you have a vast music collection. Second, it makes it easier to find the songs you want to listen to, without having to sift through multiple copies of the same track. Finally, it helps keep your music library organized, so you can enjoy your favorite songs without any distractions.
Part 3: Can iTunes delete duplicate songs automatically?
Yes, iTunes has a feature that allows users to automatically delete duplicate songs. This feature is called “Show Duplicate Items” and it can be accessed by opening iTunes and clicking on the “File” tab in the top left corner of the screen. From there, select “Library” and then click on “Show Duplicate Items”.
Once you have clicked on “Show Duplicate Items”, iTunes will display a list of all the duplicate songs in your library. You can then choose which duplicates you want to delete by selecting them and pressing the delete key on your keyboard. Alternatively, you can right-click on the duplicates and select “Delete” from the drop-down menu.
It’s important to note that iTunes will only delete exact duplicates. If you have multiple versions of the same song with different file names or metadata, they may not be identified as duplicates by iTunes. In these cases, you may need to manually search for and delete duplicate songs.
Additionally, if you have an extensive music library, it may take some time for iTunes to identify all the duplicate songs. Be patient and allow the program to finish its search before attempting to delete any duplicates.
Overall, the “Show Duplicate Items” feature in iTunes is a helpful tool for cleaning up your music library and freeing up space on your device. With just a few clicks, you can easily identify and delete any duplicate songs that may be taking up unnecessary space.
Part 4: How to Use iTunes to Delete Duplicate Tracks
Now that you know why it’s essential to delete duplicate tracks from your iTunes library let’s see how you can do it using iTunes. Follow these simple steps:
- Step 1: Open iTunes on your computer.
- Step 2: From the menu bar at the top of the screen, select “View” and then “Show Duplicate Items.” iTunes will then display all the duplicate tracks in your library.
- Step 3: Review the list of duplicate tracks and select the ones you want to delete. To select multiple tracks, hold down the “Command” key on a Mac or the “Ctrl” key on a PC and click on the tracks.
- Step 4: Once you have selected the duplicate tracks, press the “Delete” key on your keyboard, or right-click on the selected tracks and select “Delete” from the menu.
- Step 5: iTunes will ask you if you want to move the selected items to the Trash or keep them in your iTunes library. If you’re sure you want to delete the tracks, click “Move to Trash.”
- Step 6: Repeat this process until you have deleted all the duplicate tracks in your iTunes library.

Part 5: Delete Duplicate Songs in iTunes with Mac Cleaner
Mac Cleaner is an application that aims to free up space by removing unwanted files from your Mac. Additionally, it includes a module for optimizing your computer’s performance, and it can also help prolong your Mac’s lifespan by reducing daily wear and tear on the RAM and CPU. To delete duplicate songs on iTunes with Mac Cleaner, follow these steps:
Step #1: Download, Install, and Open Mac Cleaner
To optimize your macOS computer using Mac Cleaner, the first step is to download, install, and open the software. Go to the software’s download site using this link and click the “Download Now” button to download a DMG file for the installer. After the download is complete, open the file to begin the installation process and follow the onscreen instructions carefully. Once the installation is finished, Mac Cleaner will launch automatically.

Step #2: Pick From Six Different Modules
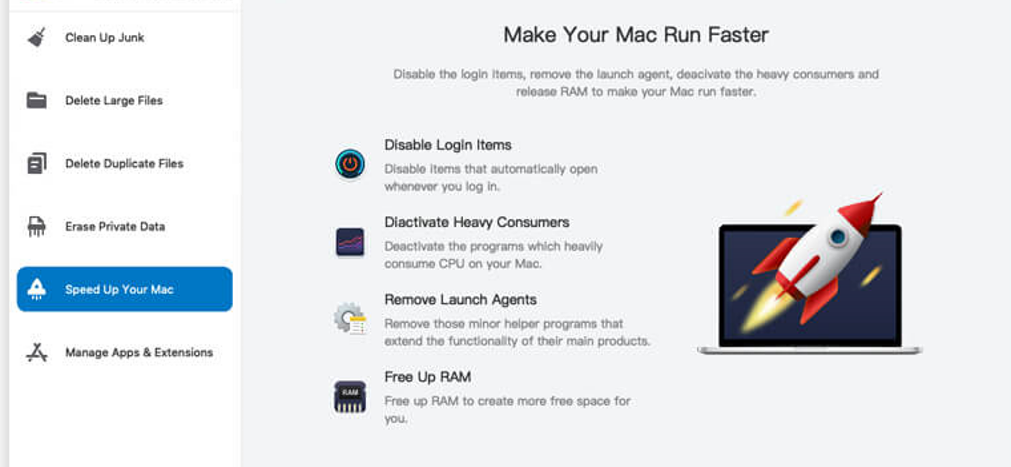
Once Mac Cleaner is launched, you will see six modules on the left sidebar of the homepage. Each module has a specific function, and you can choose from any of them depending on what you need. Among the six modules, Speed Up Your Mac is the one that can help extend your computer’s lifespan by deactivating certain apps and processes that put a strain on your device.
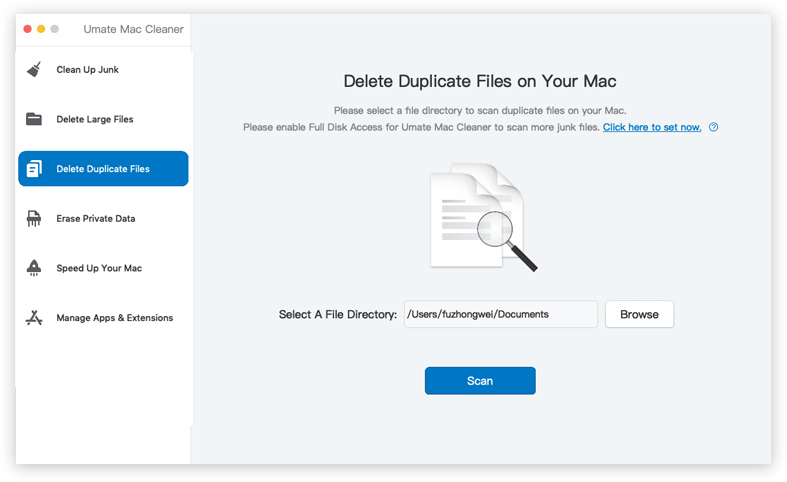
To select a module, just click on the one you need. The available modules are Clean Up Junk, Delete Large Files, Delete Duplicate Files, Erase Private Data, Speed Up Your Mac, and Manage Apps & Extensions. Launch the program and click on the “Delete Duplicate Files” module.

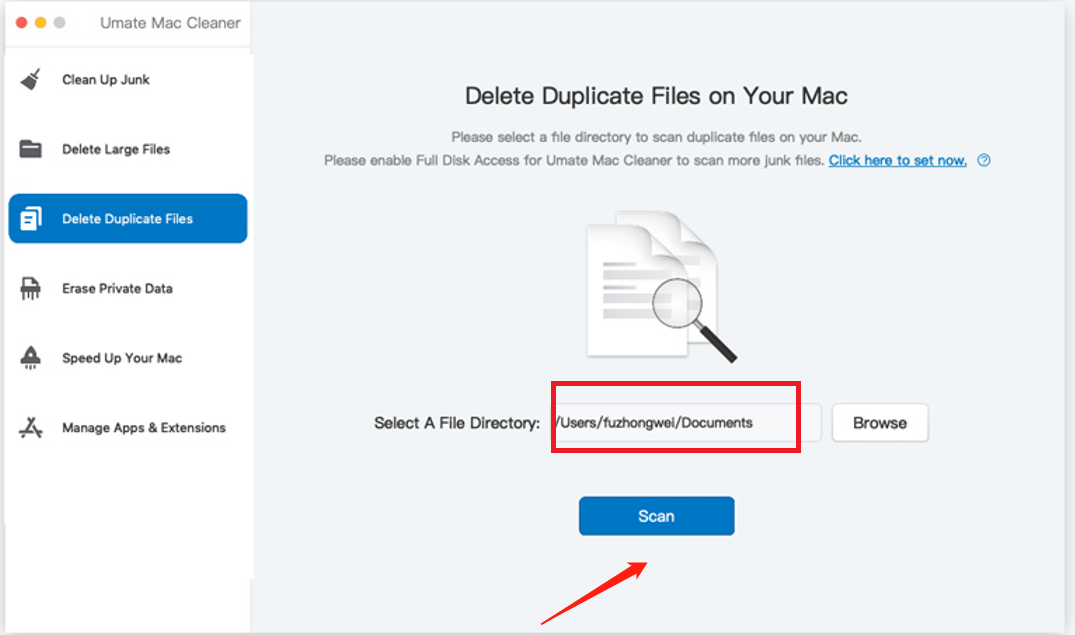
Step #3: Click Scan
After selecting a module, Mac Cleaner will provide information about the selected option. This includes a description of what it does, how it works, and more. If you want to learn about the module, you can read it. Click on the “Scan” button to begin scanning for duplicate files.
Step #4: Choose Your Action
After selecting the Speed Up Your Mac module, four options will be displayed on the left side of the interface when you click Scan. Each option deactivates specific apps and processes, depending on the one you choose.
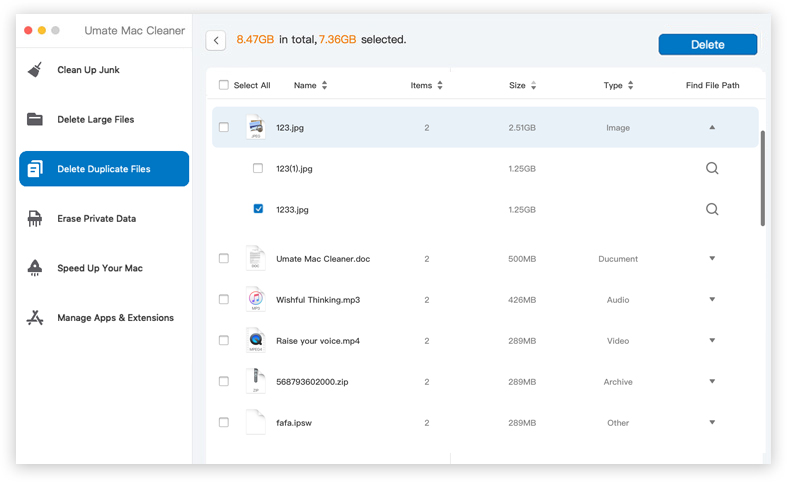
Once you select an action, a new list will appear on the right side of the interface. It’ll contain the apps and processes that you can deactivate. To deactivate them, you can either select them individually or click the Select All checkbox to choose all programs at once. Select the duplicate songs you want to delete by clicking on the checkboxes next to them.

Step #5: Deactivate the App/Process
After selecting the apps and processes you want to deactivate from the list in the previous step, click the blue Deactivate button on the top-right corner of the window. The software will start the process, which may take a few minutes. Click on the “Delete” button to delete the selected duplicate songs from your iTunes library.

Conclusion
Deleting duplicate tracks from your iTunes library is a straightforward process that can help you free up storage space, organize your music collection, and ensure that you never have to listen to the same song twice. By following the steps outlined in this guide, you’ll be able to keep your iTunes library clean and tidy and enjoy your favorite songs without any distractions. So, what are you waiting for? Get started today and delete those pesky duplicate tracks!
Latest Articles