

This is a complete guide to tell you how to disable Google Chrome helper process. Many Mac users prefer Chrome as their default browser due to its speed and easy integration with Google accounts.
However, Chrome is not native to the Mac ecosystem, which can lead to minor issues like links in Messages opening in Safari by default and larger structural issues such as increased energy consumption and strain on the computer. To improve performance and save battery life, one can address Chrome’s background tools, such as Google Chrome Helper.

Part 1: What is Google Chrome Helper?
Google Chrome Helper is a process that runs in the background on a Mac when using the Chrome browser. It is responsible for various tasks such as handling plug-ins, extensions, and web pages, and helps to improve the overall performance of the browser.
However, it can also consume a significant amount of memory and CPU resources, which can lead to increased energy consumption and strain on the computer. In some cases, it may be necessary to disable or remove certain plug-ins or extensions that are causing Chrome Helper to use excessive resources.
Part 2: How to Minimize Google Helper Activity?
To minimize the activity of Google Helper, one can use Mac Cleaner. This is a memory cleaner for macOS that has been approved by Apple and allows for easy disabling of Google Helper without the need for extensive clicking or typing. Here are a few methods to minimize the activity of Google Helper:
- Remove or disable unnecessary plug-ins and extensions: Some plug-ins and extensions may be causing Chrome Helper to use excessive resources. Removing or disabling them can help to minimize its activity.
- Close tabs and windows: Closing tabs and windows that are no longer in use can also help to reduce the activity of Chrome Helper.
- Use a memory cleaner: As mentioned in the previous answer, using a memory cleaner like Mac Cleaner can help to reduce the activity of Chrome Helper
- Limit background processes: Some background processes may be consuming resources that Chrome Helper needs. Limiting the number of background processes can help to minimize their activity.
- Use browser task manager: Chrome browser has a built-in task manager that allows you to monitor and manage the performance of Chrome Helper.
- Update to the latest version of the chrome: sometimes Chrome Helper bugs can be fixed by updating to the latest version of chrome.
It’s worth noting that these methods are not guaranteed to completely stop the activity of Chrome Helper, but they can help to reduce its resource usage and improve the performance of your Mac.

Part 3: How Does Google Chrome Helper Affect Mac’s Memory?
Google Chrome Helper can affect Mac’s memory by consuming a significant amount of it. This is because Chrome Helper is responsible for handling various tasks related to plug-ins, extensions, and web pages. It runs multiple instances of these processes in the background, each of which can take up a significant amount of memory.
As a result, Chrome Helper can quickly consume a large portion of Mac’s available memory. This can lead to slow performance, freezing, or crashing of the browser or other applications running on the Mac. Chrome Helper can also cause the Mac to slow down, as the operating system struggles to keep up with the demands of the background processes.
Many Mac users may not be aware of the availability of Activity Monitor, a useful tool for evaluating the performance of their Macs. To make use of this utility, one can create a shortcut or add it to the Dock for easy access and regular checks.

Another option for identifying high CPU usage is Mac Cleaner, a multipurpose disk analysis and cleanup app that offers various tools to improve Mac performance. Its System Junk module can scan the Mac and provide insight into where the computer is using energy and memory. One can download a free version of Mac Cleaner to give it a try. here’s how you can use Mac Cleaner:
Step #1: Download, Install, and Set Up Mac Cleaner
The first thing you must do is get the software. To do that, you must open any browser on your computer and visit the Mac Cleaner download site. There, you’ll find a Download Now button. Click that button to download a DMG file, which would be the software installer. Open that file to run the installer then simply follow the instructions from start to finish.

Step #2: Choose a Cleaner Module
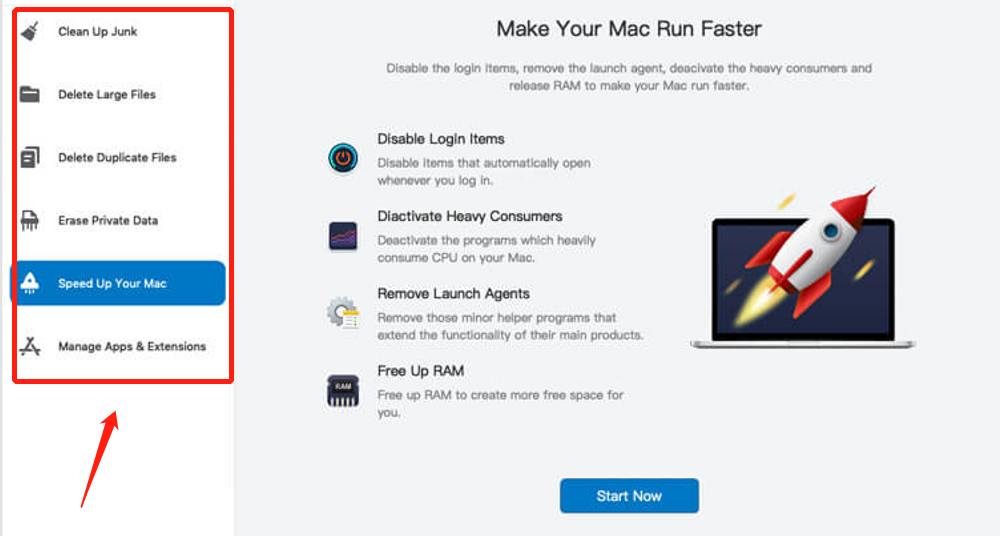
Mac Cleaner has six different modules to help you optimize your computer, including Clean Up Junk, Delete Large Files, Delete Duplicate Files, Erase Private Data, Speed Up Your Mac, and Manage Apps & Extensions.
The Clean Up Junk module scans and deletes files that the system considers junk, such as System Junk, App Junk, Trash Bin, iOS Junk, iTunes Junk, Unused Disk Images, and Downloads. The Delete Large Files module detects and deletes files that are larger than 50MB. The Delete Duplicate Files module locates and deletes duplicate files. To use any of these three modules, simply select it from the left side of the interface.
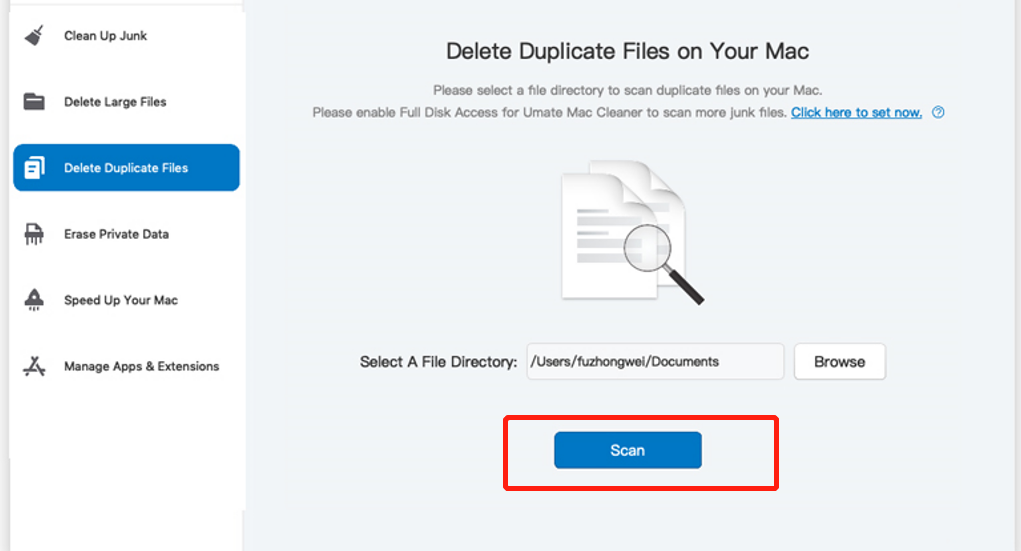
Step #3: Scan Your Mac for Files
The third step of using Mac Cleaner is to scan your computer for the appropriate files. The process may vary depending on the module you have selected. To scan for files using the cleaning modules:
- Clean Up Junk: The software has two options, Quick Clean and Deep Clean. Quick Clean scans for System Junk, App Junk, Trash Bin, and iTunes Junk. Deep Clean scans for additional file types such as Downloads, iOS Junk, and Unused Disk Images. Choose one of the options and click the Scan button.
- Delete Large Files: Simply click the Scan button to start scanning.
- Delete Duplicate Files: A pop-up window will appear, navigate to the folder you want to scan for duplicates and click “Open”. Once the directory is selected, click the “Scan” button.
Step #4: Select a File/s
After scanning, the next step is to select the files you want to delete. The process of selecting files will vary depending on the module used. For the Delete Large Files and Delete Duplicate Files modules, you will be presented with a list of files such as images, videos, documents, songs, folders, etc. where you can select items by clicking on the corresponding checkboxes. There is also an option to select all items in the list.
For the Clean Up Junk module, the list consists of categories such as System Junk, Downloads, Trash Bin, Unused Disk Images, etc. First, select a category, then a new list of actual files will appear on the right side, where you can select items as you would in the other modules.
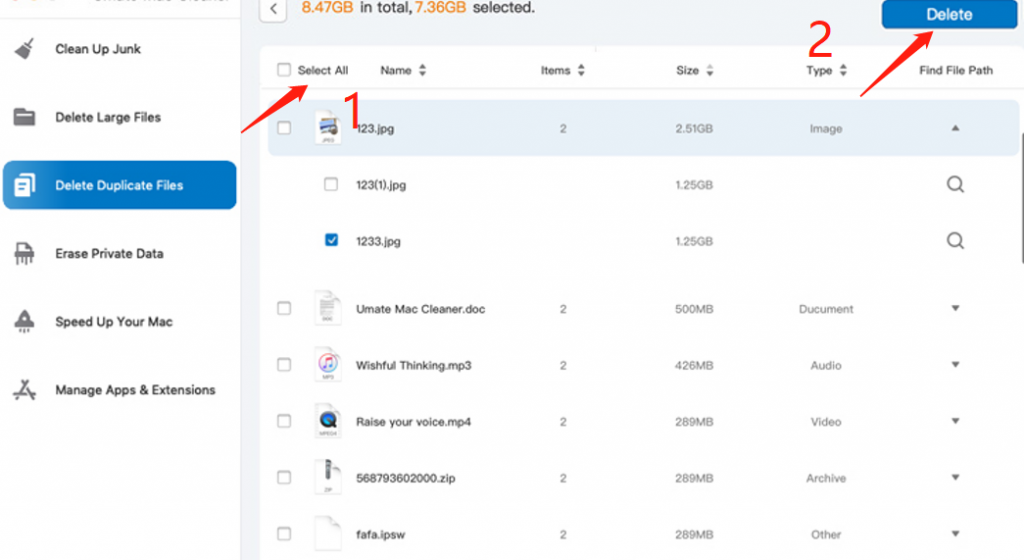
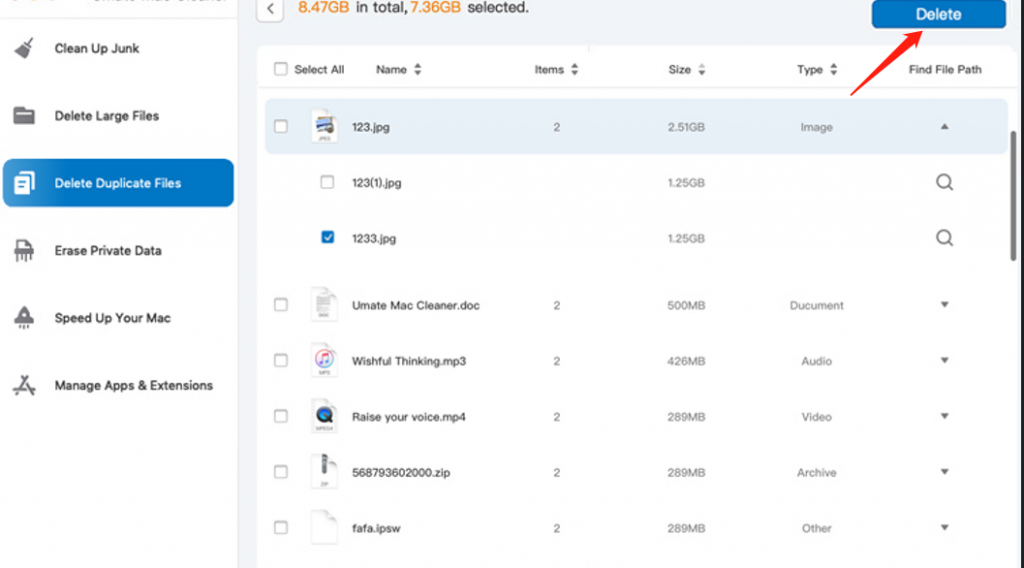
Step #5: Delete the File/s
Once you have selected all the files you want to delete, click on the blue button located at the top-right corner of the window, which will be labeled either Clean or Delete, depending on the module used. Allow a few minutes for the software to delete the files. Regular use of Mac Cleaner can also help prevent errors from recurring in the future.
Part 4: How to disable Google Chrome helper process
Here are a few ways to disable the Google Chrome helper process:
- End the process in Activity Monitor: Open Activity Monitor and find the Google Chrome Helper process. Select it and click the “X” button to end the process.
- Remove or disable unnecessary plug-ins and extensions: Some plug-ins and extensions may be causing Chrome Helper to run. Removing or disabling them can help to reduce the number of background processes.
- Use a memory cleaner: Memory cleaning software like Mac Cleaner can help to remove unnecessary background processes, including Chrome Helper.
- Use the Chrome task manager: Chrome has a built-in task manager that allows you to monitor and manage the performance of Chrome Helper. You can disable Chrome Helper by clicking on the Chrome menu button (three horizontal lines) on the top-right corner of your browser, choosing More tools and then Task Manager, then finding the Google Chrome Helper process, and clicking on the “End Process” button.
- Limit background processes: Some background processes may be consuming resources that Chrome Helper needs. Limiting the number of background processes can help to minimize their activity.
It’s worth noting that disabling Chrome Helper may cause some plug-ins and extensions to not work properly or may prevent some web pages from loading correctly. Additionally, keep in mind that disabling Chrome Helper may affect your browsing experience and may cause other issues. It’s always a good idea to monitor the performance of your Mac after disabling Chrome Helper and see if it has the desired effect.
Is it safe to disable Chrome Helper?
It is generally safe to disable Chrome Helper. Chrome Helper is a background process that is associated with the Chrome browser and is used to handle various tasks related to plug-ins, extensions, and web pages. Disabling it will prevent these processes from running in the background, which can help to reduce the amount of memory and CPU resources they consume.
However, keep in mind that disabling Chrome Helper may cause some plug-ins and extensions to not work properly or may prevent some web pages from loading correctly. Additionally, If you are disabling Chrome Helper to improve the performance of your Mac, it’s good to keep an eye on the performance of your Mac afterward and see if disabling Chrome Helper has the desired effects or not.
how to manually disable Google Chrome Helper
Here are the steps to manually disable Google Chrome Helper:
- Open Chrome and click on the three dots in the top-right corner of the browser.
- Click on “More Tools” and then “Task Manager”.
- Find the Google Chrome Helper process and click on the “End Process” button.
Alternatively, you can use the following steps:
- Open the “Activity Monitor” application on your Mac.
- Find the “Google Chrome Helper” process in the list of processes.
- Click on the “Google Chrome Helper” process and then click the “X” button at the top left of the Activity Monitor window.
This will end the Google Chrome Helper process and prevent it from running in the background. However, it is worth noting that disabling Google Chrome Helper may cause some plug-ins and extensions to not work properly or may prevent some web pages from loading correctly.
Additionally, keep in mind that disabling Chrome Helper may affect your browsing experience and may cause other issues. It’s always a good idea to monitor the performance of your Mac after disabling Chrome Helper and see if it has the desired effect.
When Chrome Helper is disabled, the loading of flash content and images must be manually authorized. This serves as an added benefit as it also functions as an automatic ad blocker, helping to save processing power that would have otherwise been used on unwanted banner ads and pop-ups.
Check your other plugins and extensions
When trying to minimize the activity of Google Helper, it is also a good idea to check your other browser plugins and extensions. Some plugins and extensions may consume a lot of resources and can cause Chrome Helper to run excessively. Removing or disabling unnecessary plug-ins and extensions can help to reduce the number of background processes and improve the performance of your Mac.
You can check which plugins and extensions are installed on your Chrome browser by going to the settings menu, selecting “More Tools” and then “Extensions”. From there you can see a list of all installed extensions and their resource usage. If you find any that are consuming a lot of resources, you can disable or remove them.
It’s also a good idea to keep your plugins and extensions updated to the latest version, as this may help to reduce resource usage and improve the performance of your Mac.
Closing Thoughts
If you’re experiencing poor performance on your Mac while using Chrome, disabling Chrome Helper can be a good starting point. Monitoring your Activity Monitor or using Mac Cleaner on a regular basis can help you identify areas where you can save on CPU usage and improve the overall performance of your Mac.
Removing Google Chrome Helper may take some time, but it is necessary to fix the issue. Even though it may be a one-time process, you now know how to resolve it in case it happens again. Using Mac Cleaner can greatly speed up the process, especially if the problem is related to a lack of storage space.
Latest Articles