If you are a music lover and have been collecting songs for years, chances are, you have a lot of duplicate songs in your music library. These duplicates can take up valuable storage space and clutter up your library, making it difficult to find the songs you really want to listen to. In this blog, we’ll take a look at why duplicate songs occur and how you can easily remove them from your music library. Say Goodbye to Duplicate Songs With These Simple Tips.
Part 1: Why Do Duplicate Songs Occur?
There are several reasons why duplicate songs occur in your music library. One of the most common reasons is importing music from different sources. For example, you may have imported a CD into your music library, and then later downloaded the same album from a digital music store. This can result in duplicate songs, as the files have different names and locations.
Another reason for duplicate songs is syncing your music library with different devices. For instance, if you have an iPhone and a MacBook, you may sync your music library with both devices. This can lead to duplicate songs, as the syncing process may duplicate files on one or both devices.

Part 2: How to Get a Duplicate Music Files Finder
If you’re looking to find and remove duplicate music files on your computer, there are several duplicate music file finder programs you can use. Some popular options include Duplicate Cleaner Pro, Mac Cleaner, and CCleaner. You can download these programs from their respective websites and follow the instructions to install them on your computer.
Once installed, simply run the program and follow the prompts to scan your music library for duplicates. Once the program has identified any duplicate files, you can choose to delete them or move them to a different folder to free up space on your hard drive.
Part 3: How to Remove Duplicate Songs in iTunes
Removing duplicate songs from iTunes can be a time-consuming process if you do it manually. Fortunately, there are several ways to automate this task. Here are the steps you can follow to remove duplicate songs in iTunes:
- Launch iTunes on your computer and click on the Library tab.
- Click on the File menu and select Library > Show Duplicate Items. This will display a list of all the duplicate songs in your iTunes library.
- Select the duplicate songs you want to delete. You can do this by holding down the Ctrl key (Windows) or the Command key (Mac) and clicking on each song.
- Once you have selected all the duplicate songs you want to delete, click on the Edit menu and select Delete.
In the confirmation dialog box, click on the Delete Song button to remove the selected duplicate songs from your iTunes library. Alternatively, you can use third-party software like Tune Sweeper, Dupe Away, or iMusic to remove duplicate songs from your iTunes library. These tools are designed to scan your entire iTunes library and identify all the duplicate songs. They also offer additional features like automatic deletion of duplicates, fixing of track information, and more.
In conclusion, removing duplicate songs from iTunes can be a tedious task if done manually, but using third-party software can simplify the process and save you time. Try out the above steps to remove duplicates from your iTunes library and enjoy a clutter-free music collection
Part 4: How to Clear Duplicate Music Manually
Clearing duplicate music manually can be a time-consuming process, but it can be done. Here are the steps to follow:
- Open your music library and select the folder or playlist you want to clear duplicates from.
- Sort the music by song title, artist name, and album name.
- Look for songs that have the same title, artist, and album. These are likely duplicates.
- Preview each song to confirm that they are indeed duplicates.
- Select the duplicate song and press the “delete” key or right-click and select “delete” from the drop-down menu.
- A message will appear asking if you want to move the selected song(s) to the trash. Click “move to trash” to remove the duplicate song(s).
- Once you have deleted all duplicates, empty your trash to permanently remove the songs from your computer.
It’s important to note that manually clearing duplicates is not foolproof, and you may accidentally delete songs that are not duplicates. It’s always a good idea to make a backup of your music library before attempting to remove duplicates manually.
Part 5: Duplicate Song Removal using Mac Cleaner
The previous methods for deleting duplicate files on a Mac can have their own drawbacks, such as complexity or the potential for leaving files behind or even causing data loss. This can be time-consuming and frustrating. In this blog post, we will show you how to use this powerful tool to identify and remove duplicate songs from your music library.
Step #1: Install Mac Cleaner on Your Computer
To install Mac Cleaner, open any browser on your computer and visit the download site. From there, click on the Download Now button to download a DMG file, which will be the installer. Open the file and follow the onscreen instructions to install the software.

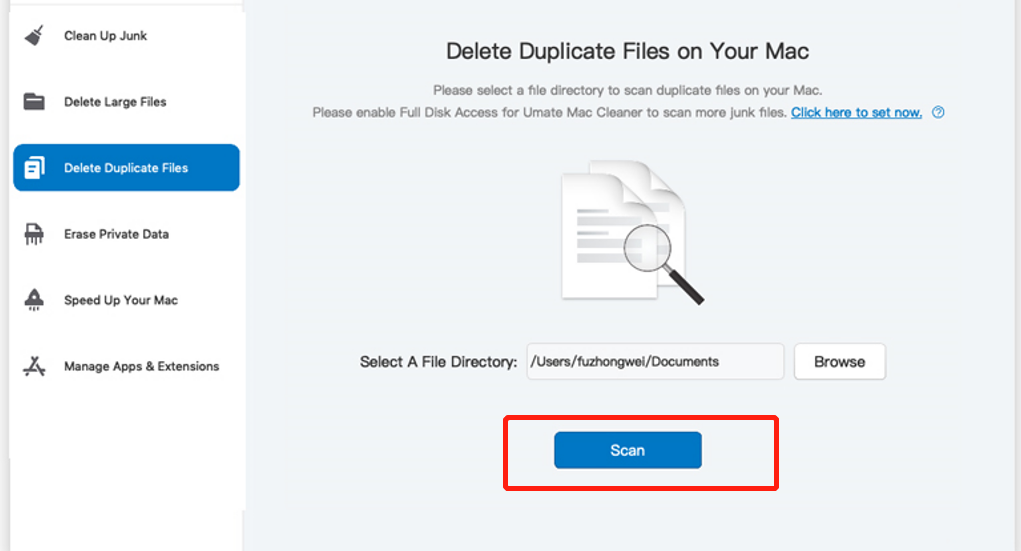
Step 2: Choose the Music Folder to Scan
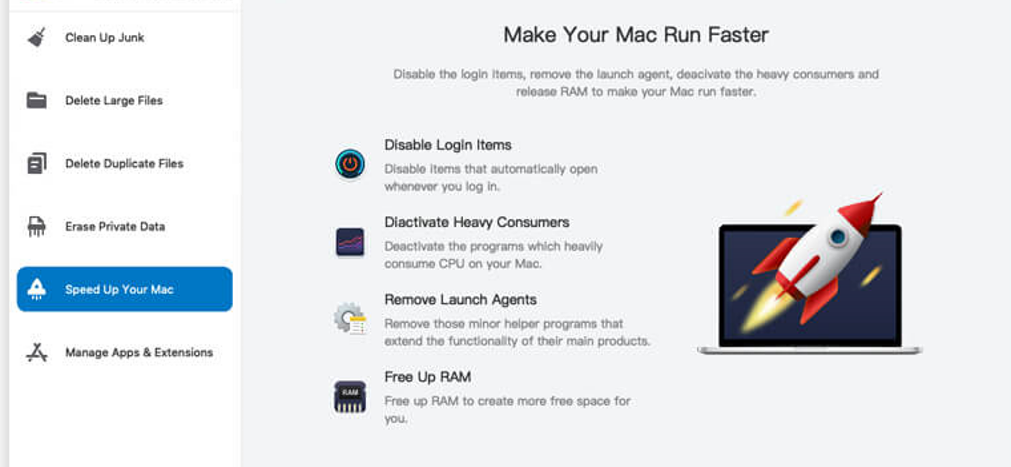
On the left side of the software, you will see six options: Clean Up Junk, Delete Large Files, Delete Duplicate Files, Erase Private Data, Speed Up Your Mac, and Manage Apps & Extensions. These options correspond to the six modules that Mac Cleaner currently offers. For your purpose of scanning and cleaning junk files, you will only need the Delete Duplicate Files module.
To select the module, simply click on Clean Up Junk on the left-hand side of the interface. This could be your iTunes library or any other folder where you store your music. Click on the “Scan” button to start the scanning process.

Step 3: Review the Duplicate Songs Found
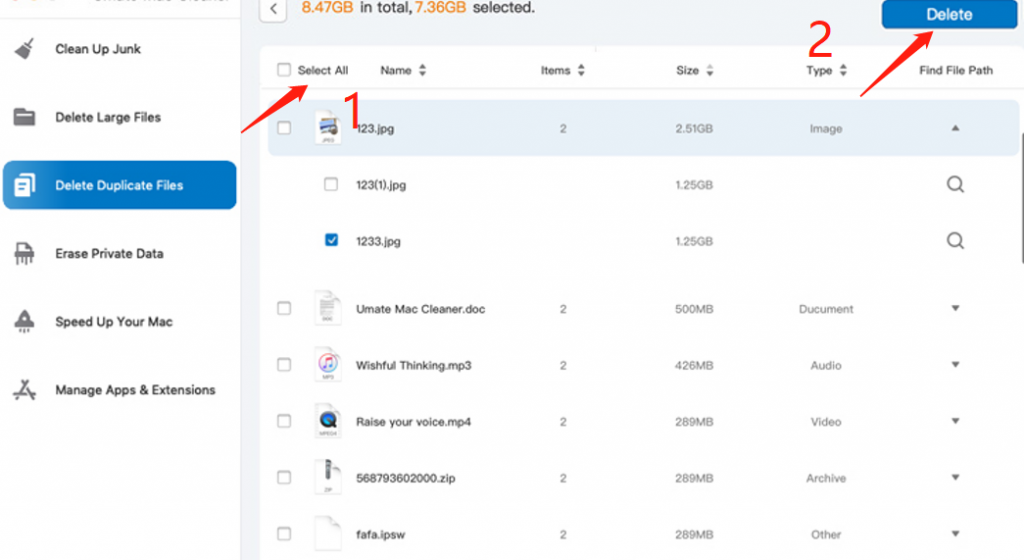
Once the scanning process is complete, Mac Cleaner will display a list of duplicate songs found in the selected folder. You can review the list and select which songs you want to remove.

Step 4: Remove Duplicate Songs
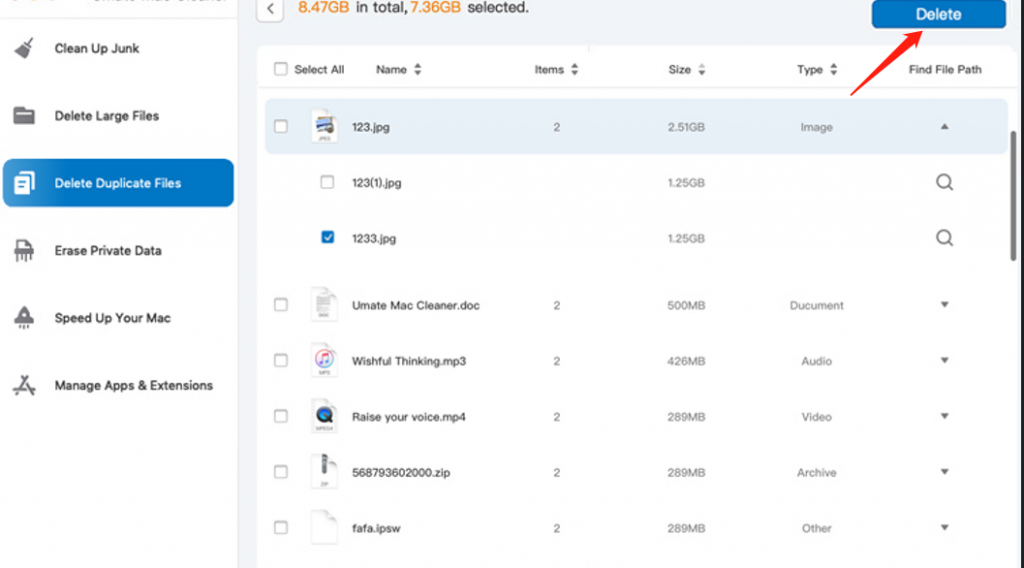
To remove the duplicate songs, simply select them and click on the “Clean” button. Mac Cleaner will delete the selected songs from your MacBook, freeing up valuable storage space and leaving your music library clutter-free.
Removing duplicate songs from your music library is essential to keep it organized and save storage space on your MacBook. With Mac Cleaner, the process is quick and easy. Follow these simple steps to identify and remove duplicate songs from your music library using Mac Cleaner.

Tips for Preventing Duplicate Songs
- While it’s easy to remove duplicate songs from your music library, it’s even better to prevent them from occurring in the first place. Here are some tips to help you prevent duplicate songs:
- Use a single source for importing music: Stick to using one source for importing music, whether it’s CDs or digital music stores. This will help prevent duplicates from occurring.
- Use music management software: Using music management software like iTunes, TunesGo, or Foobar2000 can help you keep your music library organized and prevent duplicates.
- Regularly clean up your music library: Take some time every few months to go through your music library and remove any duplicates or songs you no longer listen to. This will keep your library clean and organized.
Wrapping up
Duplicate songs can be a nuisance in your music library, but they are easy to identify and remove with the right software. By using music management software and regularly cleaning up your library, you can prevent duplicates from occurring and keep your music collection organized and easy to navigate.
Latest Articles