

We’d love to hear from you. Enabling FileVault on your Mac requires careful consideration due to various factors. However, you can disable FileVault disk encryption whenever necessary. Moreover, to optimize the performance of FileVault, you can utilize programs like Mac Cleaner.
As we store more and more sensitive information on our computers, it’s important to ensure that our data is secure from unauthorized access. One way to achieve this is by using disk encryption. On Mac computers, FileVault is the built-in disk encryption technology that encrypts your entire hard drive and protects your data from prying eyes. In this article, we’ll explain what FileVault is and how to use it to secure your data.
Part 1: What Is FileVault Disk Encryption on Mac
FileVault is a disk encryption program that is built into macOS. It uses XTS-AES-128 encryption to encrypt the entire hard drive, making it impossible for anyone to access the data on the disk without the proper credentials. When FileVault is turned on, the system prompts the user to create a master password or recovery key, which is used to decrypt the drive and unlock it. The encryption process takes place in the background, and the user can continue to use their computer while the disk is being encrypted.
Once the encryption process is complete, the user’s data is protected in case their Mac is lost, stolen, or accessed by an unauthorized user. FileVault is an essential security feature that helps ensure the safety and privacy of personal data stored on a Mac.

Part 2: Should I Use FileVault Disk Encryption on My Mac?
As an AI language model, I cannot make recommendations, but I can provide information to help you make an informed decision. Whether or not to use FileVault Disk Encryption on your Mac depends on your personal preferences and needs. Here are some factors to consider:
- Security: FileVault encryption provides an additional layer of security for your data, which can be especially important if you frequently use your Mac in public places or if you have sensitive information stored on it.
- Convenience: The encryption process can take several hours and can slow down your computer, so you may need to plan accordingly. Additionally, if you forget your password or recovery key, you may not be able to access your data, so it’s important to keep these in a safe place.
- Compatibility: Some third-party apps and accessories may not be compatible with FileVault, so you’ll need to check compatibility before encrypting your disk.
- Backup: It’s important to have a backup of your data before encrypting your disk in case of any issues during the encryption process or if you forget your password or recovery key.
Ultimately, whether or not to use FileVault Disk Encryption on your Mac is a personal decision based on your needs and preferences. However, if you value the security of your data and are willing to go through the encryption process, it can be a valuable tool to protect your information.
Part 3: How to Manage FileVault on Mac?
If you have decided to use FileVault disk encryption on your Mac, you should know how to manage it properly. Here are some essential tips to help you manage FileVault on your Mac
- Enable FileVault: If you haven’t already done so, enable FileVault on your Mac. To do this, go to System Preferences > Security & Privacy > FileVault and click the “Turn On FileVault“ button. Follow the instructions to set up FileVault on your Mac.
- Keep Your Recovery Key Safe: When you enable FileVault on your Mac, you will be asked to create a recovery key. This key is essential if you forget your login password or if your encrypted startup disk becomes damaged. Make sure to store the recovery key in a safe place, such as a password manager or a secure file on an external drive.
- Manage FileVault Users: If you share your Mac with others, you may need to add or remove FileVault users. To manage FileVault users, go to System Preferences > Security & Privacy > FileVault and click the “Enable Users” button. You can add or remove users from this window.
- Disable FileVault: If you no longer want to use FileVault on your Mac, you can disable it. To do this, go to System Preferences > Security & Privacy > FileVault and click the “Turn Off FileVault“ button. Keep in mind that disabling FileVault may take some time, depending on the amount of data on your Mac.
- Monitor FileVault Status: It’s a good idea to monitor the status of FileVault on your Mac regularly. You can do this by going to System Preferences > Security & Privacy > FileVault. If you see any warnings or errors, address them immediately.
- Use a Strong Password: Make sure to use a strong password for your FileVault-encrypted Mac. A strong password should be at least eight characters long and include a mix of uppercase and lowercase letters, numbers, and symbols. Avoid using common passwords or dictionary words.
- Back-Up Your Data: Finally, make sure to back up your data regularly. If something goes wrong with your FileVault-encrypted Mac, you don’t want to lose all your important files. You can use Time Machine or a third-party backup solution to back up your data.
By following these tips, you can effectively manage FileVault on your Mac and keep your data safe and secure.

Part 4: How to Check If FileVault is Enabled
To check if FileVault is enabled on your Mac, follow these steps:
- Click on the Apple menu in the top left corner of your screen.
- Select “System Preferences“ from the dropdown menu.
- Click on “Security & Privacy.”
- Click on the “FileVault“ tab at the top of the window.
- If FileVault is enabled, you will see a message that says “FileVault is turned on for the disk [Name of your disk].” If it is disabled, you will see a button that says “Turn On FileVault.”
Note: If you have multiple disks, you will need to check each one separately to see if FileVault is enabled for that disk.

Part 5: How to Enable FileVault
Enabling FileVault on your Mac is a straightforward process. Here are the steps to enable FileVault:
- Click on the Apple menu in the top left corner of your screen.
- Select “System Preferences” from the drop-down menu.
- Click on “Security & Privacy.”
- Select the “FileVault” tab.
- Click on the padlock icon in the bottom left corner of the window to make changes.
- Enter your administrator username and password.
- Click on the “Turn On FileVault” button.
- Choose how you want to unlock your encrypted disk. You can use your iCloud account, a recovery key, or a user account password. It’s recommended to choose a recovery key and keep it in a safe place in case you forget your password.
- Click on the “Continue” button.
- Restart your Mac to begin the encryption process.
Note that the encryption process may take several hours depending on the size of your disk and the speed of your Mac. It’s best to perform this process when you have plenty of time and don’t need to use your Mac for a while.
Once FileVault is enabled, your Mac will encrypt all the data on your disk, making it more difficult for someone to access your files without your permission. It’s a great way to ensure the security of your data, especially if you use your Mac in public places or share it with others.
Bonus: Protect Your Privacy with Mac Cleaner
Undoubtedly, there are numerous advantages to utilizing the FileVault disk encryption feature on your Mac. However, keep in mind that enabling it may consume a significant amount of storage space. Nevertheless, there’s no need to worry about this issue because you can use the Mac Cleaner program to resolve it.
This program not only cleans up unnecessary files to free up space on your Mac, but it also protects it from potential threats. Therefore, it complements the functionality of FileVault. Furthermore, Mac Cleaner is designed to safeguard your privacy by allowing you to delete files that could compromise it. With this software, it’s effortless to locate and eliminate files that may pose a threat to your privacy. Consequently, it’s a program that you should consider using, regardless of whether or not you choose to enable FileVault.
If you want to use Mac Cleaner to erase private data on your computer, you’ll need to follow a few simple steps. Here’s how to get started:
Step 1: Download and Install Mac Cleaner
First, head to the official Mac Cleaner website by clicking on this link. Once you’re on the site, look for the “Download Now“ button and click it to download the DMG installer file. Once the download is complete, open the file and follow the installation instructions. Once the installation is finished, the application will open automatically.

Step 2: Choose the “Erase Private Data” Module
On the left side of the Mac Cleaner interface, you’ll see six different options, or “modules.” To erase private data, you’ll need to select the “Erase Private Data” module. Click on it to select it.
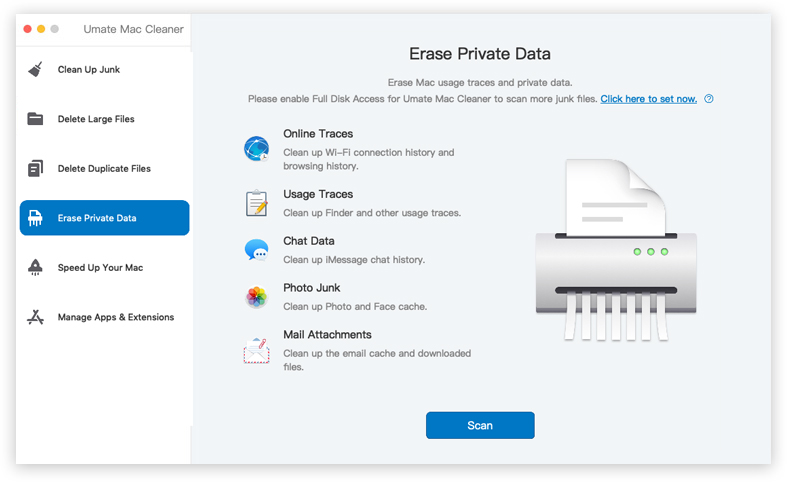
Step 3: Click “Scan”
After selecting the “Erase Private Data“ module, the Mac Cleaner interface will change to show details about this module. To proceed, click the “Scan“ button.

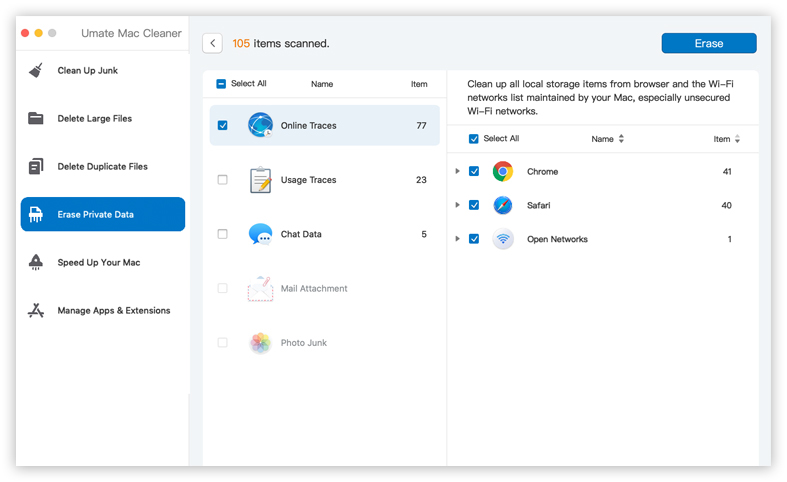
Step 4: Select the Files You Want to Erase
Once the scan is complete, you’ll see a list of items on the left side of the interface. These items correspond to different types of private data files on your computer, such as online traces, usage traces, chat data, photo junk, and mail attachments. Select an item from this list to see a new list of files on the right side of the interface. Click on the checkboxes next to the files you want to erase or click “Select All“ to erase all the files in the list.
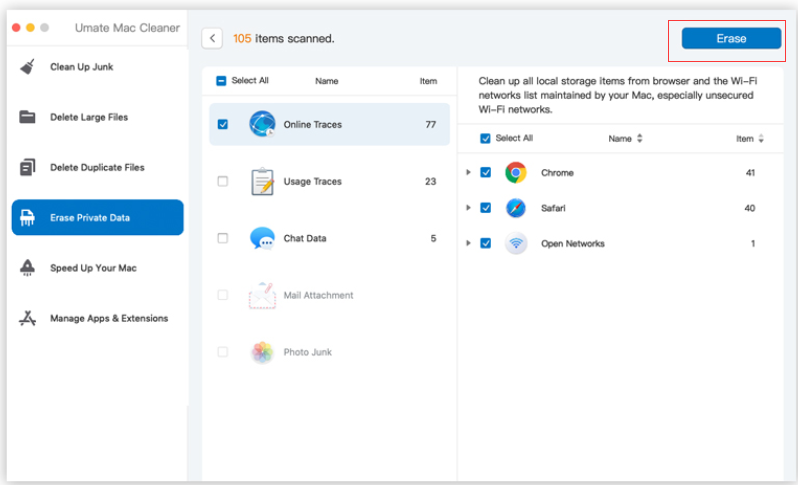
Step 5: Erase the Selected Files
After you’ve selected the files you want to erase, click the blue “Erase” button in the upper right corner of the window. This will erase the files you selected in Step 4.
Conclusion
Are you familiar with FileVault on your Mac? It’s a great way to safeguard your data, as FileVault disk encryption requires you to enter your password again to wake your Mac from sleeping, preventing unauthorized access to your files. Your Mac contains sensitive and confidential data that you don’t want others to access.
So, do you need FileVault on your Mac? If you ever need to leave your Mac unattended, someone could easily access your data. That’s why Apple created FileVault disk encryption to protect your Mac. It’s essential to learn how to turn it on and off to make the most out of this feature. Don’t just leave it there without knowing how it works.
In today’s digital age, data security is more important than ever. By using FileVault encryption, you can ensure that your sensitive data is protected from unauthorized access. It’s a built-in feature on Mac computers, and turning it on is easy. Just remember that the encryption process can take a while, so it’s best to start it when you don’t need to use your Mac for a while.
Latest Articles