

If you’re like most people, you probably have thousands of photos stored on your Mac. Over time, it’s easy to accumulate duplicate photos, which can take up valuable space on your hard drive and make it difficult to find the photos you actually want. In this blog post, we’ll explore some of the best ways to find and remove duplicate photos on your Mac.
Part 1: How to Find Duplicate Photos on Mac
There are several ways to find duplicate photos on Mac. Here are some methods you can try:
Use the built-in Photos app:
The Photos app on your Mac has a feature that can help you find duplicate photos. Here are the steps:
- Open the Photos app on your Mac.
- Click on the “Photos” tab in the sidebar to view all your photos.
- Select the photos you want to check for duplicates.
- Go to the “File” menu and choose “Create” > “Smart Album”.
- In the Smart Album window, give the album a name (e.g., “Duplicate Photos”) and set the conditions to “Photo” “is” “duplicate”.
- Click “OK” to create the album. The Smart Album will now show all the duplicate photos.
Use third-party software:
There are several third-party software options that can help you find and delete duplicate photos on your Mac. Here are a few examples:
Mac Cleaner: This app can find and delete duplicate photos on your Mac, as well as on external drives and cloud storage.
Gemini 2: This app can find duplicate files, including photos, on your Mac and give you the option to delete them.
PhotoSweeper: This app can find duplicate photos, similar photos, and even photos that have been rotated or flipped.
Manually search for duplicates:
If you prefer to manually search for duplicate photos on your Mac, you can do so using the Finder. Here are the steps:
- Open a new Finder window and navigate to the folder where your photos are stored.
- Click on the “View” menu and choose “as List” to view your photos in a list format.
- Click on the “Name” column header to sort your photos by name.
- Scroll through the list and look for photos with the same name or similar names.
- Select the duplicate photos and delete them.
Note: When deleting duplicate photos, make sure you are deleting the correct copies and not the original photos. It’s always a good idea to back up your photos before deleting any files.

Part 2: How to Get Rid of not-quite-duplicate Photos
If you have a large number of photos that are not quite duplicates but are similar, here are some methods you can use to get rid of them:
- Manual sorting: This involves going through your photos one by one and deciding which ones to keep and which ones to delete. It can be time-consuming, but it’s the most accurate method.
- Use a duplicate finder tool: There are several duplicate finder tools available online that can help you find duplicate photos. Some popular options include Duplicate Cleaner, VisiPics, and Awesome Duplicate Photo Finder.
- Use specialized software: Some photo management software like Adobe Lightroom, Apple Photos, and Google Photos have built-in tools that allow you to find and delete similar photos. You can use these tools to group photos by similarity and then select the ones you want to delete.
- Organize by date: Group your photos by the date they were taken and then delete the ones that are similar or redundant.
- Use AI-powered photo management software: There are several AI-powered photo management software like PhotoSweeper, Gemini Photos, and Remo Duplicate Photos Remover that use advanced algorithms to detect and delete similar photos. These tools can save you a lot of time and effort.
No matter which method you choose, it’s always a good idea to back up your photos before you delete them, just in case you accidentally delete something you didn’t mean to.

Part 3: How to Remove Duplicates from Photos Manually
Removing duplicates from your Photos library manually can be a time-consuming process, but it’s a good way to ensure that you’re only keeping the photos you really want. Here’s how to do it:
- Open the Photos app on your Mac.
- Click on the “Photos” tab in the sidebar.
- Select the “All Photos” album.
- Click on the “View” menu and select “As List.”
The Photos app will now display your photos in a list format. You can sort the list by date, size, or other criteria to help you identify duplicates.
- Look for duplicate photos: To find duplicates, look for photos that have the same file name or that were taken around the same time. You can also compare the photos visually to see if they are identical.
- Select the duplicates: To select duplicates, hold down the “Command” key and click on each photo you want to delete. Alternatively, you can use the “Shift” key to select a range of photos.
- Delete the duplicates: Once you’ve selected the duplicates you want to delete, press the “Delete” key on your keyboard or click on the “Delete” button in the toolbar. Photos will ask you if you want to delete the photos permanently, so make sure you’re only deleting duplicates and not photos you want to keep.
- Empty the Recently Deleted folder: After you’ve deleted the duplicates, they will be moved to the Recently Deleted folder. To permanently remove them from your library, click on the “Recently Deleted” album in the sidebar, select the duplicates you want to delete, and click on the “Delete All” button in the toolbar.
- Repeat the process: Repeat this process for all the photos in your library until you’ve removed all the duplicates.
While manual removal of duplicates can be time-consuming, it’s a good way to ensure that you’re only keeping the photos you really want. If you have a lot of duplicates, you might want to consider using a third-party app or the built-in Photos app’s duplicate finder to help speed up the process.

Part 4: How to Find duplicate Photos on Mac in Finder
Although using Finder to find duplicate photos on your Mac can be more difficult than using the Photos app or a third-party app, it is still achievable. To do so, first, open a Finder window, select the folder you want to search and create a new Smart Folder. Next, set the Smart Folder to display only image files, and then search for files that match a specific pattern, such as “filename copy” or “filename 2”. Review the Smart Folder results and remove any duplicates by selecting and deleting them or dragging them to the Trash. Finally, remember to empty the Trash to permanently delete the duplicates. By using Finder, you can ensure that you only keep the photos you really want.
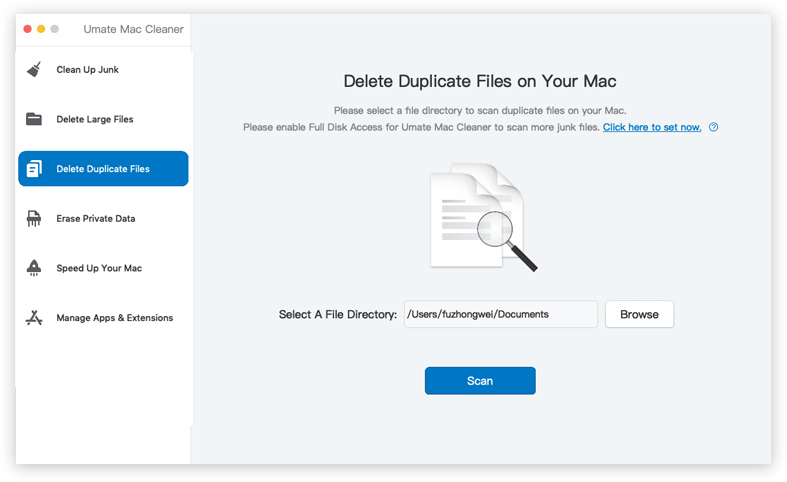
Part 5: How to Find Duplicate Photos on mac With Mac Cleaner
Mac Cleaner is a software application designed to optimize the storage of your Mac. What sets it apart is its module that provides a quick overview of your computer’s storage system, allowing you to easily identify areas that require cleaning or optimization. Mac Cleaner can help you find and remove duplicate photos on your Mac. Here’s how to use it:
To find and remove duplicate photos on your Mac, start by downloading and installing Mac Cleaner. Once installed, launch the app and select the “Duplicate Finder” option from the left sidebar. From there, choose the folder or hard drive you want to scan for duplicates, and then click on the “Scan” button.
After the scan is complete, Mac Cleaner will display the duplicate files it found. To select the duplicates you want to delete, click on the checkboxes next to the files or select them all by clicking on the “Select All” button. Finally, click on the “Remove” button to permanently delete the duplicates. With Mac Cleaner, it’s easy to keep your Mac clean and organized by removing unnecessary duplicate files.
Using a third-party app like Mac Cleaner can save you time and effort in finding and removing duplicate photos on your Mac. However, make sure to review the scan results carefully to ensure that you’re not deleting any important files accidentally.
Conclusion
Finding and removing duplicate photos on your Mac can be a time-consuming process, but it’s important to do to keep your library organized and free up space on your hard drive. Whether you use the built-in Photos app, or a third-party app, or go through your photos manually, taking the time to remove duplicates will pay off in the long run.
Latest Articles