If you’re a Mac user, you know how easy it is to accumulate thousands of photos over time. And with that many photos, it’s inevitable that some duplicates will sneak in. These duplicates not only take up valuable storage space, but also make it harder to find and organize your photos. Fortunately, there are several methods for finding and removing duplicate photos on your Mac.
Part 1: What Are Duplicate Photos?
Duplicate photos are multiple copies of the same image file that exist on a device or storage location. These copies can be created intentionally, such as when a user backs up their photos, or unintentionally, such as when the same photo is downloaded multiple times or accidentally saved twice. Duplicate photos can take up valuable storage space and make it harder to find and organize photos. Therefore, it is important to identify and remove duplicate photos regularly to keep your photo collection organized and efficient.

Method 1: Use the Photos App
If you use the Photos app on your Mac to manage your photos, you’re in luck. The app has a built-in feature for finding duplicates. Here’s how to use it:
- Open the Photos app and select the Library tab.
- Click on the Photos menu and select “Preferences.”
- In the Preferences window, click on the “General” tab.
- Check the box next to “Show duplicate items” and click “OK.”
The Photos app will now display all the duplicate photos it finds in your library. You can review them and decide which ones to delete. Maximize your Mac’s storage capacity by finding and deleting duplicate photos.
Method 2: Manually Search for Duplicates
If you don’t want to use an app or if you prefer a more hands-on approach, you can manually search for duplicates. Here’s how:
- Open the Finder and navigate to the folder where your photos are stored.
- Click on the “View” menu and select “As List.”
- Click on the “Size” column to sort your photos by size. This will group together photos that are likely duplicates.
- Review the photos and delete any duplicates you find.
Part 2: What Are Similar Photos?
Similar photos are images that are not exact duplicates but have similarities in composition, color, subject matter, or other visual elements. These photos may be taken in rapid succession or by different cameras, or they may be edited versions of the same photo. While not identical, similar photos can still take up valuable storage space and clutter your photo library, making it harder to find and organize your photos.
There are some software tools that can help identify and group similar photos, such as Google Photos or Adobe Lightroom. These tools use advanced algorithms and machine learning to analyze the visual content of photos and group them based on similarities. Once similar photos are identified, you can review them and decide which ones to keep and which ones to delete to free up storage space and simplify your photo collection.
Part 3: How to Find And Remove Similar Images on Mac
Finding and removing similar images on a Mac can be done in a few different ways:
Method 1: Use Smart Albums in the Photos App
- Open the Photos app and select the Library tab.
- Click on the File menu and select “New Smart Album.”
- Name the Smart Album and set the conditions to “Photo” “is similar to” “Photo.”
- Click “OK” to create the Smart Album.
- The Photos app will now display all the similar photos it finds in your library. You can review them and decide which ones to delete.
Method 2: Manually Search for Similar Images
- Open the Finder and navigate to the folder where your photos are stored.
- Click on the “View” menu and select “As List.”
- Sort your photos by date and review any images that are taken in rapid succession or have similar subjects or compositions.
- You can also use the “Search” function in the Finder to search for images with similar file names or metadata.
By using one of these methods, you can find and remove similar images on your Mac and keep your photo collection organized and efficient.

Part 4: Find Duplicate Photos on Mac using Mac Cleaner
Mac Cleaner is a powerful software tool that is designed to help you find and remove duplicate files on your computer. Here are some of the best features of Duplicate File Finder:
- Scans Multiple File Types: Mac Cleaner can scan a variety of file types, including photos, music files, videos, documents, and more.
- Advanced Scanning Algorithms: The software uses advanced scanning algorithms to quickly and accurately identify duplicate files, even if they have different file names or are stored in different folders.
- Flexible Search Settings: Duplicate File Finder allows you to customize your search settings to include or exclude certain file types, folders, or file sizes.
- Preview Functionality: The preview function allows you to preview the duplicate files before you delete them, so you can make sure that you are only deleting the duplicates and not the original files.
- Multiple Deletion Options: Duplicate File Finder offers multiple deletion options, including moving the duplicates to the trash, deleting them permanently, or moving them to a separate folder.
- Easy-to-Use Interface: The user-friendly interface makes it easy to navigate and use the software, even for users with limited technical expertise.
- Speed and Performance: The software is designed to be fast and efficient, allowing you to scan and remove duplicate files quickly and easily.
Mac Cleaner is an efficient software that automatically detects and eliminates unnecessary files from your computer, effectively freeing up valuable space in just a few seconds. Overall, Mac Cleaner is a powerful and reliable tool that can help you reclaim valuable storage space on your computer by finding and removing duplicate files. To get started with Mac Cleaner, simply follow these steps:
Step #1: Download, Install, and Open Mac Cleaner on Your Computer
Head to the Mac Cleaner download site using your preferred browser, click the “Download Now” button, and wait for the download to finish. Then, open the DMG file and follow the prompts to complete the installation. Once done, launch Mac Cleaner and let it work its magic.
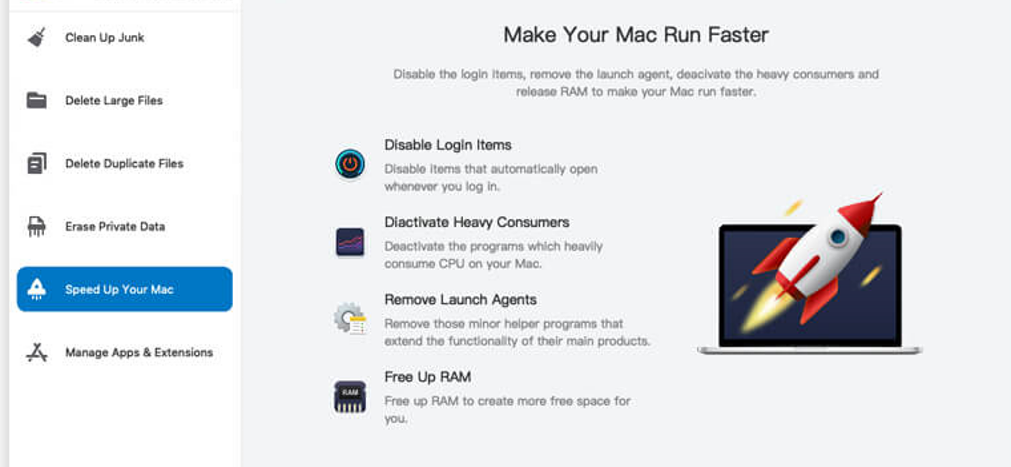
Step #2: Pick a Cleaner Module
On the left-hand side of the software, you’ll see a sidebar with six options, each corresponding to a module within Mac Cleaner. These modules are: (1) Clean Up Junk, (2) Delete Large Files, (3) Delete Duplicate Files, (4) Erase Private Data, (5) Speed Up Your Mac, and (6) Manage Apps & Extensions. To free up space on your computer, you’ll mostly need to use the first three modules, which focus on cleaning files. Here’s what each module does:
- Clean Up Junk identifies and removes unnecessary files, such as system and app cache, files in the Trash and Downloads folders, unused disk images, and more.
- Delete Large Files scans your computer for any file over 50MB, regardless of file type, and lets you easily delete them.
- Delete Duplicate Files checks each file within a directory to find any duplicates and creates a list of them for you to delete.
Since only one module can be used at a time, simply click on the desired module from the left sidebar to get started. By using the Delete Duplicate Files module, you can scan your computer for duplicate images and get a list of all the files that have duplicates.
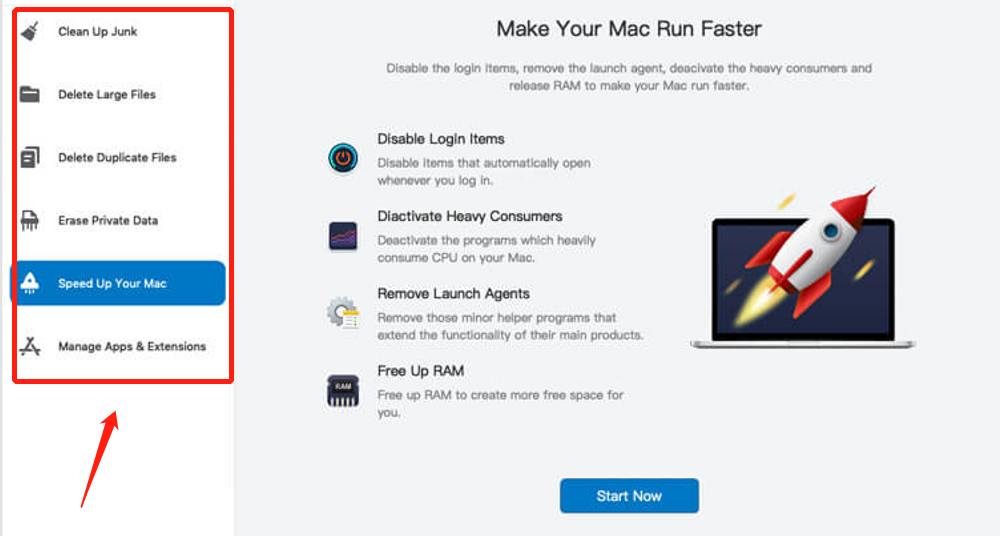
Step #3: Scan Your Mac for Files
After selecting a cleaning module, the next step is to scan your computer for the corresponding files. The scanning process will vary depending on the module you’ve chosen, and the interface will look different for each one. Here’s what you need to do for each module:
- Clean Up Junk: The software provides two options: Quick Clean and Deep Clean. Quick Clean scans for System Junk, App Junk, iTunes Junk, and Trash Bin. Deep Clean scans for all of those as well as Downloads, Unused Disk Images, and iOS Junk. Choose the option you prefer and click the Scan button.
- Delete Large Files: Simply click the Scan button after selecting this module.
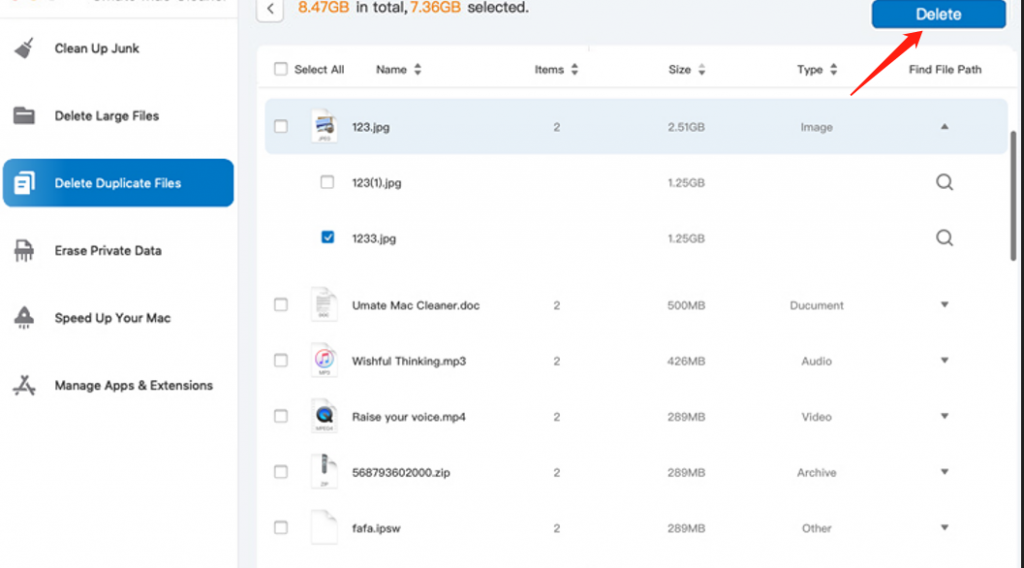
- Delete Duplicate Files: Click the Browse button located in the center of the software to bring up a popup menu. From there, navigate to the folder you want to scan and click Scan.
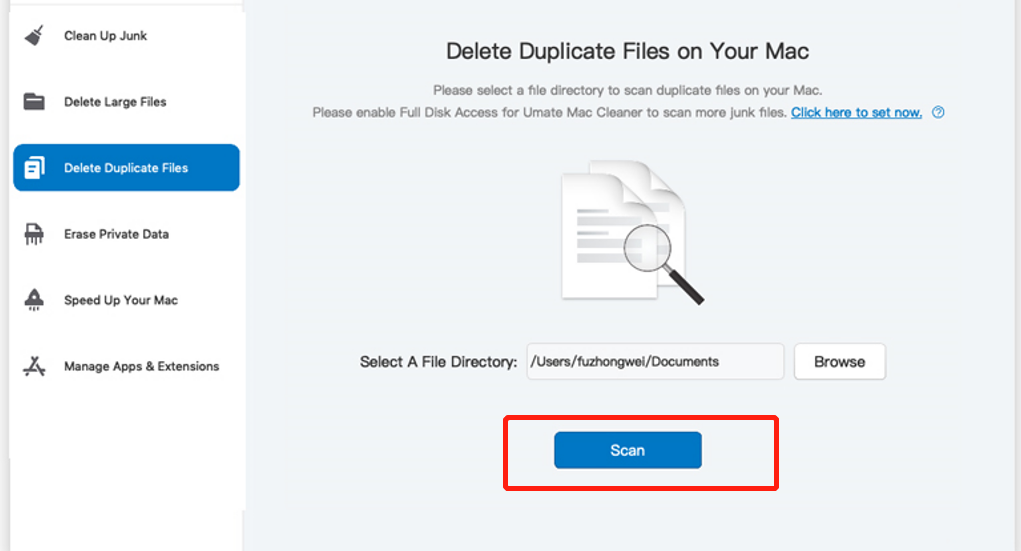
Step #4: Pick a File/s
Now that you have scanned your Mac and generated a list of files that need to be deleted, it’s time to select the ones you want to get rid of. The process varies depending on the module, but it’s simple nonetheless. For Delete Large Files and Delete Duplicate Files, you can simply check the boxes of the files you want to remove. For Clean Up Junk, you need to select a file category first, and then select the individual files to delete. Clicking the Select All option selects all items in the list.
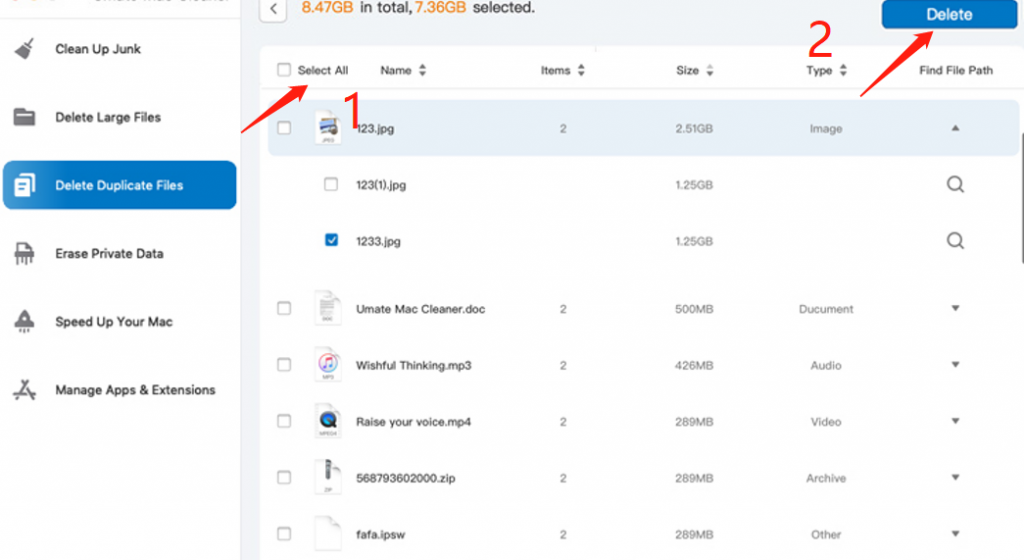
Step #5: Delete the File/s
To free up space on your Mac and delete the unwanted files, click the Clean or Delete button, which is located at the top-right corner of the interface. Once you click the button, wait until the process is completed. Once you have the list, you can easily select the files you want to delete and free up valuable disk space. With just a few clicks, you can easily organize your photo library and make sure you only keep the best pictures. So, if you want to find and remove duplicate photos on your Mac, try using Mac Cleaner today!
Conclusion
Finding and deleting duplicate photos on your Mac is important for keeping your photo library organized and saving valuable storage space. Whether you use the built-in feature in the Photos app, or a third-party app, or manually search for duplicates, there are several methods to choose from. By taking the time to find and delete duplicates, you’ll have a more organized and efficient photo library that’s easy to navigate and enjoy.
Latest Articles