Are you tired of scrolling through your media library and finding the same videos over and over again? Duplicate videos take up valuable storage space and make it difficult to organize your media collection. Fortunately, finding and removing these duplicates can be a straightforward process with the right tools and techniques.
Are you running out of storage space on your Mac and looking to free up some space? One of the best ways to do that is by finding and removing duplicate videos. Not only will this help you free up space, but it will also make your media library more organized.
In this blog, we’ll guide you through the process of finding duplicate videos on your computer or mobile device. We’ll explore different methods and tools that can help you streamline your media collection and save you time in the long run. Find duplicate videos with just a few clicks using our powerful software.

Method 1: Use Finder
Finder is a built-in file management tool on your Mac that you can use to find and remove duplicate videos. Here’s how to do it:
- Open Finder and navigate to the folder where you want to search for duplicate videos.
- Click on the “File” menu at the top of the screen and select “New Smart Folder”.
- In the search bar, type in “kind: video” to filter the search results to only videos.
- Click on the “+” button on the right side of the search bar to add another search criterion.
- Select “Name” from the first dropdown menu, and “Matches” from the second dropdown menu.
- Type in “* copy.*” in the search box to filter the results to only video files with “copy” in the name.
- Click “Save” to save the smart folder for future use.
- Review the results and delete any duplicate videos you find.
Method 2: Use Duplicate File Finder
Duplicate File Finder is a third-party app that can help you find and remove duplicate videos on your Mac. Here’s how to use it:
- Download and install Duplicate File Finder from the App Store.
- Open the app and select the folder where you want to search for duplicate videos.
- Click on the “Scan” button to start the scan.
- Once the scan is complete, review the results and select the duplicate videos you want to delete.
- Click on the “Delete” button to remove the selected videos
Method 3: Mac Cleaner
Here’s how you can optimize your Mac and prevent crashes and similar issues with Mac Cleaner – a specialized software designed for cleaning your Mac by deleting unnecessary data.
Step 1. Set up The Mac Cleaner Software
To begin using Mac Cleaner, you will need to set it up by downloading the installer from the official website and running the executable file to install the software. Once the installation is complete, open the software and move on to the next step.

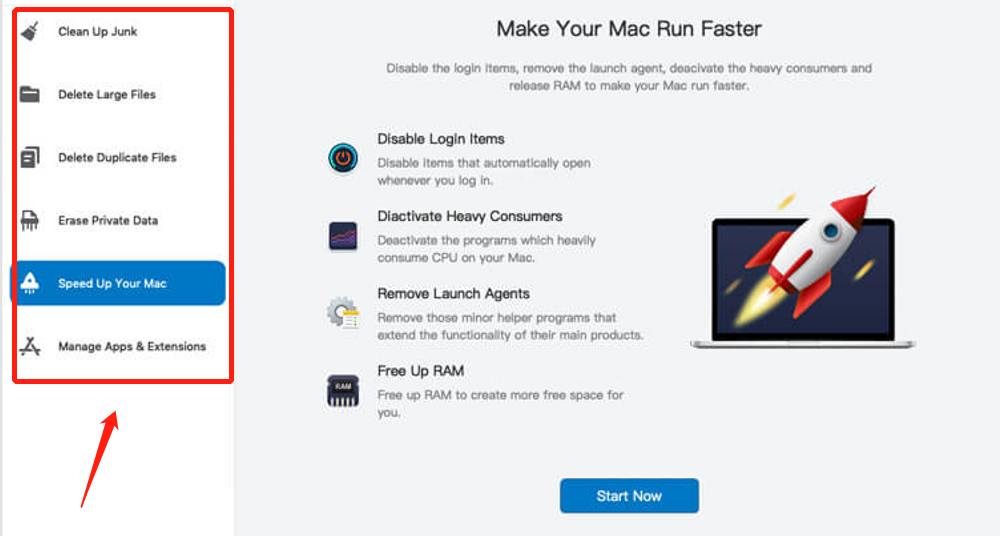
Step 2. Select A Module from The Left Sidebar
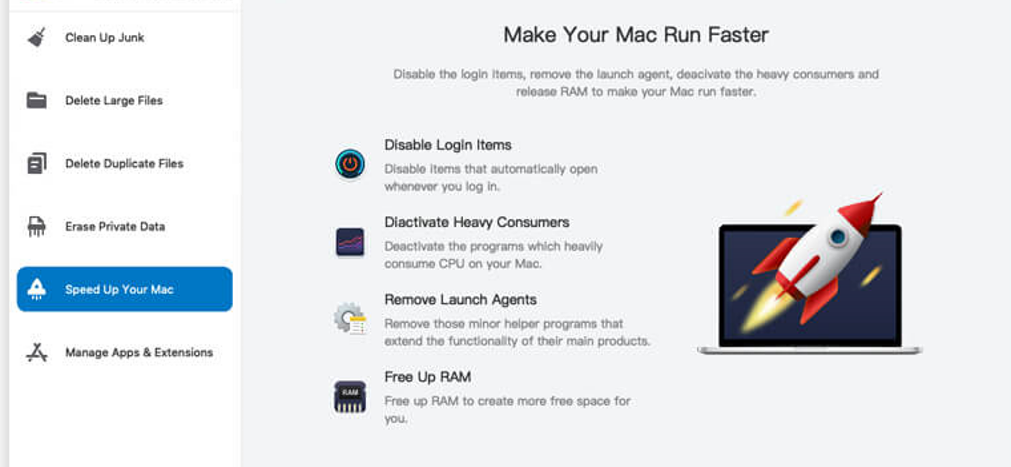
The second step involves selecting a module from the left sidebar, as Mac Cleaner provides a total of six modules, each with different functionalities and benefits to prevent Mac issues. The available modules include Clean Up Junk, which detects and cleans up junk files, Delete Large Files, which frees up space by detecting and removing files exceeding 50MB in size, and Delete Duplicate Files, which helps identify and delete extra copies of files.
Additionally, Erase Private Data detects private files to reduce the risk of cyberattacks while optimizing Mac storage space. Speed Up Your Mac performs various actions that help speed up and optimize your Mac, such as clearing up RAM and deleting unnecessary data.
Finally, the Manage Apps & Extensions module allows you to uninstall applications and remove extensions. While you may prefer using only one module, it’s recommended to use all of them one at a time to optimize your Mac in various ways and prevent common Mac issues. To get started, select the module that best suits your current needs from the left sidebar.

Step 3: Scan for duplicate videos
To begin the process, once you have selected a module from the left sidebar, you will be taken to a new screen where you will find information about the module you have selected. From here, all you need to do is click the central button that reads “Scan”, “Start Now” or “View Items” to initiate the operation.
On the Duplicate Finder screen, click on the “Scan” button to start the scanning process. This might take a while, depending on the number of videos you have stored on your Mac.

Step 4. Select An Item From The List
After choosing a module from the left sidebar, you will see details about the module on the screen. To begin the process, click the button in the center of the screen, which may say Scan, Start Now, or View Items.
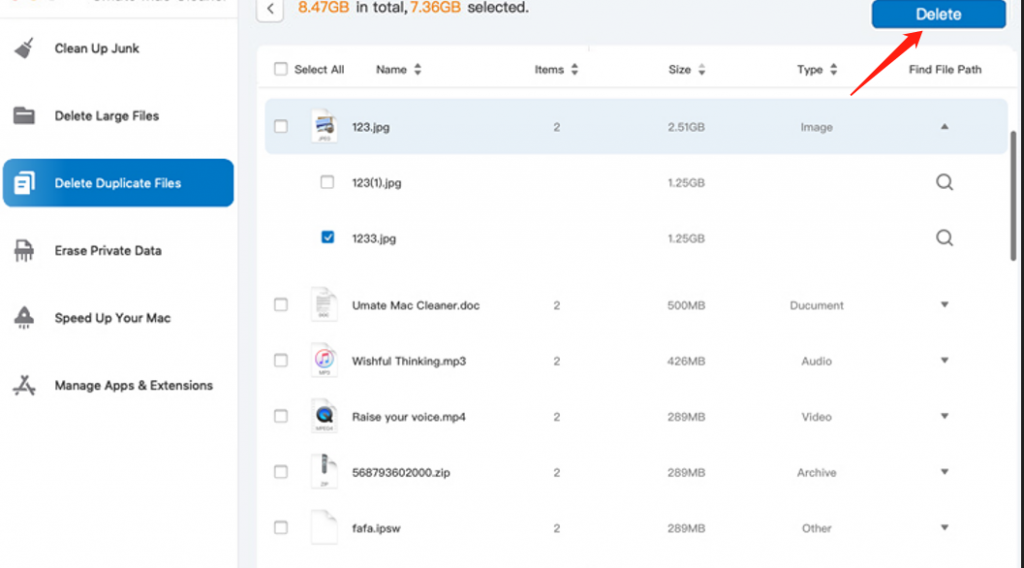
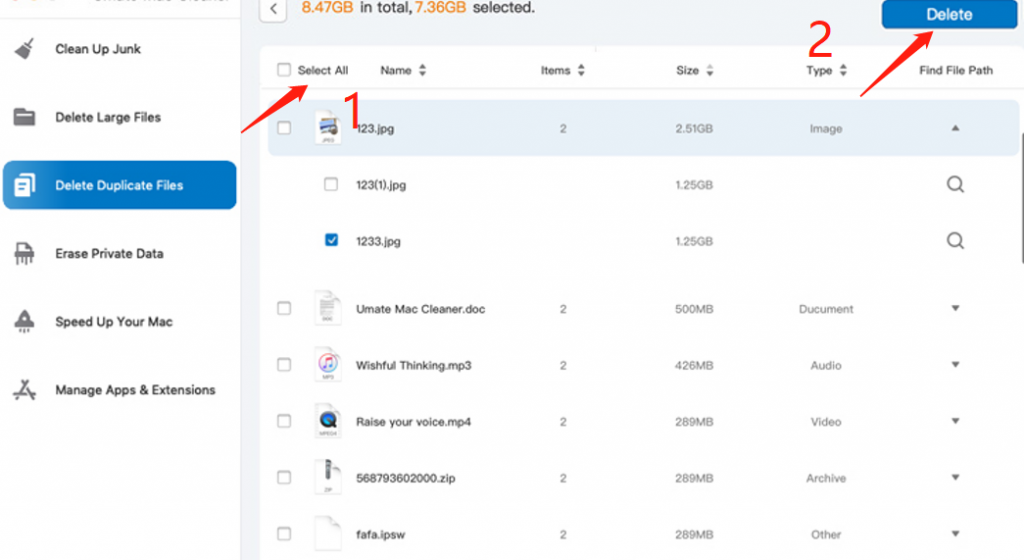
Once the scanning process is complete, Mac Cleaner will display a list of all the duplicate videos it found. Review the list and select the videos you want to delete. You can either delete them individually or use the “Select All” option to delete all duplicate videos at once.

Step 5. Click the Appropriate Action Button
After selecting an item, you will be presented with options to take appropriate action, depending on the item selected. For instance, if you selected a file, the options available to you may include Clean, Delete, or Erase. Regardless of the option you choose, you should see a button located at the top-right corner of the screen. Click this button to initiate the process. The button may vary depending on the module you selected in Step 2, and can be labeled Clean, Delete, Erase, Uninstall, Remove, Deactivate, or Disable, among others.
After you’ve selected the videos you want to delete, click on the “Clean” button to delete them. Mac Cleaner will ask you to confirm the deletion, so make sure you review the list one last time before clicking on the “Clean“ button.
Once you have clicked the button, the software will initiate the process, which should take a few minutes at most. Once complete, your Mac will have been optimized and you can expect to encounter fewer issues and errors going forward.
By following these simple steps, you can easily find and delete duplicate videos on your Mac with Mac Cleaner. Keeping your system optimized has never been easier!
How to Keep Your Mac Optimized
Keeping your Mac optimized is essential for maintaining its performance and prolonging its lifespan. Here are some tips on how to keep your Mac optimized:
- Update your operating system and apps regularly: Keeping your system and apps up-to-date ensures that you have the latest security patches and bug fixes, which can improve the stability and performance of your Mac.
- Clear out unnecessary files: Regularly deleting unnecessary files, such as temporary files and old downloads, can help free up storage space and speed up your Mac.
- Manage your startup items: Startup items are applications that automatically launch when you turn on your Mac. By managing these items, you can speed up the boot time of your Mac and reduce the strain on your system resources.
- Use a cleaning tool: There are various cleaning tools available that can help you optimize your Mac by cleaning out junk files, removing unnecessary apps, and freeing up space on your hard drive.
- Monitor your activity monitor: Your activity monitor provides real-time information about the processes and applications running on your Mac. Keeping an eye on it can help you identify any resource-intensive applications that may be slowing down your Mac.
- Manage your storage: Ensure that you have enough free space on your Mac’s hard drive. When your hard drive becomes too full, it can slow down your Mac and cause performance issues. Consider moving files to an external hard drive or cloud storage to free up space on your Mac.

Conclusion
Finding and removing duplicate videos on your Mac is a great way to free up space and organize your media library. By using one of the methods we’ve outlined in this blog post, you can easily find and remove duplicate videos on your Mac. So go ahead and try them out today!
Latest Articles