

It’s not uncommon to lose files on your computer. After all, it only takes a wrong click of a button and that file is gone. The good news is you can retrieve lost files on Mac if you deleted them normally, but what if you deleted them in another way? Would you be able to recover them still? These are some of the questions you’d ask yourself if you had recently lost files on Mac. If that’s the case, then this guide should help, as it tackles everything you need to know about the matter. But first, let’s discuss how you can lose files on Mac in the first place.
Part 1: How Can You Lose Files on Mac?
Data loss is a common problem in macOS computers, or any device, for that matter, mainly because it can happen in a variety of ways. What’s worse is that the solution to recover the lost files on Mac will be based on how you lost them in the first place.
With that in mind, you must be aware of the possible causes of data loss. Here’s a look at the common causes:
- You permanently deleted a file. When you select a file and then press the Delete key on your keyboard, you can expect to see the deleted file in the Trash. But if you pressed the Ctrl key or Command key before Delete, then you’d have successfully deleted the file permanently. You won’t see it in the Trash, and therefore, you cannot recover it normally.
- Your computer has malware or virus. It’s common knowledge that malware or virus can do a lot of bad things to a computer. One of the worst things it can do is delete files automatically, which can lead to a case of data loss.
- The file was corrupted. There are times when the virus or malware doesn’t affect the entire computer, but only a few files. If those files are corrupted, then you either have no choice but to delete them of your own volition or the file will be deleted automatically if you perform a virus scan. Either way, you lose the file permanently.
- The hardware sustained physical damage. Though most of the time, files are lost due to a problem with the system, there are times when data loss occurs due to physical damage. Perhaps water got into the hard drive. Maybe the hard drive is too old and is therefore losing files occasionally. Either way, data loss is possible this way.
- You formatted the drive. It’s a common practice to format one’s drive. It allows users to get rid of viruses and malware, and if those aren’t present, formatting can improve a hard drive’s performance by basically restarting it. Though that’s the case, it can sometimes lead to detrimental effects, like, for example, if you format the drive while you still have some important files. In that case, you won’t be able to recover those files normally.
Regardless of the reason, there are usually only a few solutions to this problem, and it involves data recovery software or services.

Part 2: Recover Files With Data Recovery Services or Software
Data recovery software is a tool that you can use to recover files that you can’t recover via Trash. To get these types of software, you must buy a license for them. Data recovery services are the service version of these kinds of tools or software.
The use of these pieces of software or services is perhaps your only solution to recover lost files on Mac.
But while it’s great that you now know how to recover lost files on Mac, as they say, prevention is better than cure. If you don’t want to go into the trouble of recovering your files, then it would be in your best interest to learn how to protect your files.
There are several ways to do that. For one, you can delete files safely, and you can do that with Mac Cleaner.
Part 3: Delete Files Safely With Mac Cleaner
Mac Cleaner is a cleaning software that allows you to delete unnecessary files from your computer. It’s one of the best solutions to your problem since it only targets unnecessary files. That basically means while it does get rid of files permanently, you can rest assured that those files are not something you’d want to recover. Here’s how you can use Mac Cleaner:
Step #1: Start Mac Cleaner on Your Computer/Laptop
Click this link. It should take you to the Mac Cleaner download site, where you’ll find a Download Now button. Click it to prompt the download of a DMG file that corresponds to the installer of the software. Once the download is complete, open the DMG file to start the installer. Then, follow the onscreen instructions from that point onwards. Mac Cleaner will open automatically once it’s installed.

Step #2: Choose Clean Up Junk
On the left side of the interface, you’ll find six different options. These include (1) Clean Up Junk, (2) Delete Large Files, (3) Delete Duplicate Files, (4) Erase Private Data, (5) Speed Up Your Mac, and (6) Manage Apps & Extensions. Since your goal is to delete files safely, you need to select Clean Up Junk. It’s the module that allows you to get rid of junk files like the system cache, app cache, Trash files, iTunes junk, and the like. It only targets unnecessary files, so it’s perfect for your purposes since you can free up space without deleting important files. Select the module by clicking on it from the left side of the interface.
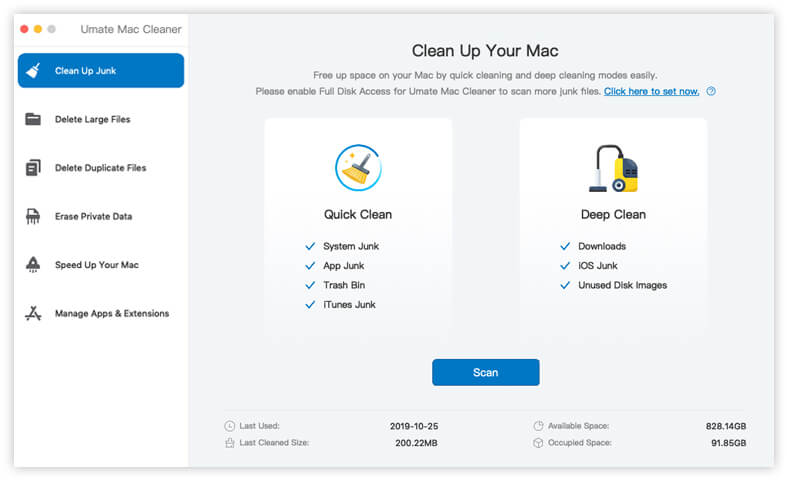
Step #3: Click the Scan Button
Upon selecting the module, you’ll notice that there are two options in each side of the interface. One says Quick Clean while the other says Deep Clean. These are the two scanning methods of the Clean Up Junk module. Quick Clean scans the computer for the following file types: System Junk, App Junk, Trash Bin, and iTunes Junk, while Deep Clean scans for those as well in addition to three more, including Downloads, iOS Junk, and Unused Disk Images. Quick Clean is faster, but Deep Clean is more accurate. We suggest choosing Deep Clean, but you can choose whichever. After that, you must click the Scan button.
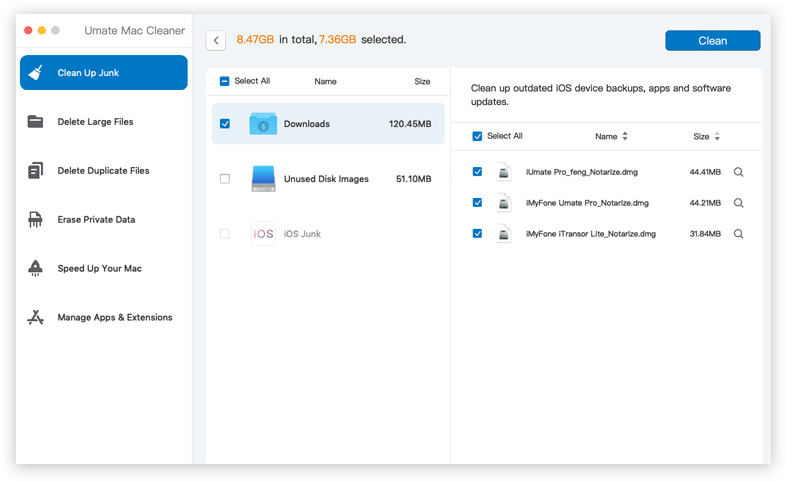
Step #4: Select a File Category and File/s
After the scan, you may notice that there’s a list on the left side of the interface. It should consist of file categories like System Junk, Downloads, Trash Bin, and Unused Disk Images, among many things. Select a file category from this list. After that, another list will appear on the right side of the interface which should consist of actual files. Select the ones you want to delete from that list by clicking on their corresponding checkboxes. You can also click Select All if you want to include all items.

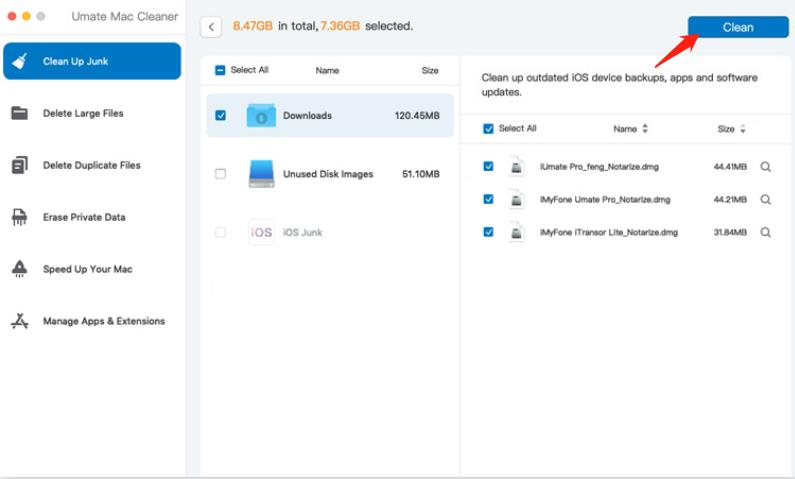
Step #5: Click the Clean Button
To finalize the process, you must click the blue button at the top-right corner of the window which should say Clean. After doing so, the software will take a few minutes to delete the files you selected in step 4, so you may have to wait for a while.
Part 4: How to Create A Backup on Mac
There are three things you can do to deal with data loss on macOS computers. The first and obvious one would be to recover the files you lost or RECOVERY. The second one is to prepare a countermeasure to prevent data loss from happening in the first place or PREVENTION. The third one is all about making sure you can control how much damage the data loss can incur to your daily life or DAMAGE CONTROL. You now know how to approach recovery and prevention.
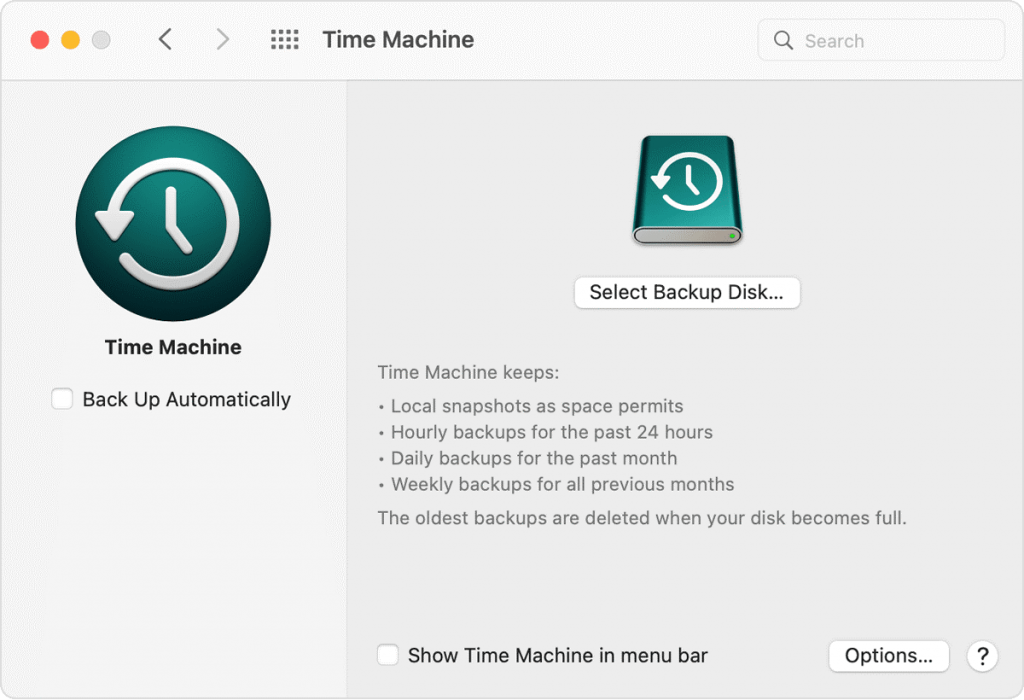
As for damage control, the best approach is usually having a backup so you can immediately recover your files. There are several ways to back up your files. However, the best method would be to use the Time Machine. Here’s how you can use it:
- Connect an external hard drive to your computer. It’ll be where you’ll store the backup.
- Next, go to your desktop and click the Apple logo at the top-left corner of the screen.
- Select System Settings or Preferences, depending on your macOS version.
- A popup window will appear. Click General from the left sidebar.
- Now select Time Machine from the right sidebar.
- Find the add (+) button or Select Backup Disk button and click it.
- Follow the onscreen instructions.
With this, you can very easily create a backup of your files on Mac, so if you do lose them, you can quickly recover them.
Part 5: Parting Words
As devastating as it can be to lose files on your macOS computer, you still have a chance to recover them. Not to mention once you’ve successfully recovered them, you can then proceed to take countermeasures to prevent that from happening again. That, too, is something you can do in a variety of ways, like using a safer cleanup software like Mac Cleaner or having a backup of your files. The possible solutions are numerous, so it’s entirely up to how well you can plan them.
Latest Articles