

If you’re wondering how to check history on Safari, the browser offers a useful feature that allows you to keep track of your browsing activity on iOS devices. By accessing your browsing history, you can easily retrieve previously visited web pages and retrace your online journey.
This is especially helpful when conducting extensive research and you need to recall a valuable piece of information that you previously accessed. To view your browsing history in Safari, follow the steps outlined in this article. Discover how to check your history on Safari by reading below.

Part 1: Why You Need to Turn Search Browser History off
Search browser history refers to the record of websites and web pages that a user has visited on their browser. This information is usually stored on the user’s computer or device and can be accessed by anyone who has physical or remote access to the device.
While search browser history can be useful for some purposes, such as helping users find previously visited sites, it also poses several risks to privacy and security. Here are a few reasons why you might consider turning off your search browser history:
- Privacy concerns: Your search history contains information about your browsing habits, interests, and potentially sensitive information such as your login credentials, credit card information, or personal conversations. This information can be used by hackers, advertisers, or malicious actors to track your activities, steal your identity, or carry out phishing attacks.
- Security risks: If your device is shared with other people, they can easily access your search history and use it to impersonate you or gain unauthorized access to your accounts. This is especially true if you use autofill features that store your passwords and other sensitive data.
- Embarrassment or reputational damage: Sometimes, we may visit sites that we don’t want others to know about. This can include adult content, medical information, or other sensitive topics. If your search history is exposed, it can lead to embarrassment or even reputational damage.
- Improved performance: Turning off your search browser history can also help improve the performance of your browser, especially if you have limited storage space on your device.
Overall, while searching browser history can be convenient, it can also pose several risks to your privacy and security. To reduce these risks, consider turning off your search history or using privacy-focused browsers that do not store your search history by default.

Part 2: how to check history on Safari
To check your browsing history on Safari for Mac, you can use the Show All History feature. This allows you to easily search through your web browsing history and quickly find previously visited web pages. Simply open the Safari app on your Mac and navigate to History > Show All History. Once you’re in the history view, you can use the Search field to look up specific pages or keywords. This is a quick and convenient way to check your history on Safari.
Another way to check history on Safari
To check your browsing history in Safari, you can follow these steps:
- Open Safari on your Mac or iOS device.
- On a Mac, click on the “History” menu in the top menu bar. On an iOS device, tap the book icon at the bottom of the screen.
- Select “Show All History” on a Mac, or “History” on an iOS device.
- This will bring up a list of all the websites you have visited recently. You can click or tap on any of these items to revisit the corresponding page.
- On a Mac, you can also use the keyboard shortcut “Command + Y” to quickly open the History tab. Additionally, Safari allows you to search your browsing history using the search bar at the top of the history page.

Part 3: Can You View History From Private Browsing?
Are you wondering how to check history on Safari when using Private Browsing? Unfortunately, it is not possible to view your browsing history as Safari does not store it while in Private Browsing mode.
This feature is designed to protect your privacy by preventing the browser from retaining any data on the sites you visit. Additionally, Safari also prevents tracking by sites and content providers. As a result, any cookies acquired during your session are erased upon tab closure.
Part 4: How to Clear Google Chrome History Manually
To clear your Google Chrome browsing history manually, follow these steps:
- Open Google Chrome on your computer.
- Click on the three vertical dots in the top right corner of the screen to open the Chrome menu.
- Select “History” from the drop-down menu.
- Click on “History” again in the new menu that appears.
- You will see a list of all the websites you’ve visited recently. You can either click on the three vertical dots next to each individual website to delete it from your history or click on “Clear browsing data” at the top of the screen.
- In the “Clear browsing data” pop-up window, choose the time range for which you want to delete the history.
- Check the boxes next to the types of data you want to clear. You can choose to clear your browsing history, cookies, cache, download history, and more.
- Click on “Clear data” to delete the selected items.
Part 5: How to Clear Firefox History Manually
To clear your Firefox browsing history manually, follow these steps:
- Open Firefox on your computer.
- Click on the three horizontal lines in the top right corner of the screen to open the Firefox menu.
- Select “Library” from the drop-down menu.
- Click on “History” from the new menu that appears.
- You will see a list of all the websites you’ve visited recently. You can either right-click on an individual website and select “Forget About This Site” to delete it from your history or click on “Clear Recent History” at the top of the screen.
- In the “Clear Recent History” pop-up window, choose the time range for which you want to delete the history.
- Check the boxes next to the types of data you want to clear. You can choose to clear your browsing history, cookies, cache, download history, and more.
- Click on “Clear Now” to delete the selected items.
Part 6: How to Check History on Safari With Mac Cleaner
Checking your browsing history on Safari is an important step in ensuring that it doesn’t fall into the wrong hands. Here’s how you can use this software:
Step #1: Download, Install, and Launch Mac Cleaner
To start using Mac Cleaner, you’ll need to follow these steps. First, visit the Mac Cleaner download site by clicking on the provided link. Then, click on the “Download Now” button to initiate the download of a DMG file.
After downloading, open the file and run the installer, following the onscreen instructions. Once the installation is complete, the software should automatically open and be ready to use. This is the first step in the process of using Mac Cleaner.

Step #2: Select a Cleaner Module
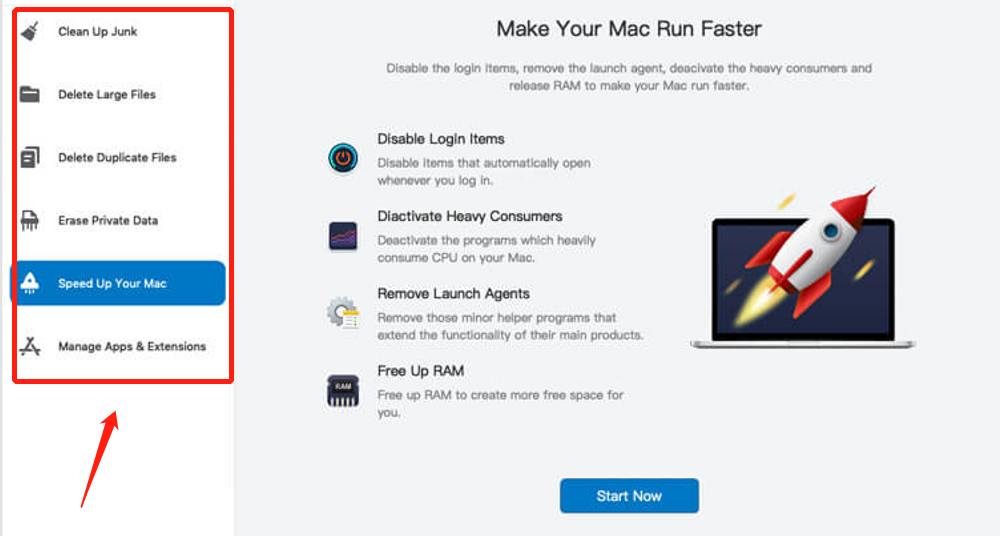
After launching Mac Cleaner, you’ll notice a sidebar on the left-hand side of the interface. It contains six modules, which are Clean Up Junk, Delete Large Files, Delete Duplicate Files, Erase Private Data, Speed Up Your Mac, and Manage Apps & Extensions. For the purposes of this guide, we’ll focus on the first three modules, which we refer to as the cleaner modules. Here’s a brief overview of each module:
- Clean Up Junk scans and removes files that the system considers as junk, including System Junk, App Junk, iOS Junk, iTunes Junk, Unused Disk Images, Downloads, and Trash Bin, among other things.
- Delete Large Files searches for files on your computer that exceed 50MB in size and removes only those files that the system considers unnecessary.
- Delete Duplicate Files checks for duplicate files across your entire computer and presents a list of files that have a copy. You can then choose to delete the duplicates.
To use any of these modules, simply click on the corresponding option in the sidebar.
Step #3: Scan Your Mac for Files
Once you launch Mac Cleaner, a sidebar will appear on the left-hand side of the interface, containing six modules: Clean Up Junk, Delete Large Files, Delete Duplicate Files, Erase Private Data, Speed Up Your Mac, and Manage Apps & Extensions. For the purpose of this guide, we will focus on the first three modules, which are commonly known as the cleaner modules. Here is a quick overview of each module:
- Clean Up Junk scans and removes files that the system considers as junk, such as System Junk, App Junk, iOS Junk, iTunes Junk, Unused Disk Images, Downloads, and Trash Bin, among others.
- Delete Large Files searches your computer for files that exceed 50MB in size and removes only those files that the system considers unnecessary.
- Delete Duplicate Files checks for duplicate files across your entire computer and displays a list of files that have a copy. You can choose to delete the duplicates as needed.
To access any of these modules, simply click on the corresponding option in the sidebar.
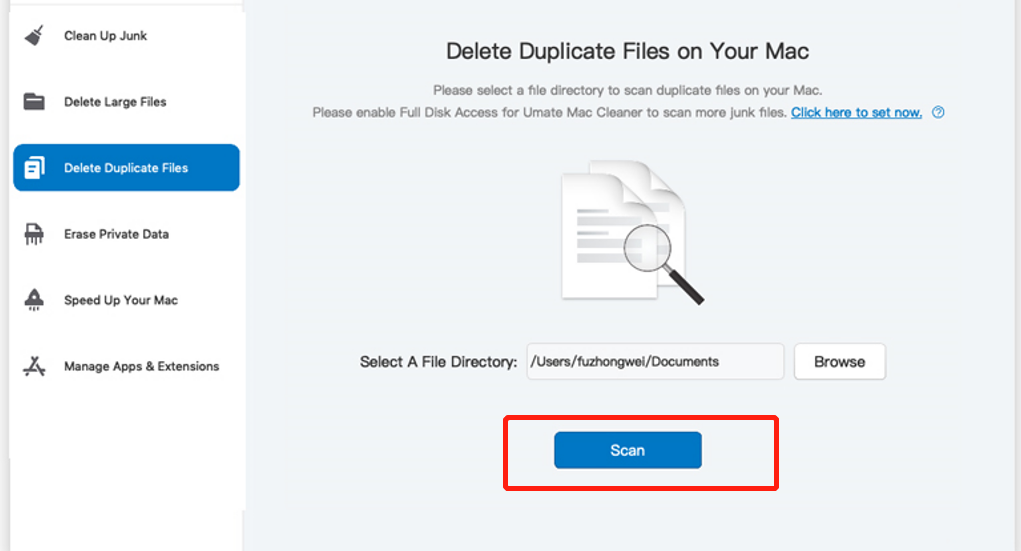
Step #4: Choose a File/s
you need to choose the file or files you want to delete. The process for selecting files will depend on the module you are using. It is much simpler for the Delete Large Files and Deletes Duplicate Files modules as you just need to choose an item from the list which includes folders and files like images, videos, documents, songs, etc.
However, in the case of the Clean Up Junk module, you will first need to select a file category from the list on the left side of the interface. The options you will see include System Junk, Downloads, iOS Junk, iTunes Junk, Trash Bin, Unused Disk Images, and more. Once you select a category, a new list will appear on the right side of the interface containing actual files. You can select the files you want to delete by clicking their checkboxes, or you can choose to delete all of them by clicking the Select All button.
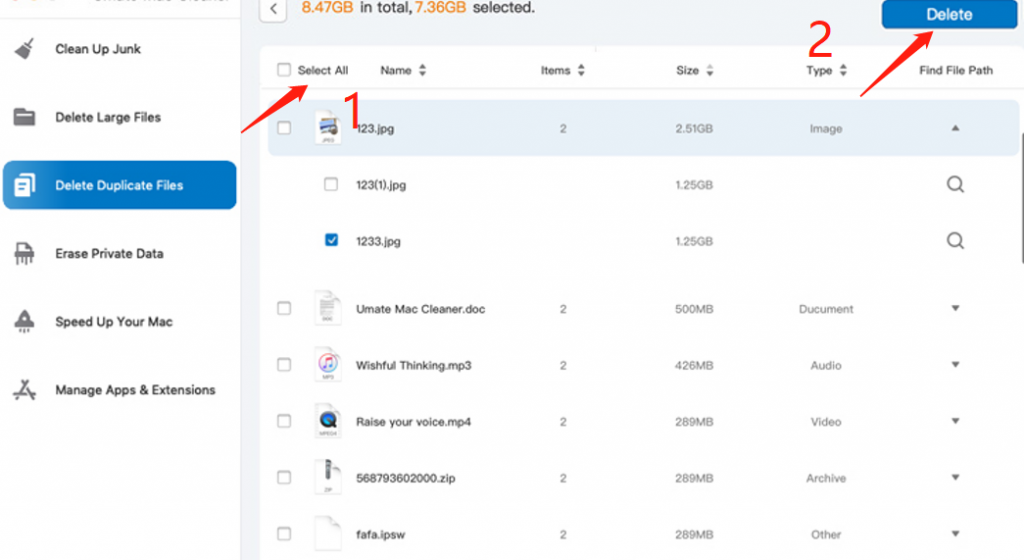
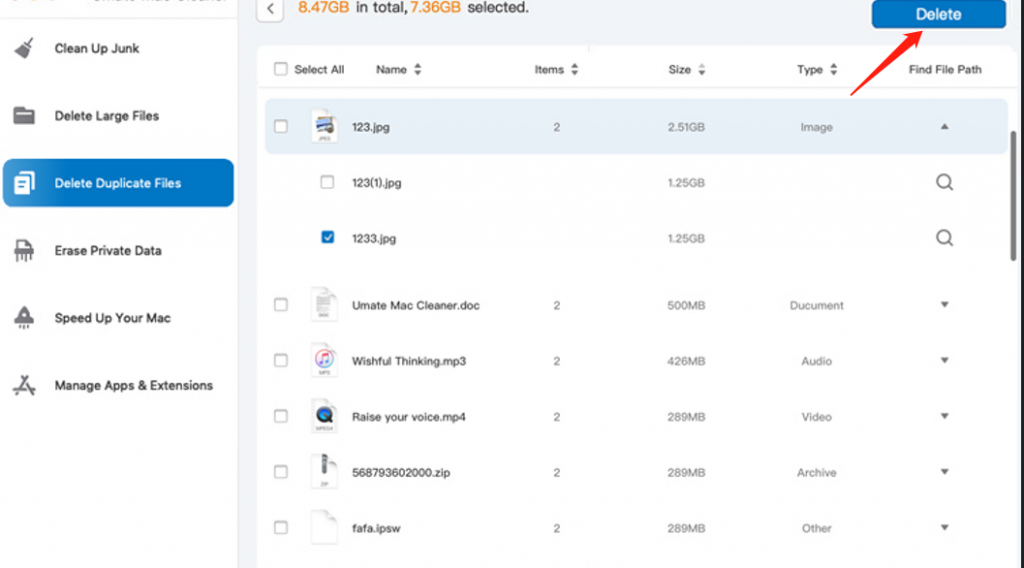
Step #5: Delete the File/s
To complete the process, the final step is to click on the blue button located in the upper right corner of the window, which will either say Clean or Delete depending on the module you are using. Once you click on the button, you may need to wait for a few seconds or minutes while the software deletes the selected files.
Conclusion
In addition to learning how to manually erase browsing history from Safari, Firefox, and Chrome, you may want to know how to check history on Safari. Using a browser history removal tool can clear associated data, listed pages, cookies, and broken caches, saving you time. It’s important to clean up your browsing history once in a while if you want to stop spies dead in their tracks.
If you’ve backed up your browsing history in iCloud, you can still manage your Safari browsing history. In today’s data-driven world, companies like Google and Facebook collect massive amounts of information online to gain a competitive advantage.
However, not everyone is comfortable sharing their browsing history, data downloads, or privacy with these profit-driven giants. To browse without intrusion, try our hacks and tricks to clear your browser history items.
Latest Articles