

The average storage capacity of iMac laptops is no less than regular macOS laptops. It has 256GB worth of disk space, so there usually isn’t any difference between their storage capabilities. However, one thing to keep in mind is that iMacs are all-in-one devices, meaning the monitor, the CPU, and its drives are all crammed together. Interestingly, this results in a much smaller remaining storage capacity as the storage drives take up a considerable amount of disk space. As a result, you may have a harder time managing the storage since you’re most likely going to run out of space frequently, but that’s why you’re here.
Though 256GB is frankly not much for a laptop nowadays since files now have large sizes, you can very easily optimize your storage capacity use if you know how to clean up iMac. With that in mind, here are four ways to free up disk space on iMac.

Method #1: Empty The Trash
The Trash contains all the files you deleted recently on your laptop. It’s the Apple counterpart of the Recycle Bin from Windows PCs. It also works the same way, and if you know anything about the Recycle Bin, you’d know that though the files inside it are technically locked or unusable until you recover them, they still take up disk space. That’s why whenever you delete a file, your total remaining disk space won’t decrease, because it only goes to another directory on your laptop, the Trash.
That’s also why it’s advisable to regularly empty the Trash. That way, you permanently delete the files and prevent them from taking storage space from your laptop. With that in mind, here’s how you can empty the Trash:
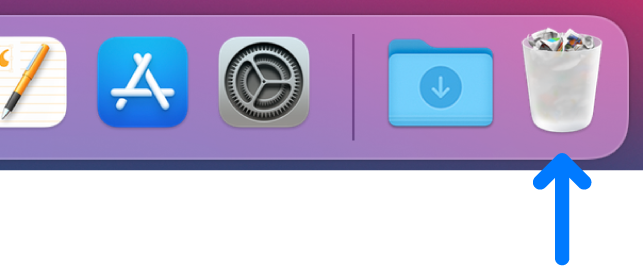
- Find the Trash icon from the Dock. The icon should look like a literal trash bin.
Note: The Dock is located at the bottom of the screen and has the icons of apps you frequently and recently used.
- Click on the icon while holding the Ctrl key on your keyboard.
- Select Empty Trash from the resulting dropdown menu.
Keep in mind that this will permanently delete those files. So, in case there are files you need that you accidentally deleted, you might want to check inside the Trash first and recover those that might be potentially valuable.
Method #2: Uninstall Unused Apps
Just like files, there should also be a couple of apps you no longer need. Here’s how to clean up iMac by uninstalling these apps:
- Click the Launchpad icon from the Dock. Its icon should be a rocket or a square with nine other squares inside.
- You’ll find a list of apps in the Launchpad. To uninstall an app, you must first hold unto the Option key on your keyboard until the apps start jiggling. That means you have entered Edit mode.
- While on Edit mode, every app will have an X icon at its corner. Click this to uninstall an app.
- Select Delete when a popup window appears to confirm your action.

Method #3: Clear The System And App Cache
Whenever you do something on your laptop, the operating system automatically generates the files needed to execute that operation. The same happens when you do something while using applications. The files they generate are called system cache if it was from a system task, or app cache if it’s when you used the app. The cache stake up a considerable amount of disk space, so deleting them is an effective way to clean up any device. With that said, here’s how to clean up iMac by clearing the cache:
- Open Finder on your laptop.
- Click Go from the top menu bar.
- Select Go to Folder… from the dropdown menu.
- When a popup window appears, type in ~/Library/Caches/ if you want to clear the system cache. But if you want to focus first on the app cache, you should instead type in /Users/[YourUserName]/Library/Caches.
- Click Go.
- Once you’re on the folder, find the cache files you want to delete.
Make sure you also delete the files in the Trash to ensure they don’t take up disk space.

Method #4: Use Mac Cleaner
Though the aforementioned methods should be excellent ways to get rid of unnecessary files, they may take several hours if you were to use all of them. That’s because you have to jump from one app to another, look for unnecessary files, and delete them accordingly. Therefore, it’s not very efficient if you were to do it regularly, as it may take a few hours of your time. Moreover, at some point, you may not even find that many files to clean up anymore as you slowly but surely purge all the unnecessary files, making these methods more ineffective over time. That’s why you might want to use Mac Cleaner for regular cleanups.
Mac Cleaner is a cleaning app designed to help users get rid of unnecessary files with just a few clicks. It currently has three cleaning modules that can help with your goal. Below is a step-by-step guide on how to clean up iMac with the app:
Step #1: Open Mac Cleaner on Your Laptop
To start with, you need to get the software on your laptop. To do so, you must click this link. It’ll take you to the Mac Cleaner download site where you’ll find a Download Now button. Click that button to download a DMG file. Once the download is complete, open it to launch the installer. Then, follow the onscreen instructions from that point onwards.

Step #2: Select a Cleaner Module
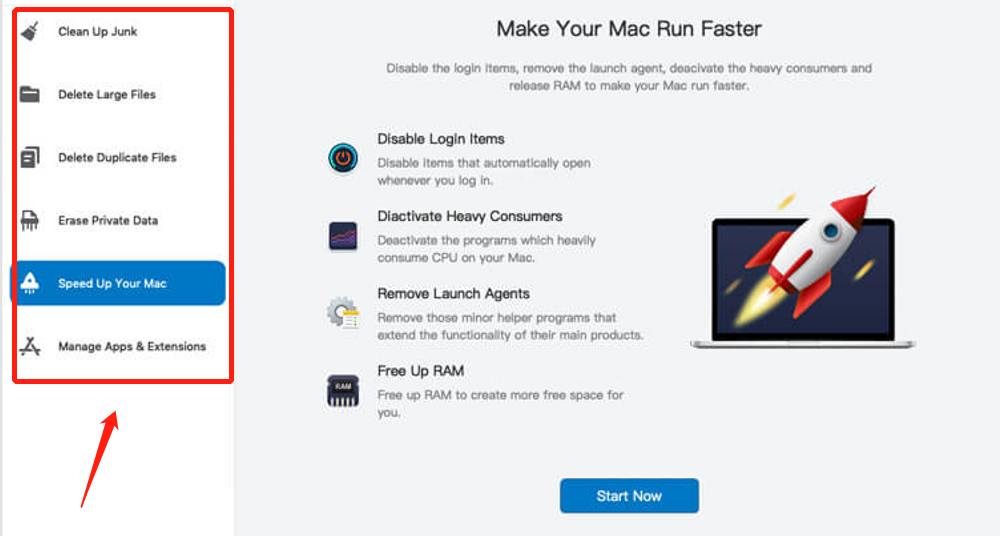
On the left side of the interface, you’ll find six different options. These correspond to the six modules of Mac Cleaner, and these include (1) Clean Up Junk, (2) Delete Large Files, (3) Delete Duplicate Files, (4) Erase Private Data, (5) Speed Up Your Mac, and (6) Manage Apps & Extensions. Since you want to learn how to clean up iMac, you’ll mostly need the first three modules which we like to call the cleaner modules. As the name suggests, they clean your Mac by deleting unnecessary files.
Here’s a look at each of these modules and what they can do:
- Clean Up Junk can scan for and get rid of junk files like the System Junk, App Junk, Trash Bin, iOS Junk, iTunes Junk, Unused Disk Images, and Downloads. It’s an excellent module for reducing your storage disk space.
- Delete Large Files scours the laptop for files larger than 50MB. It then allows you to get rid of those files.
- Delete Duplicate Files can detect and delete files that have extra copies somewhere on the laptop.
To select a module, click on it from the left-hand side of the interface.
Step #3: Scan Your Mac for Files
Your next step is to scan your laptop for files. The exact steps to do that will vary according to the module. With that in mind, here’s what you need to do to scan your iMac for each of the three cleaner modules:
- Clean-Up Junk: The software will be split into two parts. One part says Quick Clean while the other saysDeep Clean. You must select Quick Scan if you want to scan for System Junk, App Junk, Trash Bin, iTunes Junk, and Deep Clean if you want to scan all of those in addition to Downloads, iOS Junk, and Unused Disk Images. Once you select an option between the two, click the Scan button.
- Delete Large Files: Click the Scan button immediately.
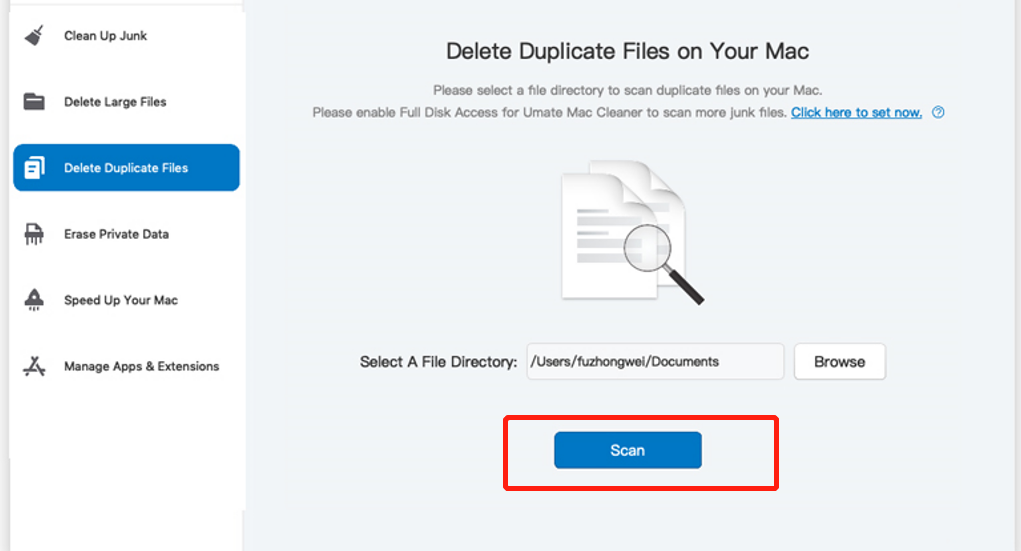
- Delete Duplicate Files: At the center of the interface, you’ll find a field that says Select a File Directory. To its left is the Browse button. Click that button, and when a popup window appears, navigate to the folder that you want to scan for duplicate files. Once you have specified the folder, click the Scan button.
Step #4: Pick a File/s
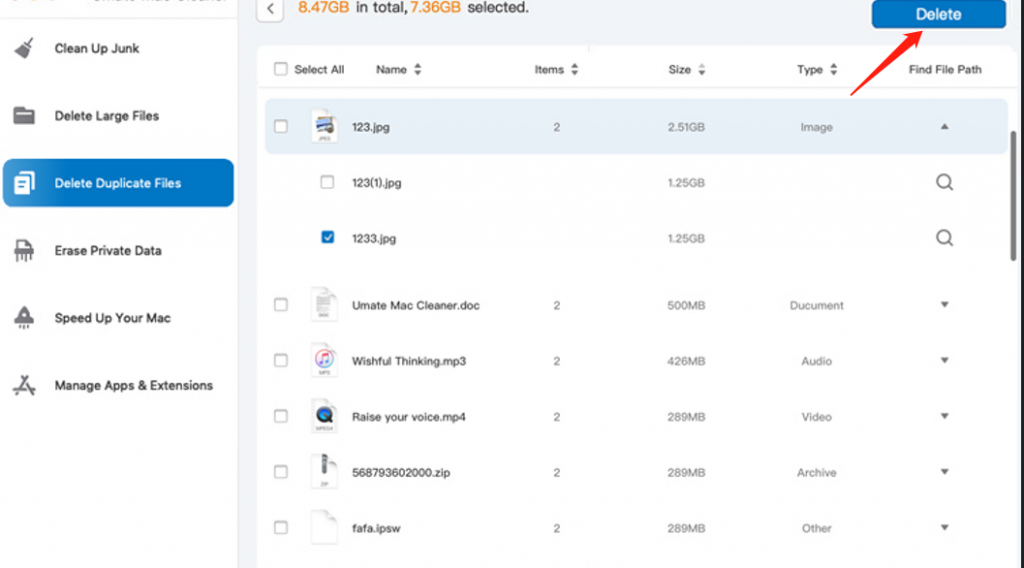
Once the scan is complete, you’ll get a list of items on the interface. What you need to do next is pick the file/s you want to delete. Similar to the previous step, the way to do that will vary from module to module. For the Delete Large Files and Delete Duplicate Files modules, you’ll get a list of items that might be any of the following types: image, video, document, song, folders, etc. Select the ones you want to delete by clicking on their corresponding checkbox. Click Select All if you want to include all items. For Clean Up Junk, you need to select a file category like Downloads, Trash Bin, or iTunes Junk first.

Step #5: Delete the File/s
Regardless of the cleaner module you chose, there will always be a blue button at the top-right corner of the window. But it should either say Clean or Delete. Click that button to finalize the process and delete all the selected items in step 4.
As you can see, it doesn’t actually need to take a long time and effort to clean up iMac. Rather, you just need efficient software, and Mac Cleaner is exactly that. But keep in mind that while the files it can scan are mostly the unnecessary ones, you still have to double-check to ensure you won’t unintentionally delete important files.
Conclusion
As you may have realized, it’s not that difficult to learn how to clean up iMac. With the right tools and guide, you should be able to maintain a reasonable amount of disk space for important files. However, you must keep in mind that there’s a limit to how much you can optimize the storage capacity of your laptop. After all, the operating system is bound to create more and more system files, and whether you like it or not, you cannot delete them. So, at some point, you may not be able to clean up your laptop since all the files are important. That’s when you know you need to buy another external storage drive.
Latest Articles