

MacBook is Apple’s laptop product line and is known to be more expensive than the offerings of other brands like Windows and Linux. For that reason, MacBook users often look for ways to extend the lifespan of their devices.
One such measure that’s fairly effective in extending a MacBook’s lifespan is cleaning up its storage system. How to clean up Mac? By eliminating unnecessary data, you’re potentially removing virus- and malware-ridden files while also saving storage space to store more files. In other words, you’re effectively hitting two birds with one stone with such a strategy.
However, cleaning up a MacBook is easier said than done, as there tend to be larger amounts of junk in a MacBook as opposed to laptops from other brands. But should you really clean up your MacBook, despite the risks of data loss?

Part 1: Is It Advisable to Clean Up Mac?
Though there is indeed an inherent risk of losing valuable files permanently by cleaning up your Mac, it’s still a necessary operation if you wish to keep your device at peak performance. You simply have to create a backup of your files prior to the cleanup process and store it in a different storage location. Alternatively, you can also try to be more careful how you clean up the files to ensure you’re not deleting important data. You must also keep in mind that you don’t necessarily have to clean up files every day. It could be once a week, or if the situation demands it. So, when should you clean up your Mac?
Part 2: When Should You Clean up Mac?
While having a regular schedule is usually an excellent way to time cleanups, there are cases where your Mac would accumulate more files than usual in a shorter amount of time. When that happens, waiting for the schedule would only harm your device. If you wish to clean up your Mac with perfect timing, here are the signs you must look out for:
Check The Storage Via About This Mac
Perhaps the best way to know when a cleanup is due is by checking the storage space of your Mac directly. You can do this by clicking the Apple icon at the top-left corner of the screen and selecting About This Mac then clicking Storage.
This will take you to a window where you can find a breakdown of your storage, including the used and free storage space and the different types of files your Mac has. Keep in mind that while you can indeed directly check the available storage space of your Mac via Disk Utility, there are cases where there’s actually less storage space available than shown in its storage breakdown. Hence, you must also rely on other signs to determine whether your Mac requires a cleanup or not.

You Can’t Install Updates
Before a Mac computer can perform updates, it must first download the executable file or firmware necessary. It then extracts that file’s contents across different locations of your Mac. In other words, updates require storage space. If you can’t install updates, this is an indication that your Mac no longer has free storage space, and you must clean it up immediately.
You Can’t Install Applications
Just like updates, applications also require a considerable amount of storage space. If you’re not able to install applications normally, as you should, this is a sign that you no longer have available space.
The Mac Is Running More Slowly
Another clear indication that a Mac requires a cleanup is when it’s not running as fast as it should. The slower speed should be fairly noticeable as you must know how fast your Mac has been performing up until now. If you believe it’s slower, it’s high time that you perform a cleanup procedure.
Once you’ve determined that you need to clean up Mac, you must decide what method you wish to use. Yes, there are a handful of ways to clean up Mac, and we’ll discuss six of them here. Let’s start with the first one.
Method #1: Clean Up Caches
If you want to clean up Mac, it’s best to start with the cache. It’s not vital to the computer, for the most part, and caches typically take up a ton of storage space. Keep in mind, though, that there are a few types of caches. Depending on the type, the steps to clean them up will vary. Generally, there are two types of cache you can delete: (1) system cache and (2) browser cache. Let’s start with the steps on how to clean up Mac system cache:
- Open Finder from the Dock.
- Click on Go from the top menu bar.
- Select Go to Folder…
- Type in Library/Caches/ in the empty field and click Go.
- You’ll be taken to the Cache folder. Simply select the files you wish to delete or you can delete the entirety of the system cache if you want. Make sure you delete it from the Trash Bin as well.
This shouldn’t affect your Mac too much that it hinders its functionality. Alternatively, you can delete the cache from your browsers. As an example, we’ll discuss the steps on how to clean up Mac browser cache if you’re using Safari:
- Open your Safari browser.
- Click the Safari icon from the top menu bar.
- Select Preferences.
- Proceed to the Advanced tab.
- Tick the checkbox for Show Develop menu in menu bar.
- Now navigate from the Advanced tab to the Develop tab.
- Click Empty Caches.
This should free up a considerable amount of storage space from your Mac.

Method #2: Delete Files Manually
If you have all the time in the world, you can also simply delete files manually. This is arguably the most straightforward method on how to clean up Mac. Of course, it’ll take up a huge amount of time, but it’s also the least risky since you know exactly what you’re deleting. To delete a file manually, simply select the file, and then press the Delete key on your keyboard.
The file will then go to the Trash. To make sure the deleted file doesn’t actually take storage space, simply navigate to the Trash and delete that file again. While you’re there, you can proceed to empty the Trash to save even more space.

Method #3: Empty The Trash
Though the name of the directory is literally Trash, it’s important to note that files inside the Trash bin on Mac still take up storage space. Since you no longer have a use for its contents anyway, it’s advisable to empty the Trash regularly.
To do so, you must follow these steps:
- Open the Trash from the Dock.
- On the Trash window, click the option that says Empty all of the Trash.
- Alternatively, you can simply right-click the Trash icon and select Empty Trash.
With this, you can very easily empty the Trash on your Mac.

Method #4: Delete Unnecessary Backups
Backups are often created automatically by the macOS to ensure you have a way to resolve irreversible issues by reverting back to the backup. Unfortunately, while they are indeed helpful, backups take up a huge amount of storage space. Therefore, if you ever want to learn how to clean up Mac, you must definitely make sure backups are on the list of things you must clean up. Here’s a look at the steps you must follow to delete unnecessary backups on your Mac computer:
- On the menu bar, click the magnifier glass icon. This corresponds to the Search Bar of Mac.
- Type in ~/Library/Application Support/MobileSync/Backup/ on the search bar.
- Press Return/Enter.
- This should take you to the folder from which all your backups are stored. Simply select the backups you think are no longer necessary. Then, press the Delete key on your keyboard to delete.
Since backups typically have a size of hundreds of MBs or even GBs, deleting a single backup should have a significant impact on the performance of your Mac computer. But of course, you must be careful which backups you delete since you might need one of them in the future.

Part 3: How to Clean up Mac Using Mac Cleaner
One of the issues with Mac computers is that there usually is no way to clean up the storage at once. You must go through each file type or category one by one. For example, you have to clean caches separately from browser caches.
This, of course, can take a considerable amount of time. If you wish to learn how to clean up Mac without spending hours, you might want to use Mac Cleaner—a Mac cleaner tool that allows you to clean up different file types with a few clicks. It’s a much faster way to rid your Mac of junk and other unnecessary data. Here’s how you can use this software:
Step 1. Launch The Mac Cleaner Software
Go to the official website of Mac Cleaner and download the installer from there. Once your download is complete, use the executable file and install the software on your Mac computer. Open it immediately after and proceed to the next step.
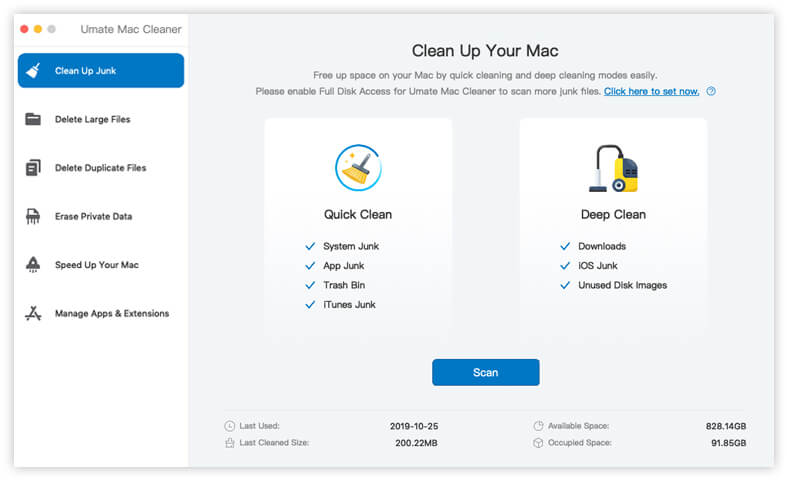
Step 2. Select A Module
Mac Cleaner has six modules. Each module has different functionalities. Since your goal is to learn how to clean up Mac, all six modules will be useful. For your reference, here’s a look at what each module does:
- Clean Up Junk locates junk files on your Mac and gives you the option to delete them. These include System Junk, App Junk, Trash Bin, and more. This module can save you the hassle of looking for junk files manually.
- Delete Large Files targets specifically files that have reached a certain size threshold, 50MB, to be exact. It only detects files that are unnecessary, so there’s no need to worry about deleting valuable files. This is particularly useful if you have a ton of large videos you want to delete but don’t want to bother finding.
- Delete Duplicate Files scans for any file that has an extra copy within the same device, hence the name. You can use this to delete pictures that you copied accidentally in the past. It’s also useful for deleting extra copies of your files that were created automatically when you backed up your Mac previously.
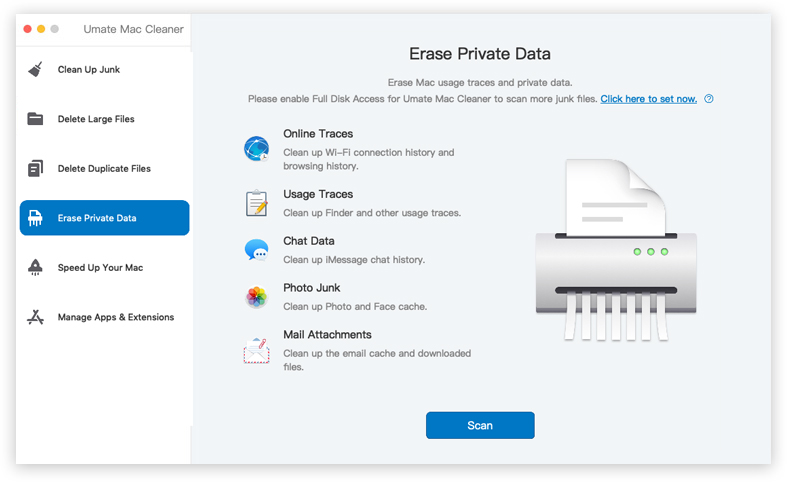
- Erase Private Data focuses on private data or files within your Mac computer. These may include chat data, browsing history, and mail attachments. It’s an excellent module since it locates files that are normally ignored by the built-in cleaning features of Mac.
- Speed Up Your Mac aims to optimize your Mac computer by deleting unnecessary data, clearing your RAM, and such. Unfortunately, it’s not the best for cleaning up Mac, hence why we’ll be skipping this module.
- Manage Apps & Extensions detects applications and extensions and allows you to uninstall/remove them.
You simply need to select a module from these six. These modules should be found on the left sidebar of the software.
Step 3. Scan for Files/Apps/Extensions
Upon selecting a module, the screen will change and you’ll find various information on the selected module. You’ll also find a button at the bottom-middle area of the software, which you must then click to proceed to the next step.
Step 4. Select An Item And Click The Top-Right Button
After the scan procedure is complete, the software will display a list of items, which may vary according to the module you selected. But regardless, you must select an item from this list and click the button at the top-right corner of the screen. If you selected modules #1 to #4, the item will be a file, and the button will Clean, Delete, or Erase that file. If you selected module #5, the items will either be an application or extension, and the button will Uninstall or Remove that item.
With this, you can very easily clean up Mac without moving from one folder to another. In fact, you don’t need to move to any other window except the Mac Cleaner, and you’ll be able to clean up your Mac thoroughly.

Part 4: Wrapping up
Your Mac computer might be performing well, but it’s only a matter of time before it slows down due to old age. That’s why it’s always advisable to clean up your Mac every now and then. That way, you can make space for more important files while deleting potentially virus-ridden files. Of course, you must be careful not to delete valuable files on your Mac. Otherwise, you’ll have to trouble yourself to recover them. With Mac Cleaner, not only can you easily learn how to clean up Mac, but you can also do so without risking your actually valuable data.
Latest Articles