

A laptop’s cache consists of temporary files that certain apps require to launch and operate more smoothly. Browsers, for example, have a cache where they store files that contain the contents of specific sites. With the cache, these browsers are able to load the sites more quickly. Needless to say, the cache is an important component of every device, but they also pose the risk of slowing down your device if it’s too big. It also hogs storage space that you can use for other purposes. The effects are particularly noticeable in laptops like MacBook Air since they have a storage capacity that isn’t all that plenty, to begin with.
The good news is you can clear your cache much like how you can delete junk files from your laptop, albeit with a different set of steps and methods. There are several ways how to clear cache in MacBook Air. Let’s start with the method.

Part 1: How to Clear System Cache in MacBook Air
There are different types of cache. The system cache is temporary files that macOS itself creates whenever you perform a system operation, such as creating a backup, booting up, and more. It’s arguably the largest type of cache, larger than app cache and browser cache since it involves the entire Mac system. But just like the other two, it’s safe to delete system cache files for the most part, but of course, there are exceptions. Anyway, here’s how to clear the system cache in MacBook Air:
- Open the Finder app on your laptop.
- Click the Go tab from the top menu bar.
- Select Go to Folder… from the resulting dropdown menu.
- A popup menu will appear, from which you must type in ~/Library/Caches/.
- Click the Go button. This will take you to the Caches folder.
- Find the cache folders that you think you no longer need.
- Drag them to the Trash.
Once you delete the system cache folders, make sure you go to Trash and delete them again. That way, they don’t take up disk space on your laptop needlessly. But if you think you’ll need to retrieve them later, you can also just wait for 30 days for the deleted files to automatically get erased when the Trash empties 30-day old deleted files.

Part 2: How to Clear App Cache in MacBook Air
When an application launches, it creates a folder where it stores files that it needs to boot up properly. It’s also where it stores files that it requires to perform various in-app operations. These are what they call cache files. Though it’s necessary to boot up and execute operations, they don’t always have to exist. Even if you delete them, nothing will go wrong with the app, though if it needs those files, it’ll simply create them again. Hence, it should be safe to clear the app cache on your laptop.
- On your laptop, open a session of Finder.
- Click the Go tab from the top menu bar.
- Select Go to Folder… from the dropdown menu.
- A popup window should appear. In the text field, type in /Users/[YourUserName]/Library/Caches.
- Click Go.
- The system will then take you to the Cache directory where you can find the folders of each of your apps. Inside the folders are their cache files. Simply find the folders of the apps you think you no longer need.
- Drag the folder into the Trash.
Again, you must delete these files on the Trash as well so they don’t take up storage space on your computer. Also, keep in mind that app caches are mostly required to start the app. Therefore, you can clear the cache even while the app is open.

Part 3: How to Clear Browser Cache in MacBook Air
Browsers also have a cache folder. It contains the files or data that it generates whenever you visit a site. These files are necessary so you can visit sites you’ve already visited more quickly, but they’re not essential. Therefore, it should be safe to clear the browser cache. The steps will vary according to what browser you’re using, so we’ll only discuss the steps for Safari:
- Open the Safari browser on your laptop.
- Click the Safari tab from the top menu bar.
- Select Preferences… from the dropdown menu.
Note: Alternatively, you can simply press Command + , (comma) as a shortcut.
- On the Preferences window, you’ll find numerous tabs. Head to the Advanced tab.
- Tick the box for the Show Develop menu in menu bar.
- Close the Preferences window.
- Click the Develop tab from the top menu bar this time.
- Select Empty Caches.
Note: You can also use the shortcut of Option + Command + E as an alternative.
If you’re using a different browser, like Google Chrome or Firefox, you can just look into the steps to clear their cache on the internet. The same goes for other lesser-known browsers as well, like Operate and Brave. Regardless, all browsers should have a way to clear their cache without doing it manually, as you did for the system and app cache.

Part 4: BONUS: Clean up Your MacBook Air With Mac Cleaner
Though the app, system, and browser cache does take up a considerable amount of storage space, they’re but a portion of what makes up a laptop’s disk. There are other files that are potentially less useful than the cache. If you wish to clean up your MacBook Air, then it’s best if you delete those kinds of files first before the cache. But as one might imagine, it’s not going to be easy since these files are typically scattered throughout the laptop. They don’t have a specific directory, unlike cache.
Mac Cleaner is a software that would be perfect for this job as it allows you to find junk, duplicates, and other unnecessary files and can also delete them accordingly. If you wish to use this software, here’s what you need to do:
Step #1: Open Mac Cleaner On Your Laptop
First off, you need to open a browser and head to the Mac Cleaner download site. There, click the Download Now button. You must then open the file to run the installer. The software should automatically open once the installation is complete.
Step #2: Select Clean Up Junk
You’ll find six different options on the left-hand side of the software. These correspond to the modules that Mac Cleaner has, and they include (1) Clean Up Junk, (2) Delete Large Files, (3) Delete Duplicate Files, (4) Erase Private Data, (5) Speed Up Your Mac, and (6) Manage Apps & Extensions. You simply have to select one of these options. For our purposes, you’ll need to select Clean Up Junk. It scans your laptop for junk files, including Trash Bin, iTunes Junk, Downloads, and most important, System and App Junk. If you didn’t know, system and app junk may include cache files.
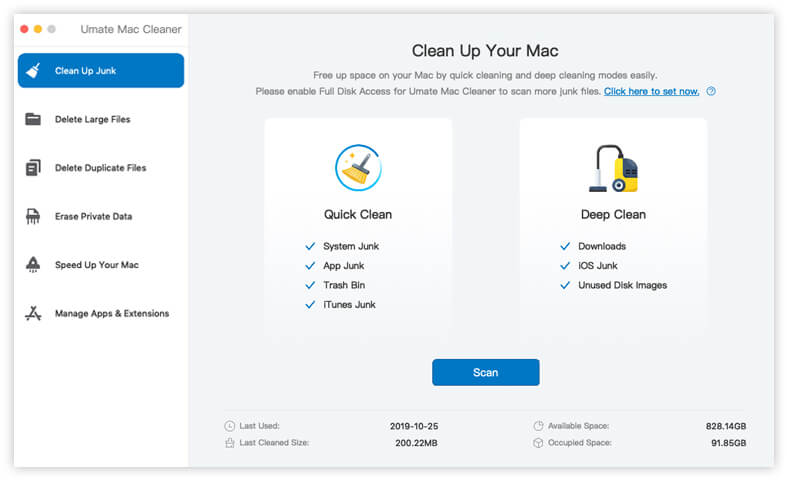
Step #3: Click the Scan Button
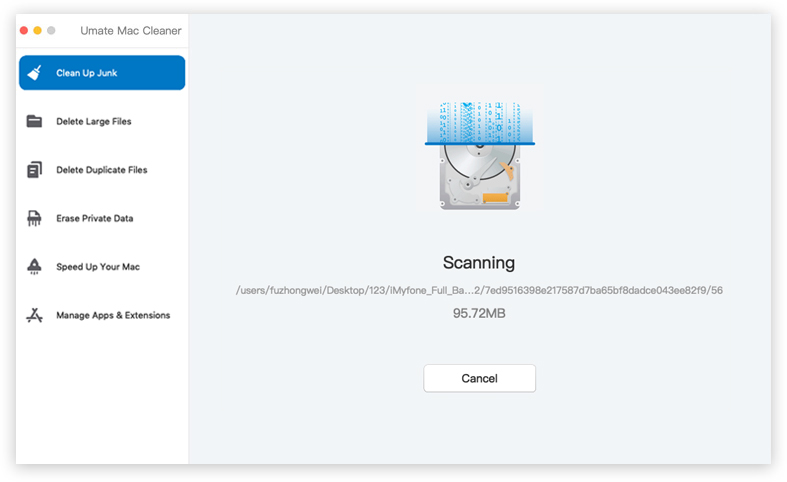
Upon selecting the Clean Up Junk module, you’ll see two options on the interface, Quick Clean and Deep Clean. Quick Clean only scans System Junk, App Junk, Trash Bin, and iTunes Junk. Deep Clean scans those in addition to Downloads, iOS Junk, and Unused Disk Images. Choose between the two. We suggest choosing Deep Clean since it’s more likely to not leave behind files as opposed to the Quick Clean option. Then, click the Scan button to start scanning for files.
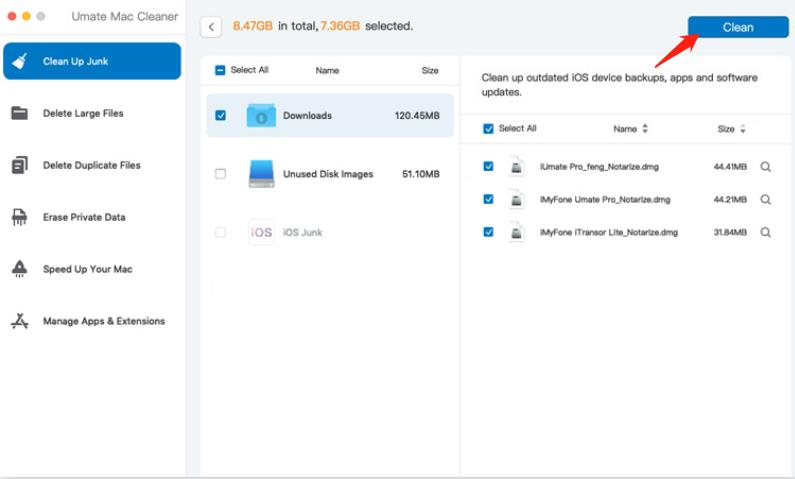
Step #4: Select a File Category and File/s
You’ll find a list of items on the left side of the software, which should include the categories shown in the previous section, like System Junk, Downloads, Trash Bin, Unused Disk Images, etc. Select a category from this list, and once you do that, another list will pop up on the right side of the software. These are the actual files you can delete that belong to the selected category. Select the files you wish to delete by clicking their checkboxes. Click Select All if you want to delete all items in the list.
Step #5: Click the Clean Button
To finalize the process, you simply have to delete the selected files by clicking the Clean button at the top-right corner of the window. After doing so, wait for a few seconds or minutes for the cleaning process to complete.
Though there’s no guarantee that the cache will appear in the scan, it doesn’t matter that much if your main goal is to free up storage space. Even if you ignore the cache, you can still delete unnecessary files and clear your disk space considerably with this tool. The best part is you can do it manually without repercussions.
Conclusion
Cache brings both advantages and disadvantages to your laptop. It can speed up the operation of certain files, but it can also slow down the laptop in its entirety when there’s too much. However, that doesn’t make them any less important. If your storage is no longer sufficient, then clearing the cache is a good idea. But that’s not always going to be the case. At the end of the day, the decision to clear cache is up to you, and if you do decide to push through with the decision, you already know what to do and how to clear cache in MacBook Air now that you’ve read this guide.
Latest Articles