Google Drive is a popular cloud storage service that allows you to store, share, and access your files from anywhere. However, with the increasing amount of data that we store on our Google Drive, it’s not uncommon to have duplicate files. Having duplicates not only takes up valuable storage space but also makes it difficult to manage your files effectively. In this blog, we will discuss some methods to delete duplicates in Google Drive.
Part 1: Why Do You Have Duplicates in Google Drive?
There are several reasons why you may have duplicates in Google Drive. Some common reasons are:
- Manual copying: You may have manually copied files or folders from one location to another, resulting in duplicates.
- Multiple devices: If you use Google Drive on multiple devices, such as a computer, phone, or tablet, you may end up with duplicates if you save the same file on different devices.
- Shared files: If you collaborate with others on a file or folder in Google Drive, they may accidentally create duplicates.
- Backup and sync: If you use Google Backup and Sync to back up files from your computer to Google Drive, you may end up with duplicates if you back up the same file multiple times.
- Third-party apps: Some third-party apps that integrate with Google Drive may create duplicates when you use them to upload or download files.
It’s important to regularly check for duplicates in Google Drive to keep your files organized and avoid wasting storage space.
Part 2: How to Remove Duplicates in Google Drive
If you have duplicates in your Google Drive, you can follow these steps to remove them:
- Use Google Drive’s “Duplicate Finder” add-on: Google Drive has a free “Duplicate Finder” add-on that you can use to locate and delete duplicates. To access it, go to “Add-ons” in the top menu bar of your Google Drive, select “Get add-ons,” and search for “Duplicate Finder.” Once you have installed the add-on, follow the instructions to scan and remove duplicates.
- Use the “Shift” key: If you have a lot of duplicates in a folder, you can use the “Shift” key to select multiple files at once. Simply click on the first file you want to delete, hold down the “Shift” key, and click on the last file in the series. This will select all of the files in between. Then, right-click and select “Remove” or press the “Delete” key.
- Use a third-party tool: There are several third-party tools available that can help you remove duplicates in Google Drive. Some of these tools are free, while others require a subscription. Examples include Duplicate Cleaner for Google Drive, Google Drive Duplicate Finder, and UnDuplicate.
- Manually remove duplicates: If you only have a few duplicates, you can manually remove them by right-clicking on the file and selecting “Remove” or pressing the “Delete” key. Keep in mind that if you have multiple copies of a file, you will need to delete each copy individually.
- Use Google Drive’s built-in duplicate detection: Google Drive has a built-in duplicate detection feature that can help you find and remove duplicates. To use this feature, go to the “Settings” menu in your Google Drive and select “General.” Then, scroll down to “Suggestions” and check the box next to “Find duplicates.” Google Drive will then scan your drive for duplicates and suggest files to remove.
Overall, there are several ways to remove duplicates in Google Drive. You can use a third-party tool or Google Drive’s built-in features to help you locate and delete duplicates quickly and efficiently.

Part 3: How to Remove Google Drive Duplicates Locally
Removing Google Drive duplicates locally is similar to removing duplicates on any other storage device on your computer. Here are the steps you can take:
- Open the Google Drive folder on your computer. If you don’t have the folder installed, download and install it from the Google Drive website.
- Use the search bar at the top of the folder to search for duplicate files. Use keywords like “copy” or “duplicate” to find files with those terms in their names.
- Select the duplicates you want to remove. To select multiple files, hold down the Shift key and click on each file. To select non-consecutive files, hold down the Ctrl key (Windows) or Command key (Mac) and click on each file.
- Once you have selected the files you want to delete, right-click on one of them and choose “Move to Trash” (on Mac) or “Delete” (on Windows). Alternatively, you can press the Delete key on your keyboard.
- Empty the Trash or Recycle Bin to permanently delete the duplicates. Right-click on the Trash (Mac) or Recycle Bin (Windows) and choose “Empty Trash” or “Empty Recycle Bin.”
Note: Be careful when deleting files locally as it may affect the files on your Google Drive. Always make sure you have a backup of important files before deleting them. Additionally, deleting files locally will not delete them from Google Drive unless you delete them from there as well.

Part 4: How to Use the Google Drive Web Interface to Delete Duplicates
If you have duplicates in Google Drive, you can use the web interface to delete them. Here’s how:
- Open your web browser and navigate to Google Drive.
- Log in with your Google account if you’re not already signed in.
- Click on “My Drive” to view your files and folders.
- Click on the “Search Drive” bar at the top of the screen and enter a search query for the file type or name that you want to find duplicates of. For example, if you want to find duplicate PDF files, you can enter “.pdf” in the search bar.
- Google Drive will display all the files that match your search criteria, including duplicates.
- Select the duplicate files that you want to delete by clicking on the checkbox next to them.
- Once you’ve selected all the duplicates you want to delete, right-click on one of them and select “Remove” from the context menu.
- In the confirmation dialog box, click “Remove” to permanently delete the selected files from Google Drive.
Note: Deleting files from Google Drive will also remove them from any linked devices or shared folders. Be sure to double-check before deleting any files to avoid accidentally deleting important data.
Part 5: How to Use the Google Drive Desktop App to Delete Duplicates
The Google Drive desktop app is another option you can use to remove duplicates from your Drive. Here are the steps you can follow:
- Download and install the Google Drive desktop app on your computer.
- Once installed, sign in to your Google account.
- In the settings, make sure that the option “Sync My Drive to this computer” is checked. This will ensure that all files and folders in your Drive will be synced to your computer.
- Wait for the sync to complete. This may take some time depending on the size of your Drive.
- Once the sync is complete, open File Explorer (Windows) or Finder (Mac).
- Navigate to the folder where your synced Google Drive files are stored. By default, this folder is named “Google Drive“.
- Search for duplicate files using the methods described earlier in this article, such as sorting by name or using a duplicate file finder tool.
- Once you have identified the duplicate files, select them by holding down the Ctrl (Windows) or Command (Mac) key and clicking on each file.
- Right-click on the selected files and choose “Move to trash” (Windows) or “Move to bin” (Mac).
- The duplicates will now be moved to the trash or bin, where you can permanently delete them or restore them if needed.
Note that deleting files using the Google Drive desktop app will also delete them from your online Drive account, and vice versa. So be sure to double-check that you are deleting the correct files before proceeding.
Part 6: Delete Duplicates in Google Drive using Mac Cleaner
In order to delete duplicates in Google Drive, there are several other files that you can eliminate to delete duplicates in Google Drive This may include system cache, junk files, and more. Mac Cleaner is a software that can help with this task. It can scan your computer for unnecessary files and delete them accordingly.
Step #1: Download, Install, and Set Up Mac Cleaner
To start using Mac Cleaner, the first step is to download and install it. Begin by opening a browser and navigating to the Mac Cleaner download page. On the page, locate the “Download Now” button and click it to download the DMG file. After the download is finished, extract the contents of the DMG file and install the software onto your computer. You might require a DMG opener or a ZIP tool to extract the contents. If you’re uncertain about where to start, follow the onscreen instructions. After installation, the software should automatically open up.
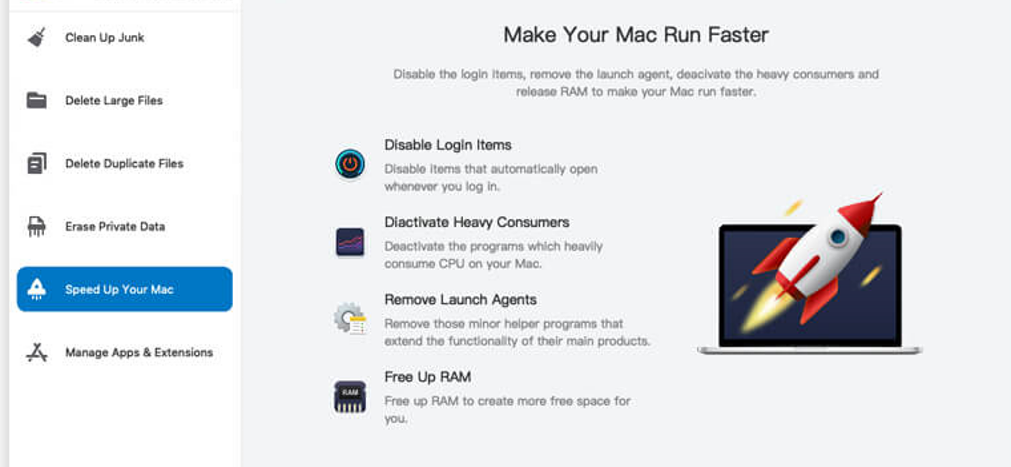
Step #2: Choose a Module
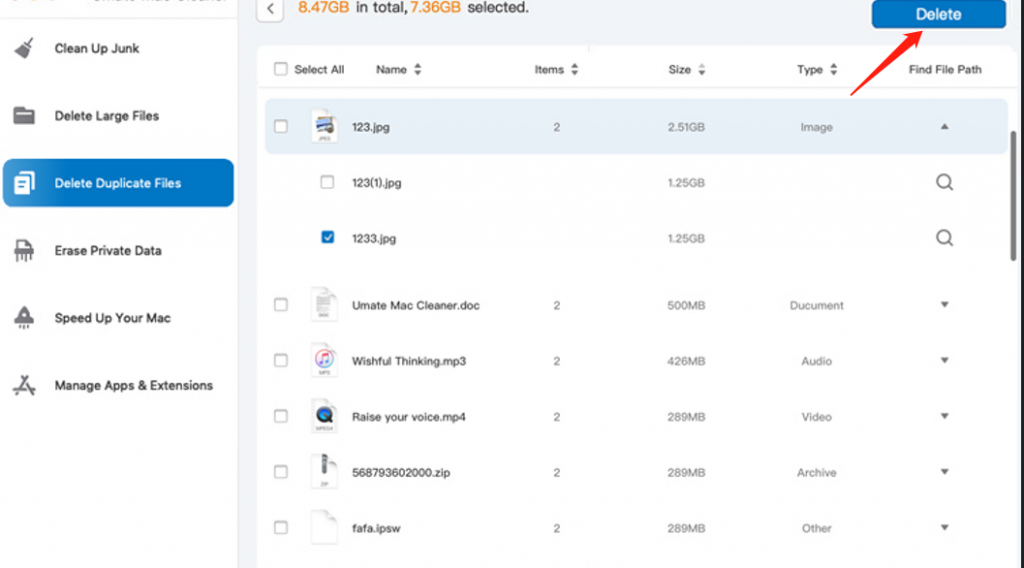
In the second step, you need to select a module from the Mac Cleaner software, which has six different modules – Clean Up Junk, Delete Large Files, Delete Duplicate Files, Erase Private Data, Speed Up Your Mac, and Manage Apps & Extensions. While each module has its respective features, we’ll only be using the first three modules, as they’re the most effective in freeing up storage space by deleting unnecessary files. Here’s a brief description of each module:
- Clean Up Junk: It examines your computer for temporary files or junk files such as System Junk and App Junk that are no longer useful to your computer.
- Delete Large Files: This module scans your computer for files larger than 50MB and allows you to delete them to free up storage space.
- Delete Duplicate Files: It checks a specific folder for duplicate files and lists the files with corresponding copies, allowing you to delete them.
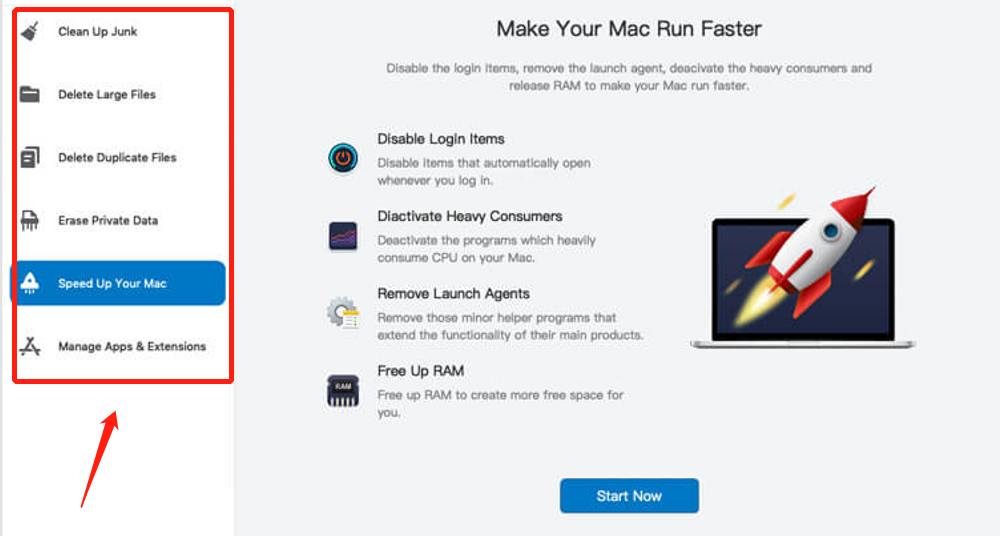
Step #3: Click the Scan Button
Once you have chosen a module, the software will present you with information about it. If you’re interested, you can read the details to learn more about the module. When you’re ready to proceed, simply click the Scan button located in the center area.
However, if you’re using the Clean Up Junk module, you’ll need to choose between Quick Clean and Deep Clean first, as these options will scan for different types of files. The software provides information on this. Additionally, for the Delete Duplicate Files module, you’ll need to select a directory by clicking the Browse button and choosing a folder from the Select a File Directory field.
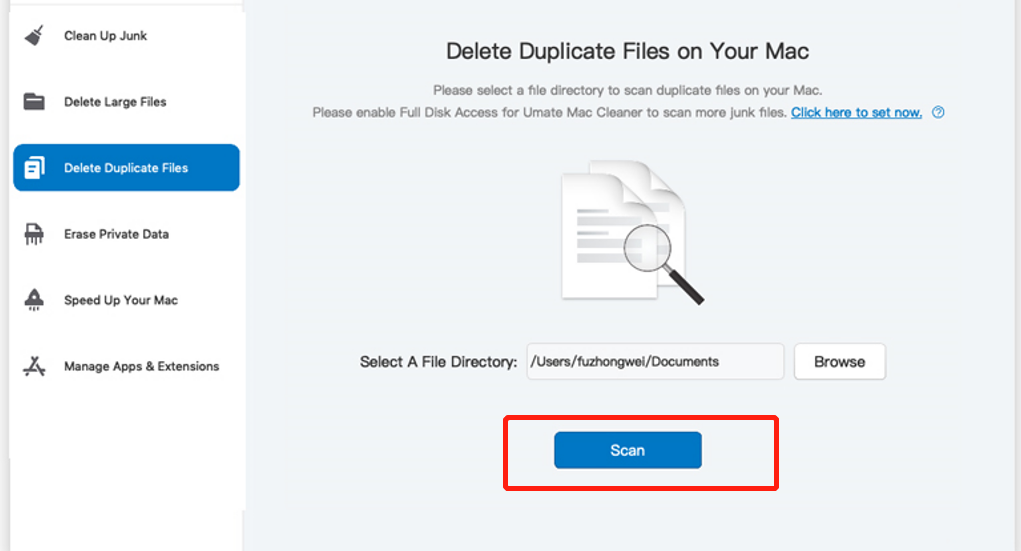
Step #4: Choose an Item/File
Once the scan is complete, a list of items that can be deleted from your computer will be displayed, which may take some time. To select the files you want to delete, simply click the corresponding checkboxes. Alternatively, you can click “Select All” to choose all of the items.
However, for the Clean Up Junk module, you need to first choose a file category from the left side of the interface before you can view a list of files. These categories may include System Junk, Trash Bin, and more. Once you select a file category, the list will appear on the right side of the interface, where you can select the files you want to delete.
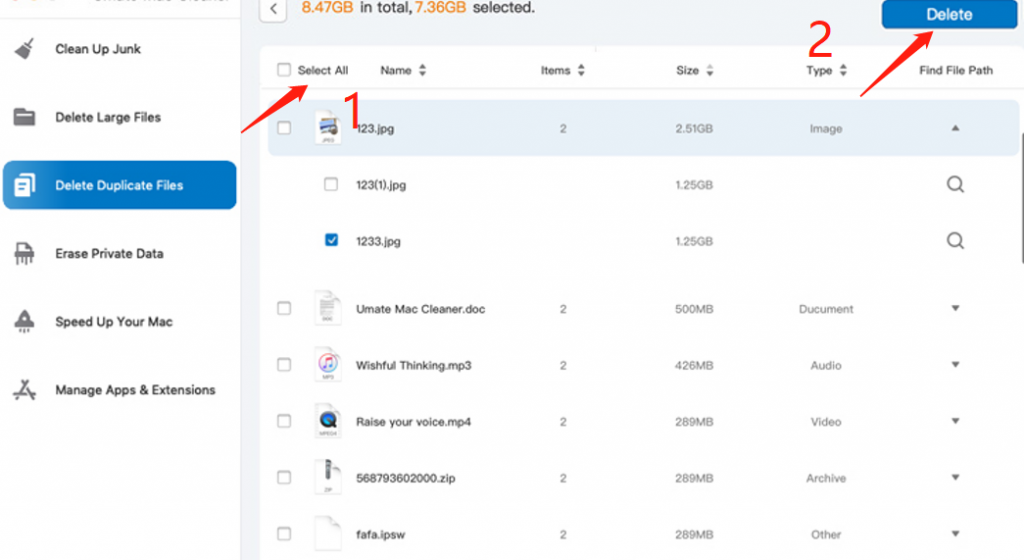
Step #5: Delete the Files
To delete the selected files and free up space on your computer, click the blue button located at the top-right corner of the page, which should be labeled Clean or Delete depending on the module used. Once the files are deleted, you’ll notice that there were more useless files on your computer than you first thought, not just the duplicates in Google Drive. This highlights the usefulness of tools that can scan and remove unnecessary files.
Conclusion
Having duplicates in Google Drive can be frustrating, but it’s not impossible to manage them. By using the methods mentioned above, you can easily find and delete duplicates in Google Drive.
Whether you choose to use the web interface, desktop app, or third-party tools, make sure to regularly clean up your Google Drive to keep it organized and free from unnecessary duplicates. Note that deleting files from Google Drive will remove them permanently, so make sure to double-check before you delete anything.
Latest Articles