

If you want to use a font on a word processing software like Microsoft Word or Pages, you must first download its file and upload it into the Fonts directory. And if you’ve been doing this since you had your macOS computer, chances are you’ve already downloaded hundreds if not thousands of fonts throughout the computer’s entire lifespan. While it may not necessarily be the largest in terms of file size, it can be annoying to have to sift through numerous fonts just to find the one you’re looking for.
If you’re tired of going through this trouble as well, it would go a long way to know how to delete fonts on Mac. But before you get to that, you must first understand how fonts work, and how exactly they get into your macOS computer in the first place.
Part 1: How to Add Fonts on Mac
When you buy a computer, you may notice that it immediately has a bunch of fonts. That’s because these fonts are called system fonts, and they’re built into the device as soon as you get them. But fonts can also find their way into your computer by means of installation. Basically, you download the font file, then copy that into the Fonts folder. Here’s how you add a font:
- Download the font from the internet. You may have to pay for premium fonts if they have a price.
- Open the Font Book app.
- You’ll find a plus icon somewhere at the top menu bar. Click that button.
- When a popup window appears, use it to navigate to the folder where the downloaded files are.
- Select the files that correspond to the fonts.
- Click Open.
If you don’t want to download a font from a third-party site, you can instead download system fonts with these steps:
- Open Font Book app.
- Click All Fonts from the left sidebar.
- Find and select the system font you want to download from the list.
- There should be an Install Font button somewhere on the right side of the interface. Click that button.
That’s how one populates their computer’s Fonts folder. The same process goes into deleting them.

Part 2: How to Delete Fonts on Mac
As stated earlier, adding and deleting fonts follows roughly the same process. Here’s how it usually goes:
- Open the Font Book app on your computer.
- Find the fonts you want to delete.
- Select them. You can select multiple fonts by holding the Command key on your keyboard.
- Press the Delete key on your keyboard.
- A popup window will appear. Click Remove to confirm your decision.
That’s pretty much how to delete fonts on Mac. Keep in mind that like most files when deleted, the fonts will go to the Trash. If your main goal was to free up disk space on your computer, then we would suggest you go to the Trash then empty it promptly.
That way, the fonts don’t take up space even if they’re no longer available for usage. Now, if you’re unsure whether deleting your fonts is the right move, you can always export them so when it turns out you need them later, you can revert the deletion process by essentially using the export as a backup or as a way to recover the deleted fonts.

Part 3: How to Export Fonts on Mac
In case you didn’t know, exporting files means extracting elements from an app to turn them into files. Once that’s done, you can then access the files and do it as you will. In this case, you can store it in a safe place, perhaps your iCloud account.
To export fonts on macOS computers here’s what you need to do:
- Open the Font Book app on your macOS computer.
- Find the fonts you want to export.
- Select them by simply clicking on them. Again, you can select multiple fonts by holding the Command key.
- Click File from the top menu bar.
- Select Export Fonts from the resulting dropdown menu.
- A popup window will appear. Use it to navigate to the folder where you want to export the fonts.
- Once you’ve selected the folder, click Save.
With the files exported, it should now be fine to delete the fonts on Mac as you please. You don’t have to worry about losing them permanently or installing them all over again as you can simply get the exported fonts and copy-paste them into the Font Book once again. And since you already know how to add fonts on macOS computers, that shouldn’t be much of an issue either.
Part 4: BONUS: Use Mac Cleaner to Free Up Space
As previously mentioned, a singular font is at most a hundred KBs in file size. Even if you manage to delete a thousand fonts at once, that’ll only yield a free disk space of 100MB, which isn’t really that substantial. In fact, it’s a bit negligible. If your goal for learning how to delete fonts on Mac is to simply free up space on your macOS computers, your best bet would be to focus on other file types. The problem is how you would have to deal with them, but that’s not an issue with Mac Cleaner.
Mac Cleaner is a cleaning app that allows you to get rid of a variety of files from your computer. These include junk files like system cache and app cache or large files. If you want to use the Mac Cleaner software, here’s what you need to do:
Step #1: Open Mac Cleaner on Your Computer/Laptop
The first step is to get the software, and you can start by clicking this link. It will take you to the software’s download site. On that page, there will be a button that says Download Now. Click that button to prompt the download of a DMG file, which is the extension for installers in macOS computers. Once it completes the download, open the DMG file to start the installer. Follow the onscreen instructions onward. The software will open automatically once the installation is complete.

Step #2: Select Clean Up Junk
Mac Cleaner currently has six different modules, namely (1) Clean Up Junk, (2) Delete Large Files, (3) Delete Duplicate Files, (4) Erase Private Data, (5) Speed Up Your Mac, and (6) Manage Apps & Extensions. You’ll find these as options in the left sidebar of the interface. Each module allows you to do different things, but for our agenda, you’ll mostly need the Clean Up Junk module. That’s because it’s the safest way to free up space on your computer. After all, it can target junk files like System Junk, App Junk, Trash Bin, iOS Junk, iTunes Junk, Unused Disk Images, and Downloads. You can select Clean Up Junk from the software by clicking on it from the left side of the interface.
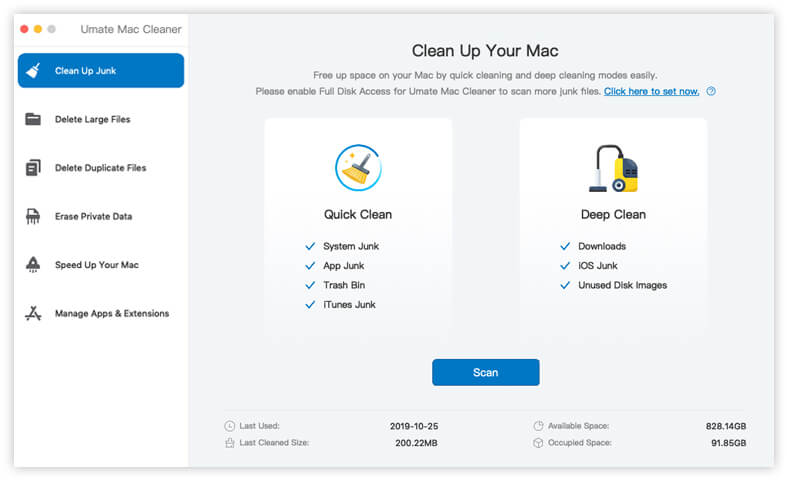
Step #3: Click Scan
The Clean Up Junk module is unique in that it has two different types of scanning methods. Each one obviously has its own strengths. The first scanning method, Quick Clean, allows you to get rid of the following file types: System Junk, App Junk, Trash Bin, and iTunes Junk. Its strength is that it does it fairly quickly. Meanwhile, the second method, Deep Clean, scans the computer for far longer, but it can scan the aforementioned file types in addition to three more, including Downloads, iOS Junk, and Unused Disk Images. We suggest choosing Deep Clean if you’re not in a hurry. After doing so, click the Scan button.
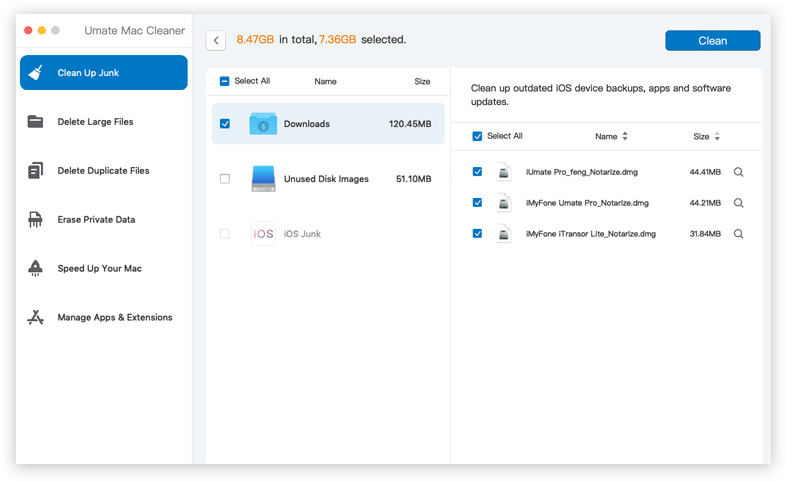
Step #4: Pick a File Category and File/s
After the scan, the software will take you to the new page, and it should consist of a list found on the left side of the interface. There, you’ll find different items, and they mostly correspond to the file categories mentioned earlier, such as System Junk, Downloads, Trash Bin, and Unused Disk Images, among many things. Select a category from this list. Upon doing so, a new list will appear on the right side of the interface. There, you’ll find actual files that belong to the selected category. Select files from that list by clicking on their corresponding checkboxes. You can also click Select All if you want to include all items in the list.

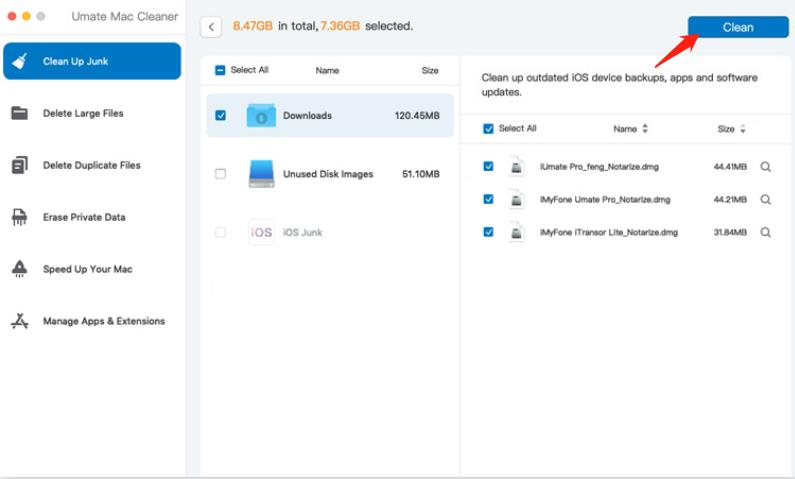
Step #5: Delete the File/s
To finalize the process, the last thing you need to do is click the Clean button found at the upper right corner of the window. It’ll allow you to get rid of the items that you selected from the previous step, though it may take a while for it to finish the process.
Conclusion
With this, you now know of a couple of ways how to delete fonts on Mac. It might be a little bit of a hassle, but it’s certainly going to be worth it. You’ll find that it becomes much easier to manage your fonts, and if you’re looking for a specific one, you don’t have to find it like a needle in a haystack. Perhaps the main issue with deleting fonts is that when you open a document with a font you don’t have, the text will turn to the default font. With that in mind, practice moderation when deleting fonts.
Latest Articles