

This is a complete guide to tell you how to delete locked files on Mac.
Though not many macOS users know this, you can lock a file if you want. It’s practical in many situations. For example, if you have a document with ten versions, you can lock one of those versions if you don’t want anything to happen to it. Perhaps you want to lock the original version or the final version. That way, you either don’t lose the original, or you don’t lose progress by accidentally deleting or changing the final version. By locking a file, you’re essentially preventing anything from happening to it. It won’t get deleted, modified, or affected by certain commands. The way to lock a file isn’t that difficult or complex either.
How to Lock a File on Mac
To lock a file on a macOS device, you simply have to follow these steps:
- Click on the file while holding the Ctrl key on your keyboard.
- Select Get Info from the dropdown menu.
- Tick the box for Locked located at the bottom of the popup window.
Note: In other macOS versions, instead of a Locked checkbox, there’s a padlock icon at the bottom-right corner of the window. Clicking it will lock/unlock the file or folder depending on its current status, whether it’s locked or unlocked.
You can use this method on any file or folder as long as it’s closed. If it’s a file, it won’t work if it’s open. In addition to the deletion limitations of a locked file, there are other things you need to know about them. For one, when you move a locked file to a different directory or folder other than the Trash, the system automatically creates a copy of it. Then, it moves that copy to your chosen folder. That way, the locked file remains untouched, while your action of moving the file is still fulfilled.
Furthermore, if you attempt to change a locked file, like typing in text in a locked document, a warning message will appear asking whether you want to create a duplicate of the file to make the change, unlock the existing file, or cancel the edit.
Now, if you’re more interested in how to delete locked files on Mac, here’s a list of the viable methods:

Method #1: Delete Locked Files Anyway
When you delete a locked file on your macOS computer or at least attempt to, a warning message will appear. It’s different from the message you’ll find when you try to edit a locked file. Instead of giving you the option to duplicate the file or unlock it, the warning message instead gives you the option to either Stop the operation or Continue.
If you want to delete the file anyway, you simply have to click the Continue button. This will always appear regardless of whether you tried to delete one file, two files, or a hundred. If you selected an unlocked file and locked file together and deleted them, the warning message will also appear, but not before the system deletes the unlocked files first. This is your best option for how to delete locked files on Mac. However, there are certain scenarios where this wouldn’t be very ideal.
Method #2: Unlock the Files First
If you’re not fond of immediately deleting files without unlocking them first, this is the method for you. Instead of deleting it right away, you can instead unlock the files for a streamlined process. There are three ways to go about this method.
- Simple Unlock: You can unlock the files the same way you locked them. Simply uncheck the Locked box.
- Batch Unlock: If you have a ton of files to unlock, doing the simple method will take a long time. For a quicker process, you can instead select all the locked files (make sure all of them are locked), the press Option + Command + I on your keyboard. That will open only one Get Info window for all the files. You can then uncheck the Locked box.
- Command Unlock: The last way to unlock a locked file is by using the Terminal and entering a command. This method is suitable if the locked files are spread through several folders. All you have to do is open the Finder app, click Applications from the left sidebar, find and open the Utilities folder, then find and double-click the Terminal icon to open it. On the Terminal, type in chflags -R nouchg folder_name. Replace the “folder_name” where all the locked files or folders are located. Then, press Enter. That will unlock all the files on that specific directory or folder.
Once you successfully unlock the files, you simply have to delete them the way you delete regular files, by either pressing the Delete key on your keyboard or dragging them to the Trash icon from your Dock. It’s up to you how you go about this method.

Method #3: Use a Locked File Delete App
If you can’t be bothered to unlock or delete the locked files on your macOS computer by yourself, you can instead use a third-party app that specializes in this specific task. Yes, there are tools and apps out there designed to delete locked files.
What app you’ll use will depend entirely on your preferences, but make sure you get one that’s free since these third-party apps don’t really help much aside from making the process a little bit easier. What’s worth it is an app that allows you to not only delete locked files but also delete other files that are often difficult to find and delete, like Mac Cleaner.
Method #4: Try Out Mac Cleaner [RECOMMENDED]
Mac Cleaner is a cleaning app that allows you to get rid of all kinds of files, including junk files, large files, duplicates, and even apps and browser extensions. What makes it ideal for your objective is that it can also automatically delete locked files without issue. Perhaps the main downside to the app is that it may not be able to detect all the locked files on your computer given that it only detects unnecessary files. However, it’s also an advantage in the way that it prevents data loss.
The difference between Mac Cleaner and the apps mentioned earlier that specialize in deleting locked files is that it can also detect these files, regardless of their location. Hence, you won’t have to jump from one folder to another looking for the locked files you want to delete. With that being said, here’s how you can use the Mac Cleaner software:
Step #1: Open Mac Cleaner on Your Computer/Laptop
The first step is to get the software, and you can start by clicking this link. It will take you to the software’s download site. On that page, there will be a button that says Download Now. Click that button to prompt the download of a DMG file, which is the extension for installers in macOS computers. Once it completes the download, open the DMG file to start the installer. Follow the onscreen instructions onward. The software will open automatically once the installation is complete.

Step #2: Select Clean up Junk
Next, you need to select a module that you’ll use for your objective. If you didn’t know, Mac Cleaner has a total of six modules, including (1) Clean Up Junk, (2) Delete Large Files, (3) Delete Duplicate Files, (4) Erase Private Data, (5) Speed Up Your Mac, and (6) Manage Apps & Extensions. Each one has different functionalities. For your objective, you need the Clean Up Junk module as it allows you to detect junk files like System Junk, App Junk, Trash Bin, iOS Junk, iTunes Junk, Unused Disk Images, and Downloads. Locked files can belong to any of these categories. Select the module by clicking on it from the left sidebar.
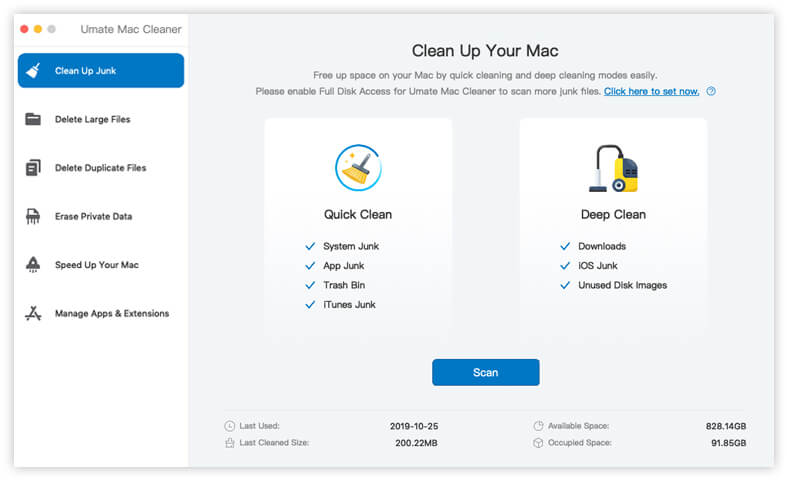
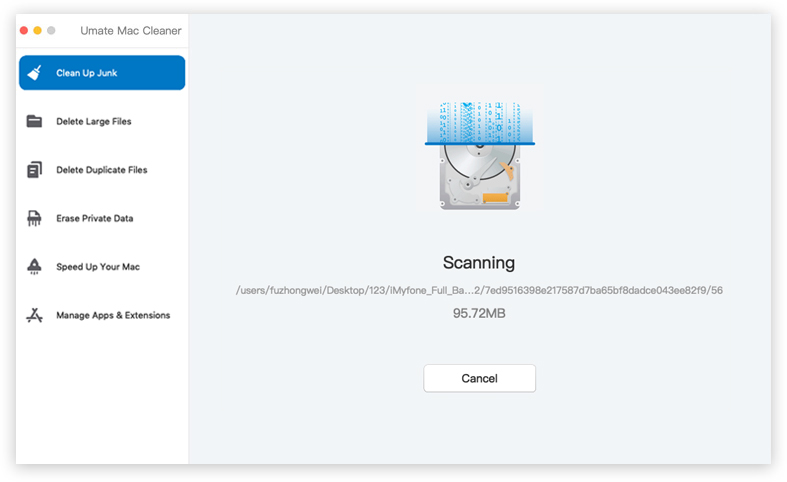
Step #3: Click the Scan Button
On the software, you’ll find two scanning methods. One is Quick Clean, while the other is Deep Clean. You should almost always select Deep Clean since it’s more accurate, scans all the file categories it can scan, and it can find more files than Quick Clean. The only downside is it takes longer. You can select Quick Clean if you’re in a hurry. After selecting a scan option, click Scan.
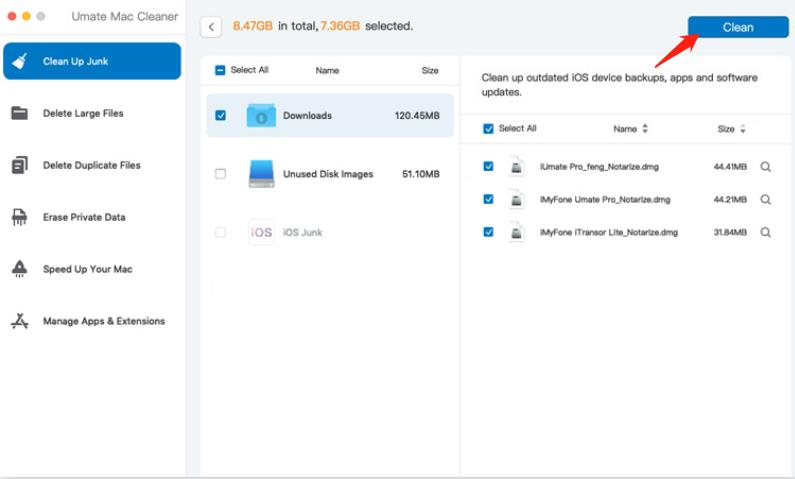
Step #4: Pick a File Category and File/s
The next window will have a list on the left side of the interface. It will consist of file categories, including Trash Bin, Downloads, System Junk, and the like. Select what you want to start with first. Upon doing so, a new list will appear on the right side of the interface. This time, it consists of actual files. Select files by clicking their checkboxes. You can click Select All to select them all.

Step #5: Click the Clean Button/Delete the File/s
Once you think you selected all the locked files on your computer that you no longer need, click the Clean button located in the upper right corner of the window. That should take a few minutes or even seconds if it’s fast, but it’ll finalize the process.
Wrapping Up
Though many macOS users make it seem like deleting a locked file on a computer is difficult, it’s actually rather easy, as you may have realized in this article. You only have to click one or two extra buttons compared to deleting a regular file. But the issue isn’t that it’s difficult to learn how to delete locked files on Mac, but more on how to delete them in the most convenient possible. So far, using tools like Mac Cleaner is the most convenient method if you’re dealing with multiple files.
Latest Articles