

As we accumulate more and more files on our Macs, it can be easy to lose track of where certain files are stored. Whether you’re looking for a specific document or trying to free up space by identifying large files, it’s essential to know how to find files on your Mac hard drive. In this article, we’ll explore some methods to help you find files on your Mac hard drive.

Method 1: Using Spotlight
Spotlight is the search feature built into macOS that allows you to quickly find files, folders, applications, and other content on your Mac. Here’s how to use it to find files on your hard drive:
- Step 1: Click on the magnifying glass icon in the top-right corner of the screen or press Command + Spacebar.
- Step 2: Type in the name of the file you’re looking for.
- Step 3: The search results will appear in the Spotlight window, and you can click on any result to open it.
- Step 4: You can also use the filters on the left-hand side of the Spotlight window to narrow down your search results by file type, date modified, and more.
Method 2: Using Finder
Finder is the default file manager on macOS, and it provides a range of tools for managing and finding files on your hard drive. Here’s how to use Finder to find files on your hard drive:
- Step 1: Open a new Finder window by clicking on the Finder icon in the Dock or by pressing Command + N.
- Step 2: Click on the “All My Files” option in the sidebar.
- Step 3: You can use the search bar in the top-right corner of the window to search for a specific file by name.
- Step 4: You can also use the filters at the top of the window to narrow down your search results by file type, date modified, and more.
Method 3: Using Terminal
If you’re comfortable using the command line interface, you can also use Terminal to find files on your hard drive. Here’s how to use Terminal to find files on your hard drive:
- Step 1: Open Terminal by searching for it in Spotlight or by navigating to Applications > Utilities > Terminal.
- Step 2: Type in the following command and press Enter: find / -name “[file name]”
- Step 3: Replace [file name] with the name of the file you’re looking for.
- Step 4: The command will search your entire hard drive for files that match the name you specified and display the results in the Terminal window.
Why analyze disk space usage on Mac?
Analyzing disk space usage on a Mac is important for several reasons:
- Freeing up storage space: When your Mac’s hard drive is running low on storage space, it can slow down your computer’s performance and affect its functionality. By analyzing disk space usage, you can identify which files and folders are taking up the most space and decide which ones to delete or move to an external hard drive, freeing up valuable storage space.
- Preventing data loss: If your hard drive is full, there is a higher risk of data loss due to file corruption or system crashes. Analyzing disk space usage helps you identify files and folders that are at risk and prioritize backing up important data to prevent data loss.
- Identifying unnecessary files: Over time, your Mac can accumulate unnecessary files, such as duplicates, temporary files, and cache files. Analyzing disk space usage helps you identify these files so that you can delete them, freeing up valuable storage space and improving your Mac’s performance.
- Improving organization: By analyzing disk space usage, you can identify which files and folders are taking up the most space and organize them in a way that makes it easier to find what you need quickly. This can save you time and increase productivity.
Overall, analyzing disk space usage on a Mac is an essential maintenance task that can help keep your computer running smoothly, prevent data loss, and improve productivity.

How to manually find the “space eaters’ on Mac
Here’s how to manually find the “space eaters” on a Mac:
- Open Finder: Click on the Finder icon in the Dock or go to the Applications folder and double-click on Finder.
- Go to the “All My Files” view: In the Finder window, click on “All My Files” in the left-hand sidebar. This view shows all the files on your Mac, sorted by type and date.
- Sort by size: Click on the “Size” column to sort the files by size, with the largest files at the top.
- Identify large files and folders: Look for files and folders that are taking up the most space on your Mac. These could include large applications, videos, music files, or documents.
- Drill down into folders: If you see a folder taking up a lot of space, double-click on it to open it and see what files are inside. You can then sort by size again to identify the largest files in that folder.
- Delete or move large files: Once you’ve identified the largest files and folders, decide which ones you no longer need and delete or move them to an external hard drive to free up space on your Mac.
Alternatively, you can use third-party disk space analyzer tools such as DaisyDisk, Mac Cleaner, or OmniDiskSweeper to help you identify large files and folders on your Mac more quickly and easily.
How to Find and Remove the Biggest Files on Mac Using Mac Cleaner
Mac Cleaner is a third-party app that can help you quickly and easily identify what is taking up space on your Mac and remove unwanted files. However, be careful when deleting files, and make sure you don’t delete any important system files or documents.
Mac Cleaner is a software tool developed to assist users in removing specific files, including large files such as iPhone backups, which tend to occupy significant storage space on your Mac. Here are the steps to find and remove the biggest files on Mac using Mac Cleaner:
Step #1: Launch Mac Cleaner on Your Computer
To begin, launch Mac Cleaner on your computer. First, open a web browser and navigate to the download page for Mac Cleaner. Click the “Download Now” button to download the DMG file. After the download is complete, open the file and follow the onscreen instructions to install the software. Once the installation is complete, Mac Cleaner will launch automatically.

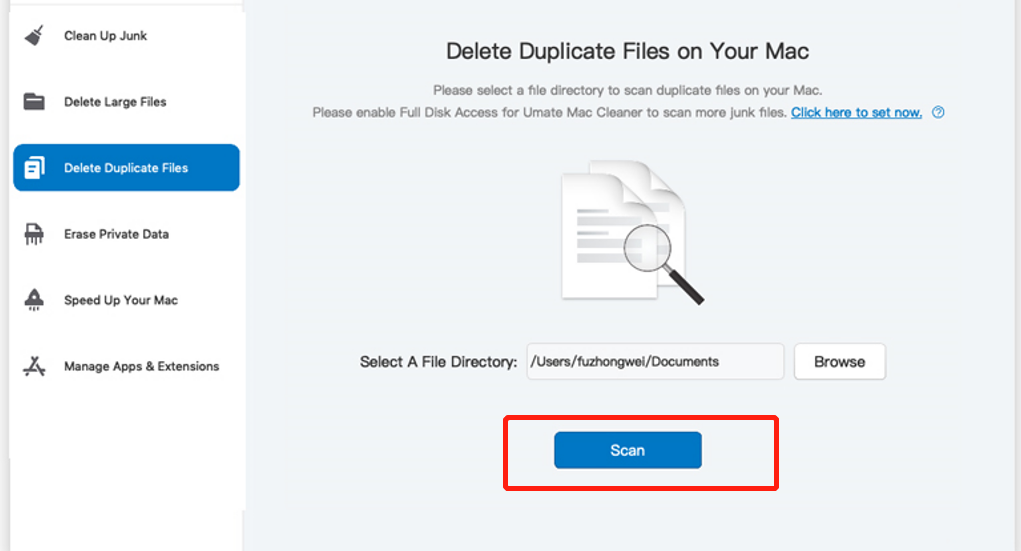
Step #2: Choose the Delete Large Files Module
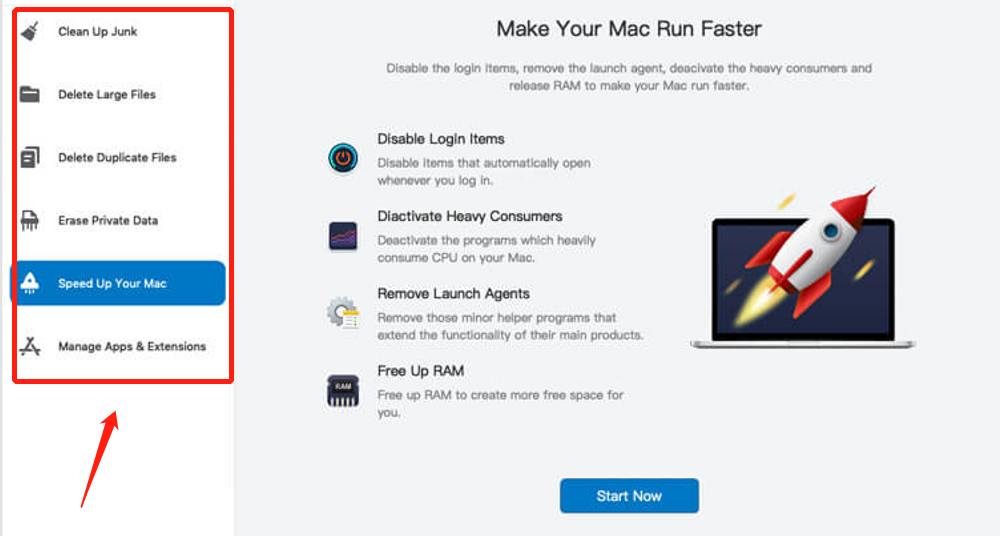
Next, select the “Delete Large Files” module from the sidebar on the left-hand side of the software. Mac Cleaner offers six modules including “Clean Up Junk,” “Delete Large Files,” “Delete Duplicate Files,” “Erase Private Data,” “Speed Up Your Mac,” and “Manage Apps & Extensions.” The “Delete Large Files” module allows you to find and remove files that are over 50MB in size. To select the module, click on the option in the left sidebar.
Step #3: Click Scan
After selecting the “Delete Large Files” module, you will notice a change in the software’s appearance, and a “Scan” button will appear. Click on the “Scan” button to proceed. The software will then lead you to a list of items that correspond to files larger than 50MB.
Step #4: Choose a File/s
You can determine this by viewing various details about each item, such as their file type, size, and when they were last used. If you can’t find the iPhone backups, click “Select All” to include all items. Mac Cleaner will analyze your Mac’s storage and identify the biggest files.
Once the scan is complete, you’ll see a list of files and folders sorted by size. Click on the “Large Files” category to see the biggest files on your Mac.
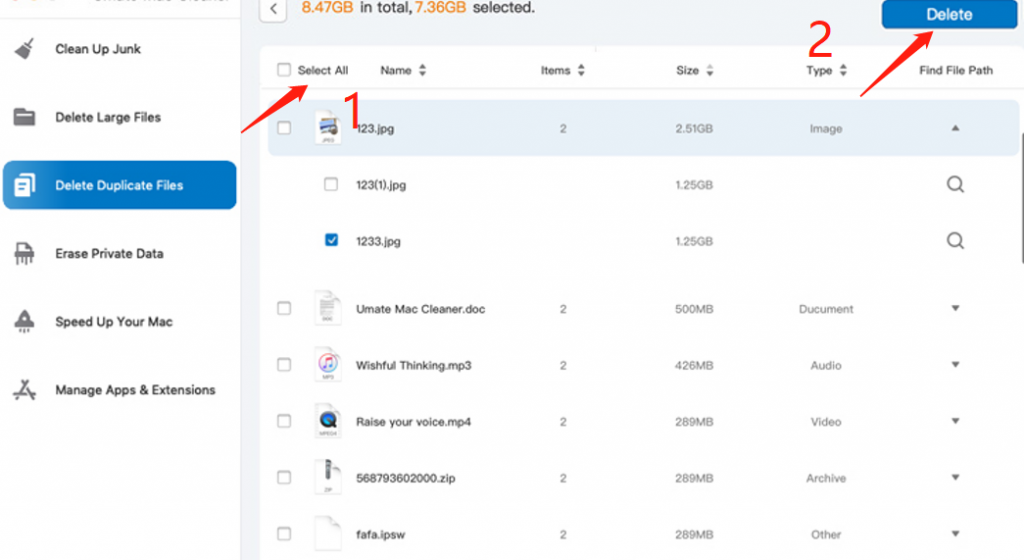
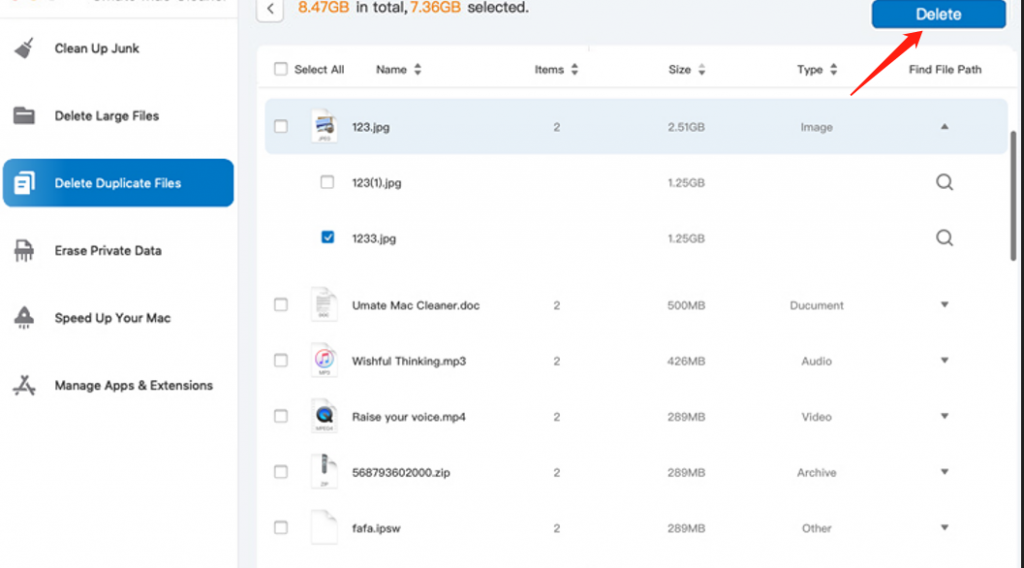
Step #5: Delete the File/s
To complete the process, click on the “Delete” button at the top-right corner, which will start the deletion process of the selected files. This may take some time, but it should be the last step you need to take. Using tools like Mac Cleaner is more efficient compared to previous methods, as you don’t need to find the backup directory, and it can bypass encryption or protection. However, be cautious while using the software to ensure that you don’t delete important files.
By using Mac Cleaner, you can quickly and easily find and remove the biggest files on your Mac, including those that may be taking up valuable storage space, and keep your computer running smoothly.
Conclusion
In conclusion, there are several ways to find files on your Mac hard drive. Whether you prefer to use Spotlight, Finder, or Terminal, it’s important to know how to locate files on your hard drive. With these methods, you can quickly find the files you need and manage your storage space more efficiently.
Latest Articles