

This article tell you how to free up RAM on Mac.
RAM, short for random access memory, is a device’s short-term memory. It stores data the processor needs when you perform various tasks on the computer. For instance, whenever you open an application, it consumes an amount of RAM from the operating system. Some generate small chunks of data, while others generate massive chunks of data. The size of the data each operation generates equates to how much RAM they consume. For this reason, when you open up numerous applications at once, your computer RAM would eventually get full, which can lead to various consequences.
What Happens If RAM Is Full on Mac?
There are several things that can happen when the RAM gets full on Mac. Below are a few examples of what these might be:
- Your computer gets considerably slower
- Some of the apps crash or freeze randomly
- There’s a bit of delay between typing and the computer’s receipt of the input
- It takes ages to load certain sites or apps
- You may encounter various error messages concerning memory
Not only can this issue get annoying, but it can also result in long-term damage to your computer. For that reason, if you suspect you’ve run out of RAM or are at least about to run out of RAM, you must free up some of it, one way or another, and this article will guide you throughout the process. Here’s how to free up RAM on Mac in five different ways.

Method #1: Force Quit RAM-Hungry Applications
Though there are several things that consume RAM, what takes up most of the RAM in a computer are applications, or more specifically, heavy-duty applications. These may include intensive apps like Photoshop or video games that require a ton of memory, like Minecraft. Fortunately, you can very easily free up RAM by simply closing these applications. If that’s your plan, you’ll need to use the Force Quit function built-in on Mac computers. The Force Quit feature on Mac is essentially a way to close applications without opening its window and clicking the X button at the top-right corner.
It’s the ideal method for when the particular app is not responsive or is freezing, which is perfect for our purposes since freezing is quite common when the RAM is full. Here’s how you can use Force Quit:
- On your Mac, click the Apple icon at the top-left corner of the screen.
- Select Force Quit from the resulting dropdown menu.
- On the Force Quit window, choose the app you wish to close.
- Click the Force Quit button at the bottom of the window.
Note: Alternatively, you can press Option + Command + Esc on your keyboard to open the Force Quit window.
Alas, apps aren’t the only ones running on your computer that are consuming RAM. There’s also what we call processes.

Method #2: Stop Demanding Processes
Background processes are essentially pieces of software that run in the background of your computer, meaning you cannot see them on your Dock. You also typically can’t find them in the Force Quit window as it only includes apps. Though each process doesn’t consume much RAM, the main problem is that there are too many processes. Hence, you must strive to stop them as soon as possible. For this, you’ll have to use yet another built-in function in Mac called the Activity Monitor.
As the name suggests, the Activity Monitor allows you to monitor processes currently running on your Mac. There, you can find information like the GPU and CPU usage of each process, as well as the amount of memory they use.
For that reason, it’s relatively easy to see which processes are consuming your RAM, and you can stop them using the built-in Stop feature on Activity Monitor. Here’s how to free up RAM on Mac using the Activity Monitor functionality:
- On your Mac, open Finder.
- Navigate to the Applications folder.
- Open the Utilities folder.
- The Utilities folder contains utility apps, including Activity Monitor. Simply find and open it from this folder.
- The Activity Monitor should have five tabs, one of which is Memory. Click that tab.
- Find the processes that have the highest value under the Memory column and select them.
- Click the X button at the top-left corner of the window.
In the Activity Monitor, you can also check how much RAM your Mac currently has remaining and the amount that’s currently being used by apps and processes. It’s a fairly useful utility as it gives a lot of information to users.

Method #3: Check Your Peripheral Devices
Other than apps and processes, there is yet another thing that consumes RAM, and that is your peripheral devices, like speakers, headsets, keyboards, monitors, and the like. This is because when you plug in any of these devices, the computer automatically allocates storage for them if they ever need to generate files. With that in mind, if you think your RAM is too low for no reason, it might be because a peripheral device is consuming a lot of it. Hence, you must check whatever is connected to your Mac computer and unplug them individually to determine which is causing the problem.

Method #4: Restart Your Mac
Whenever one encounters an error with their computer, the first thing that comes to mind is to restart it. Though it doesn’t always work, there’s a reason why this is the first response of most people to computer issues—it’s simple, easy, and why bother dealing with complicated stuff if the problem can be solved with a single press of a button. Surprisingly enough, restarting your Mac is one way to free up RAM on Mac. This is because the RAM is just “temporary” storage for files, meaning it resets whenever you shut down your Mac and open it again, thereby freeing up the RAM completely.

Method #5: Utilize Mac Cleaner [RECOMMENDED]
If you wish to free up RAM on Mac as much as possible, you must perform all the aforementioned methods, which may take a while, especially if you’re not exactly a techie. If you don’t have the time to spare, we recommend Mac Cleaner.
Mac Cleaner is a modular program that allows you to clean your Mac in many ways. It can delete unnecessary files, erase private data, and, most importantly, free up RAM. The best part about this is you only need to click a few buttons, and the software will do the rest. It looks for all kinds of ways to free up RAM, meaning it’ll potentially perform methods #1 to #4 with just a few clicks. Without further ado, here’s how to free up RAM on Mac using Mac Cleaner:
Step #1: Open Mac Cleaner
First things first, you must download the Mac Cleaner installer from their official website. Afterward, use the installer to install the software into your computer. And finally, open the Mac Cleaner once the installation is complete.
Step #2: Select the Speed up Your Mac Module
As stated earlier, Mac Cleaner is a modular program, and this is because it consists of six different modules. Each module has different functionalities, and though they each have their own uses, in this particular scenario, you’ll only need the Speed Up Your Mac module. This module allows you to boost your Mac’s performance through its four different functionalities. One such function is the Free Up RAM, which basically allows you to clear your RAM with just a few clicks.
Therefore, you simply have to select the Speed Up Your Mac module to gain access to this functionality. To select a module, click the Speed Up Your Mac option from the left sidebar of the interface, which should also display the other five options.

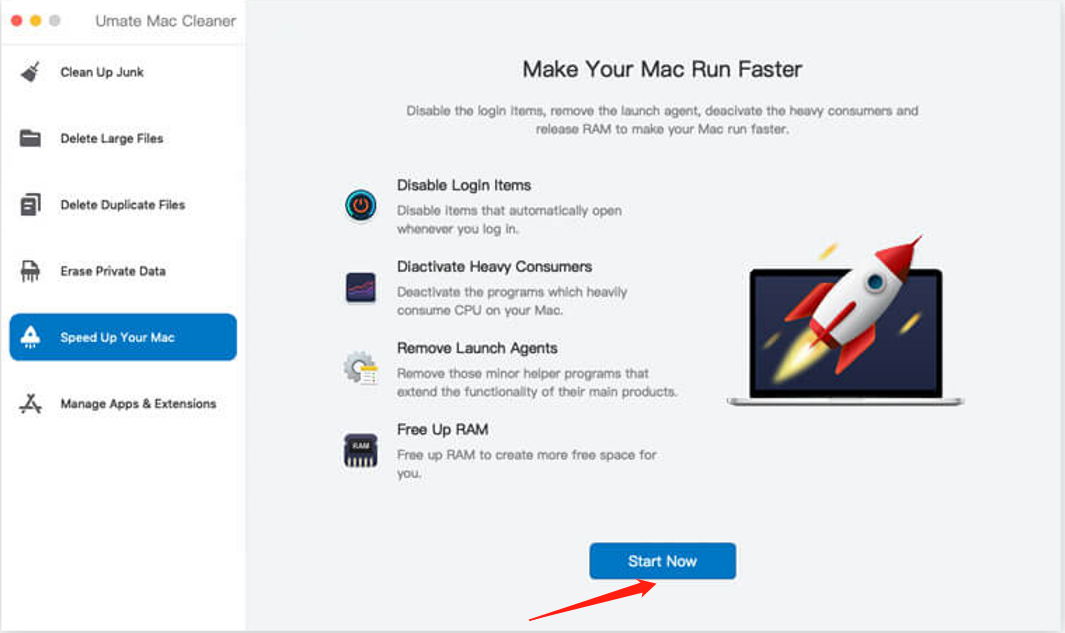
Step #3: Click Start Now
When you select a module, the interface will display information about its features. Selecting the Speed Up Your Mac module, in particular, will show you its four functionalities. Simply click the Start Now button to proceed to the next step.
Step #4: Choose Free up RAM
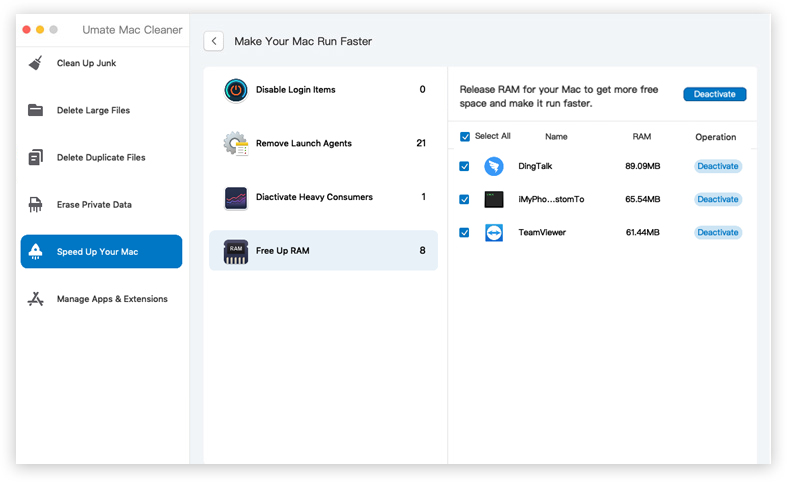
After you click Start Now, the software will start the Speed Up Your Mac module and change screens. On the next screen, you’ll find four different options, including (1) Disable Login Items, (2) Remove Launch Agents, (3) Deactivate Heavy Consumers, (4) and Free Up RAM. Simply choose the Free Up RAM option as your goal is to free up RAM.
Step #5: Deactivate Unnecessary Processes
Once you select the Free Up RAM option, you’ll find a list of items on the right side of the interface. These are the different processes that are currently consuming a portion of your computer’s RAM. Naturally, your goal is to deactivate these so you can free up some RAM. To do this, you simply need to select the process by clicking its corresponding checkbox.
You may also click the checkbox of Select All to choose all the items in the list. Afterward, click the Deactivate button at the top-right corner of the interface to finalize the process and free up RAM that those particular processes are using.
It may not be the simplest to understand, but it’s definitely one of the easiest ways to free up RAM. After all, you only need to click a few buttons, and the software will do the rest. Moreover, it only detects processes that aren’t vital to the Mac. For that reason, you won’t make the mistake of deactivating a process that your Mac needs to operate properly.
Final Words
With this, you can manage your RAM more successfully, which is crucial since the RAM has a lot to do with the performance of your computer. Ideally, you’d want to make sure the RAM isn’t full, as that often leads to a ton of lag and, in some cases, errors. It may not be easy, but with this guide, it should be completely possible. After all, you now have the motivation to manage your RAM as you’re already aware of the consequences of not doing so. Moreover, you now know how to free up RAM on Mac, though we still advise using specialized tools like Mac Cleaner as it’s typically more efficient.
Latest Articles