There are several essential resources in a computer. Disk space, CPU, GPU, and RAM are some examples. Since they’re vital to your macOS computer, running out of them can prove to be detrimental. Running out of disk space, for example, means you cannot have more files on your computer. Similarly, when you run out of CPU and GPU, your computer will slow down considerably. The RAM is particularly important to manage since it affects both the computer’s storage and performance.
Though you can very easily solve disk space shortage by using cloud storage, you cannot do the same with other computer resources. The good news is unlike the CPU and GPU, you can get more RAM if you know the methods.
With that in mind, here’s a look at five ways how to get more RAM on Mac.
Method #1: Activate The Configurable Memory Slots
Certain models of macOS computers come with configurable memory slots. They’re basically memory slots that you can tweak to modify the RAM they provide. For instance, if a memory slot provides 8GB of RAM by default, if it’s configurable, you might be able to set the RAM it gives your computer to 16GB. These models are expensive, so it’s not a method you’d want to rely on if you bought your macOS computer for an affordable price. But here’s how you can use this method anyways:
- Click the Apple icon at the top-left corner of your screen.
- Select About This Mac from the resulting dropdown menu.
- A popup window will appear consisting of five tabs. Go to the Memory tab.
- Click the Memory Upgrade Instructions button.
- Follow the onscreen instructions.
Since the instructions vary from model to model, it’s best to rely on the instructions you’ll find on your computer rather than a pre-defined set of instructions from guides like this. Regardless, that should increase the maximum memory capacity of your computer. But as you might imagine, this method isn’t suitable for most users, so here’s a more accessible method.

Method #2: Force Quit Unnecessary Apps
Though they may not permanently increase the RAM capacity of your Mac, there are ways to temporarily reduce the RAM usage so you can use allocate more RAM on other important matters. One way to reduce the RAM usage is using Force Quit—a feature in macOS computers that allows you to force close apps that are currently open. Here’s how you can use it:
- Press Option + Command + Esc on your keyboard.
- Force Quit should appear with a list of apps open on your computer. Click on the apps you want to close.
- Click the Force Quit button.
That should very quickly close unnecessary apps that are consuming RAM needlessly on your computer.

Method #3: Close Useless Background Processes
If closing apps isn’t enough, perhaps going deeper is needed. In particular, you might need to close background processes—the hidden pieces of software that run on your computer. Background processes usually consume a few hundred KBs of RAM. Though it’s not much, there are typically hundreds of these background processes, so they can pile up to a considerable amount of RAM. Fortunately, you can also close unnecessary background processes if you want, and here’s how:
- Open the Finder app on your computer.
- Select Applications from the left sidebar.
- Find and open the Utilities folder.
- Locate and double-click the Activity Monitor icon.
- Once Activity Monitor is open, go to the Memory tab.
- Find the processes that are consuming too much RAM. You can see how much memory they’re consuming by the number under the RAM column. The higher the number, the more RAM they’re consuming.
- Select the processes you want to close.
- Click the X icon at the top-left corner of the window to close the selected process.
With this, you should be able to get rid of any app and process you want to close, particularly the ones that are consuming too much memory. However, you must also keep in mind that some of these are vital to your macOS computer. If you force close processes recklessly, you might end up crashing the computer, so be careful.

Method #4: Purge The Computer
The fourth method involves using Terminal—the command line of macOS computers that allows you to perform commands by typing in lines of code. Coincidentally, there’s a code for clearing the RAM of your computer, and here’s how you can use it:
- Open Finder on your computer.
- Select Applications from the left sidebar of the window.
- Find and open the Utilities folder.
- Locate and double-click the Terminal icon.
- Once in Terminal, type in the following text: sudo purge.
- Press Enter or Return.
This code should purge the memory of your computer, clearing it in the process. It’s a rather simple command, but a powerful one, so it should work most of the time.

Method #5: Use Mac Cleaner
Though you can indeed get more RAM by simply installing a new memory module, it requires you to spend money, which is often not viable to most people. Moreover, the aforementioned free methods typically take too much effort or time, so they might be too inconvenient. In short, most methods require either too much money or too much time, both of which are unappealing. If you want a fast but cheap method of increasing the RAM of your Mac, we suggest using Mac Cleaner.
Mac Cleaner is an app that can delete unnecessary files. On top of its cleaning features, it can also optimize the computer by minimizing RAM usage, which is perfect for your purposes. To use the software, here’s what you need to do:
Step #1: Download, Install, and Open Mac Cleaner
To start, you must click this link. Doing so will open a browser and take you to the Mac Cleaner download site. There, you’ll find a Download Now button which you must click. It will download a DMG file that corresponds to the installer. Open the file once the download is complete. That should start the installer. Then, follow the onscreen instructions from that point onwards. The Mac Cleaner software should start or open automatically once the installation is complete.

Step #2: Choose Speed up Your Mac
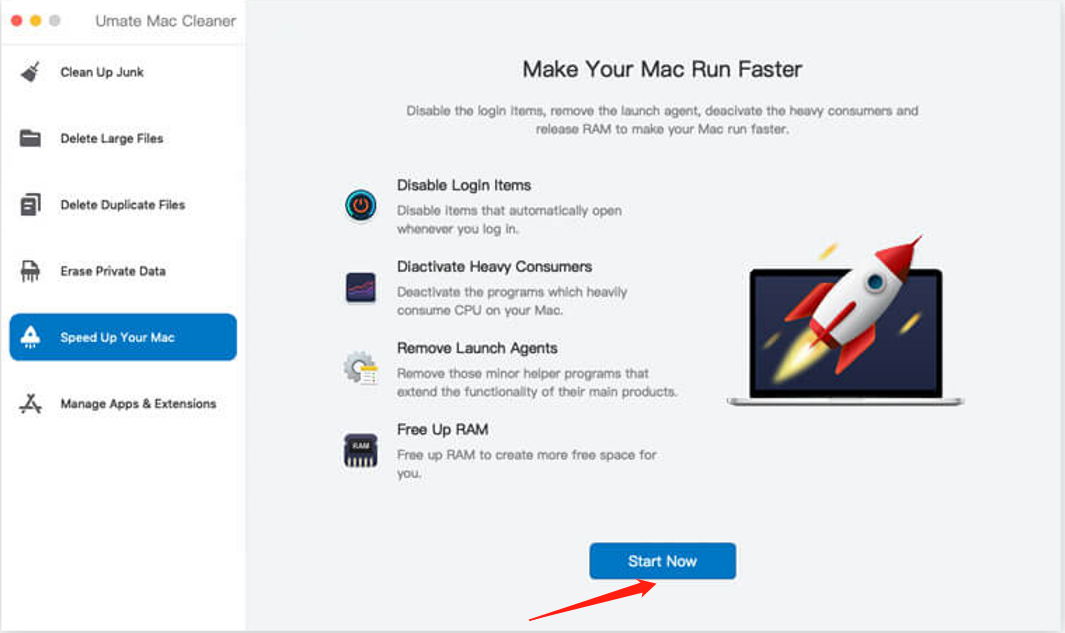
The software currently has six different modules, namely (1) Clean Up Junk, (2) Delete Large Files, (3) Delete Duplicate Files, (4) Erase Private Data, (5) Speed Up Your Mac, and (6) Manage Apps & Extensions. Most of these deal with disk space, so they won’t be the most useful for your purposes. Thankfully, the Speed Up Your Mac has a feature that allows you to reduce the RAM usage of your computer, so it’s the ideal module for your goal. Simply select the module by clicking on it from the left side of the interface.

Step #3: Click Start Now
Upon selecting the module, the interface will show the corresponding information about its features and functionalities. You can read it if you want to learn more about the Speed Up Your Mac module. But to proceed, you must click Start Now.

Step #4: Pick an Action
After you click Start Now, the software will take you to the next page where you’ll find a list consisting of four items. These items correspond to the actions you can take using Speed Up Your Mac. Here’s what each item or action can do:
- Disable Login Items allows you to deactivate apps and processes that automatically open on startup.
- Deactivate Heavy Consumers can disable apps and processes that consume too much CPU and GPU.
- Remove Launch Agents temporarily eliminates the programs that open alongside other apps and processes.
- Free Up RAM can reduce RAM usage by deactivating apps and processes that consume too much of it.
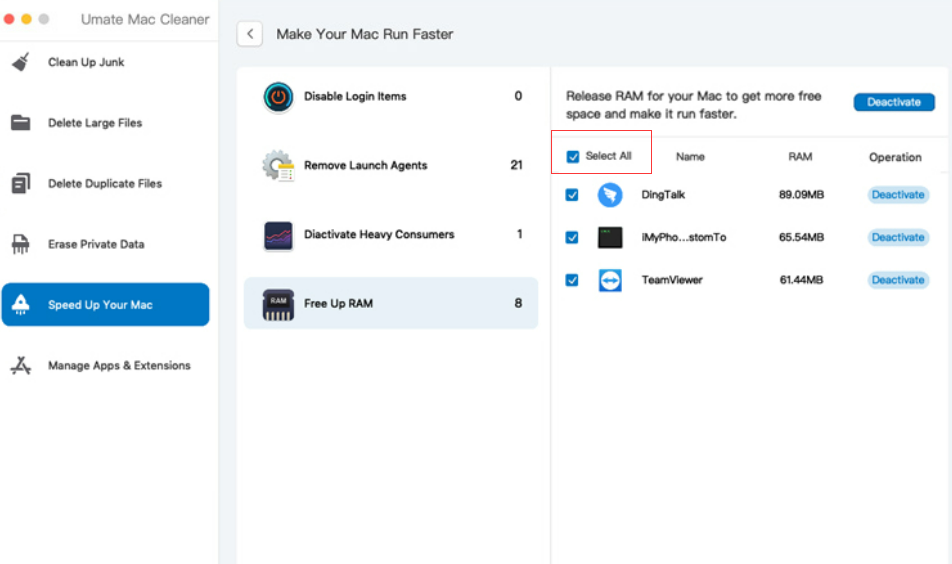
Since your goal is to learn how to get more RAM on Mac, you must select the Free Up RAM option. Upon doing so, a new list will appear on the right side consisting of apps and processes. Select the ones you want to deactivate by clicking on their corresponding checkboxes. You can also click Select All if you wish to deactivate all the applications included in the list.

Step #5: Deactivate the App/Process
To finalize the process, you just have to click the blue button at the top-right corner of the window that says Deactivate. It should take a few minutes or so to execute the task, but once it does, you should feel a noticeable change in the performance.
Keep in mind that this is only a temporary solution. It doesn’t permanently increase the RAM capacity of your computer. It simply reduces the RAM usage so you can use more RAM in the short term. However, while it doesn’t solve the issue permanently, it’s still handy since it only takes a few minutes to complete, so you can do this daily or whenever you want.

Wrapping Up
Though RAM is indeed an important resource for macOS computers, or any device, for that matter, it’s not the only resource you must manage. You must also ensure your computer has sufficient disk space, CPU, and GPU. Otherwise, your computer will still perform poorly even with all the RAM in the world. Thankfully, similar to RAM, you can manage the CPU and GPU by minimizing their consumption, though you can’t easily increase it, unlike the RAM. Furthermore, since you already have access to tools like Mac Cleaner, you can very easily manage your disk space using its other features.
Latest Articles