

Looking to merge multiple folders into one Mac? One way to achieve a duplicate-free Mac quickly is to download Mac Cleaner. However, if you prefer to merge your folders manually, read on for the best tips and tricks. Organizing your computer files can be a challenge, especially when you need to combine files and folders that may contain duplicates or different versions of the same file.
Merging folders on a Mac may not be as easy as dragging and dropping files, but in this article, you’ll discover how to do it without losing any of your files. Discover Finder tips and Terminal tricks that make merging simple. Learn how to merge multiple folders into one Mac now!
Part 1: How to Merge Folders with Terminal
Learn how to merge multiple folders into one Mac with the help of Terminal. The ditto command is a powerful tool to merge folders. However, it’s important to use the commands exactly as they’re typed, as even a minor mistake could result in data loss. Additionally, note that ditto overwrites any duplicate files in the destination folder.
To avoid the problem of duplicate files, it’s recommended to use a duplicate finder like Mac Cleaner before merging your folders. This tool scans your computer or a specified folder for exact duplicates and similar files. To merge multiple folders into one on Mac, follow these steps using Terminal:
- Open Terminal.
- Type “ditto” in the Terminal window.
- Drag the source folder you want to copy into the Terminal window, followed by dragging the destination folder.
- Press the “Return” or “Enter” keys to start the merging process.
Be patient as the process may take some time to complete, depending on the size of the folders being merged.
Part 2: How to Merge Folders with Finder
To merge multiple folders into one on your Mac, you can follow these steps without having to manually drag and drop files one by one:
- Open both folders you want to merge.
- Select all the files in your source folder by pressing common+A.
- Drag and drop the files into your destination folder.
- If any file in your source folder has the same name as a file in your destination folder, a pop-up window will appear. You can choose to Keep Both, Stop, Replace, or Skip the file.
- To avoid the pop-up window for each file with the same name, check the box next to Apply to All.
By following these steps, you can quickly merge multiple folders into one on your Mac without the need for manual file transfers.
Part 3: How to Move Folders on Mac
To avoid selecting individual files, you can move the entire folder. If you want to know how to merge multiple folders into one Mac, hold down the Option key while dragging the folder to the new location. This will prompt a third button called “Merge,” but be aware that this method can get messy. If there are duplicate files with the same name in the folders, Finder will automatically delete the older one and keep the newer version.
Part 4: Find Files Faster, Use Shortcuts and Tags
By using folder titles when searching for files, you can easily locate any item on the go. To view files without opening them, save them with a distinct name based on the date, company, and type of document. Efficient and fluid productivity is promoted and simplified by dedicated Mac organizers, which enable you to add new resources with a one-click system. With all the necessary files at your fingertips, navigating various browsers becomes effortless, saving you time and effort.
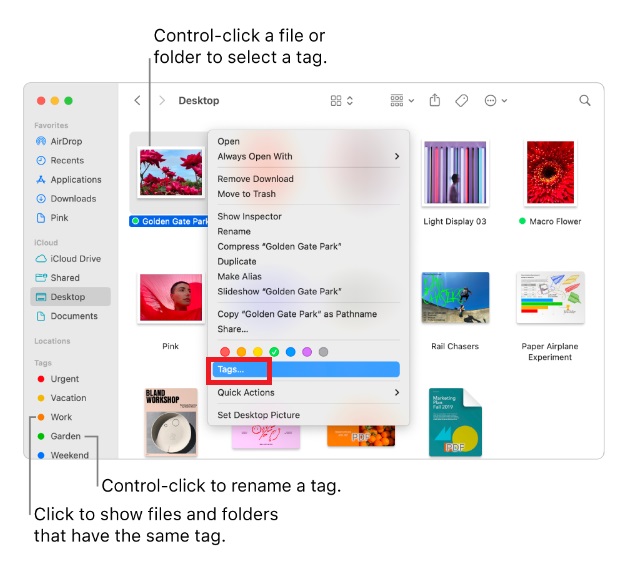
To avoid a jumbled mess, Mac’s built-in tagging feature lets you label files or folders with color codes. To tag an open application, drag the pointer to the right of the name, click the arrow beside the Tags field, and select a tag from the group or enter a new one to arrange and organize Mac files.
Part 5: Use Mac Cleaner to Declutter Junk Files
Mac users have a plethora of tools at their disposal to optimize their systems and merge multiple folders into one Mac. One such tool is Mac Cleaner, which not only removes duplicate files and clutter but also frees up memory and RAM to help with file organization. Since macOS has a well-structured file system, maintenance requirements are minimal for optimal performance.
However, Mac Cleaner is a powerful cleaning software that offers multiple maintenance and optimization features, such as performance monitoring, speed improvement, and the removal of unnecessary data. This tool even includes an intelligent cleanup feature and optimization algorithms that can detect and remove large or old files to free up space on your Mac. With Mac Cleaner, your Mac will work like a charm.
Mac Cleaner is our top choice and perhaps the best cleaner app available, whether free or paid. While it is not as extensive as other alternatives, with only six primary modules, each module packs more features than those found in other apps. In addition, its interface is user-friendly and easy to navigate, even for beginners who have never used a cleaner app before.
The software is lightweight and won’t cause your macOS computer to lag. As long as you can read the caption of each button, using it should be relatively straightforward. To learn more about Mac Cleaner, here’s a user guide.
Step #1: Download, Install, and Launch Mac Cleaner
To begin, visit Mac Cleaner’s official download site using your browser and click on the “Download Now” button to initiate the download of a DMG file. Once the download is finished, open the file to run the installer and adhere to the onscreen instructions. Once installed, the software will open automatically.

Step #2: Select from Six Modules
The Mac Cleaner interface has six modules located on the left side, each with its own set of functionalities and features. These modules are Clean Up Junk, Delete Large Files, Delete Duplicate Files, Erase Private Data, Speed Up Your Mac, and Manage Apps & Extensions.
Clean Up Junk scans your computer for junk files such as system and app cache, temp files, iTunes junk, iOS junk, and Trash files, while Delete Large Files looks for files and folders with a size of 50MB or more to free up space on your computer.
Delete Duplicate Files checks for extra copies of files in a specified directory and allows you to delete their duplicates.
Erase Private Data looks for files that may cause data leaks, such as chat history, Finder history, and browsing history.
Speed Up Your Mac includes various features that help you speed up your computer by deactivating certain apps and processes.
Lastly, Manage Apps & Extensions allows you to uninstall applications and remove browser extensions. Simply select the module you want to use from the left side of the software.
Step #3: Click Scan/Start Now/View Items
Regardless of the module you select, scanning for items is always necessary. These items can vary from files to apps depending on the module. Here are the steps you need to follow for each module:
- Clean Up Junk: After choosing this module, the software splits into two parts labeled Quick Clean and Deep Clean. Quick Clean scans for System Junk, App Junk, Trash Bin, and iTunes Junk. Deep Clean scans those files along with the Downloads folder, iOS Junk, and Unused Disk Images. Choose between the two options and click the Scan button.
- Delete Large Files: Simply select the module and click the Scan button.
- Delete Duplicate Files: To scan for duplicate files, navigate to the Select a File Directory field and click the Browse button. After selecting the directory, click the Scan button.
- Erase Private Data: Click the Scan button after selecting this module.
- Speed Up Your Mac: After selecting this module, click the Start Now button.
- Manage Apps & Extensions: Like Clean Up Junk, this module is also divided into two parts: Uninstall Applications and Remove Extensions. Select the appropriate option and click the View Items button beneath it without having to click that option.
Step #4: Choose Item/s
Regardless of the module you select, the software always displays a list of items that may vary depending on the module. Here’s how you can choose the appropriate items from the list:
- Clean Up Junk: On the left side of the interface, a list of file categories such as System Junk, Downloads, Trash Bin, and Unused Disk Images appears. Select a category to see a new list on the right side consisting of actual files belonging to the selected category. Check the boxes next to the files you want to delete to select them.
- Delete Large Files: Choose an item such as a file, folder, disk image, or archive from the list.
- Delete Duplicate Files: Choose an item such as an image, document, audio, or video from the list.
- Erase Private Data: The left side of the interface shows five options such as Online Traces, Usage Traces, Chat Data, Photo Junk, and Mail Attachment. Select a category to see a new list of items on the right side. Check the boxes next to the items you want to erase to select them.
- Speed Up Your Mac: The left side of the interface has four options Disable Login Items, Deactivate Heavy Consumers, Remove Launch Agents, and Free Up RAM. Instead of files, the right side of the interface shows apps and processes that can be disabled or deactivated. Select the appropriate items from the list.
- Manage Apps & Extensions: If you choose Uninstall Application, the software displays a list of applications, and you don’t need to do anything until step 5. If you choose Remove Extensions, the left side of the interface shows a list of browsers that you can select from. A new list on the right side displays extensions, which you don’t need to select until step 5.
Step #5: Click the Blue Button
After selecting the appropriate items from the list, you should be ready to finalize the process. No matter what module you chose, the software will display a blue button on the interface that should say one of the following: Clean, Delete, Erase, Deactivate, Uninstall, or Remove. Simply click that button to complete the process.
Mac Cleaner offers a simpler interface with fewer options initially. However, each of its features carries significant weight, which should be apparent to you by now.
Conclusion
Learn how to merge multiple folders into one Mac easily and efficiently by implementing the best practices and utilizing in-built features. Experiment with the available tools such as Mac Cleaner to organize your files and improve performance, and consider using a duplicate finder like Mac Cleaner to avoid confusion caused by duplicates. Merging folders can be a challenging task, but try Mac Cleaner today to streamline your file organization and retrieval.
Latest Articles