As the digital age progresses, more and more of our precious memories are being captured on our electronic devices. However, with this convenience comes a new problem – how to organize all of our digital photos on our Macs. The good news is that there are plenty of tools and methods available to help you streamline and organize your Mac photo library. In this guide, we’ll walk you through the steps you need to take to get your photo collection organized and under control.
Part 1: Organize Photos on Mac
Let your Mac photo library well organize! Our ultimate guidelines for how to organize photos on MAC will help you simplify your digital life.
Step 1: Create a Folder Structure
The first step in organizing your Mac photos is to create a folder structure that makes sense for your needs. You can create a system that is organized by year, event, location, or any other criteria that make sense for you. This will help you keep your photos organized and easy to find.
Step 2: Use Smart Albums
Smart Albums are a powerful feature in Apple’s Photos app that can help you to automatically sort your photos based on criteria that you set. For example, you can create a Smart Album that automatically adds all photos taken in a specific location or during a certain time frame. This can save you a lot of time and make it easier to find the photos you’re looking for.
Step 3: Delete Duplicates
Duplicates can take up a lot of unnecessary space on your Mac and make it harder to find the photos you actually want. There are many tools available to help you find and delete duplicate photos, including third-party apps like Duplicate Photos Fixer and PhotoSweeper.
Step 4: Tag Your Photos
Tagging your photos can make it easier to find them later. You can add tags based on people, locations, events, or any other criteria that make sense for your needs. You can also use facial recognition in the Photos app to automatically tag photos of specific people.
Step 5: Use iCloud Photo Library
iCloud Photo Library is a cloud-based service that can help you to keep all of your photos in sync across all of your devices. This means that you can access your photos from anywhere and don’t have to worry about losing them if your Mac crashes or gets stolen.
Step 6: Regularly Backup Your Photos
Finally, it’s important to regularly back up your photos to an external hard drive or cloud-based storage service. This ensures that you won’t lose your precious memories if your Mac fails or gets stolen.

Part 2: How to Put All of Your Photos in Mac Photos App
The Mac Photos app is a great way to organize and manage all of your photos in one place. If you have photos stored in various folders or on external hard drives, you can easily import them into the Photos app. Here’s how to do it:
Step 1: Open the Photos App
First, open the Photos app on your Mac. You can find it in the Applications folder or by searching for it in Spotlight.
Step 2: Go to File and Click on “Import”
In the top menu bar, click on “File” and select “Import” from the dropdown menu. Alternatively, you can use the keyboard shortcut Command + Shift + I.
Step 3: Choose the Photos You Want to Import
A window will pop up with all of the available folders and drives on your Mac. Navigate to the folder or drive where your photos are stored and select the ones you want to import.
Step 4: Choose Import Settings
After you’ve selected the photos you want to import, choose the import settings. You can choose to import the photos into an existing album or create a new one. You can also choose whether to keep the original file or convert it to a different format.
Step 5: Click on “Import”
Once you’ve selected your import settings, click on the “Import” button. The Photos app will begin importing your photos. Depending on the number and size of your photos, this may take a few minutes.
Step 6: Check the Imported Photos
Once the import is complete, you can view your photos in the Photos app. They will be organized by date, with the most recent photos appearing first.
Repeat this process for all of the folders or drives where you have photos stored. By importing all of your photos into the Photos app, you can easily organize and manage them all in one place. You can also use the features of the app, such as Smart Albums and tagging, to further organize your photos and make them easier to find.
Part 3: Declutter Photos by Removing Duplicates and Similar Images
If you have a large collection of digital photos, it’s likely that you have duplicates and similar images taking up valuable storage space on your computer. Removing these unnecessary files can help you to declutter your photo library and make it easier to find the photos you actually want. Here are some steps you can take to remove duplicates and similar images from your photo collection:
Step 1: Use a Duplicates Finder Tool
There are several third-party tools available, such as Duplicate Photos Fixer and PhotoSweeper, that can help you find and remove duplicate photos. These tools scan your photo library for identical files and give you the option to delete them.
Step 2: Manually Review Similar Images
Even if two photos aren’t identical, they may be very similar, such as photos taken in rapid succession or with only slight differences. Manually reviewing your photos and removing similar images can help you to declutter your photo library further. To do this, you can use the Photos app on Mac. In the Photos app, select the photos you want to compare and click on “Edit” in the top right corner. Then, click on the “Compare” button to see the photos side by side. You can then select the one you want to keep and delete the other.
Step 3: Use Smart Albums
Smart Albums in the Photos app can help you to automatically sort your photos based on specific criteria, such as duplicates or similar images. To create a Smart Album, go to “File” and click on “New Smart Album” in the dropdown menu. From there, you can set criteria for the album, such as “Photos with Similar Composition.” This album will then update automatically based on the criteria you’ve set, and you can review and delete the photos as needed.
Step 4: Regularly Delete Unwanted Photos
To keep your photo library organized and clutter-free, it’s important to regularly review and delete any unwanted photos. This can include duplicates, similar images, or simply photos that no longer hold any value to you.
By taking these steps to remove duplicates and similar images from your photo collection, you can declutter your photo library and make it easier to find and enjoy the photos you actually want.

Part 4: How to Organize Photo Library on Mac
Organizing your photo library on Mac can be a daunting task, especially if you have a large collection of photos. However, by following these steps, you can easily and effectively organize your photo library on Mac:
Step 1: Import All Photos into the Photos App
Import all of your photos into the Photos app. This will allow you to easily organize and manage all of your photos in one place. To do this, follow the steps outlined in the previous answer.
Step 2: Create Albums
Create albums to organize your photos into different categories or themes. You can create as many albums as you need, and you can add photos to multiple albums. To create an album, click on the “+” icon in the top left corner of the Photos app and select “Album” from the dropdown menu.
Step 3: Add Descriptions and Keywords
Add descriptions and keywords to your photos to make them easier to search for. To do this, select a photo or a group of photos and click on “Info” in the top right corner. You can then add a description and keywords to the photo.
Step 4: Use Smart Albums
Smart Albums can help you automatically organize your photos based on specific criteria, such as location, date, or people. To create a Smart Album, go to “File” and click on “New Smart Album” in the dropdown menu. From there, you can set criteria for the album, such as “Photos taken in the last month.” This album will then update automatically based on the criteria you’ve set.
Step 5: Delete Unwanted Photos
Regularly review and delete any unwanted photos from your photo library. This can include duplicates, similar images, or simply photos that no longer hold any value to you. This will help you to keep your photo library organized and clutter-free.
By following these steps, you can easily and effectively organize your photo library on Mac. With a well-organized photo library, you can easily find and enjoy the photos you actually want to see.
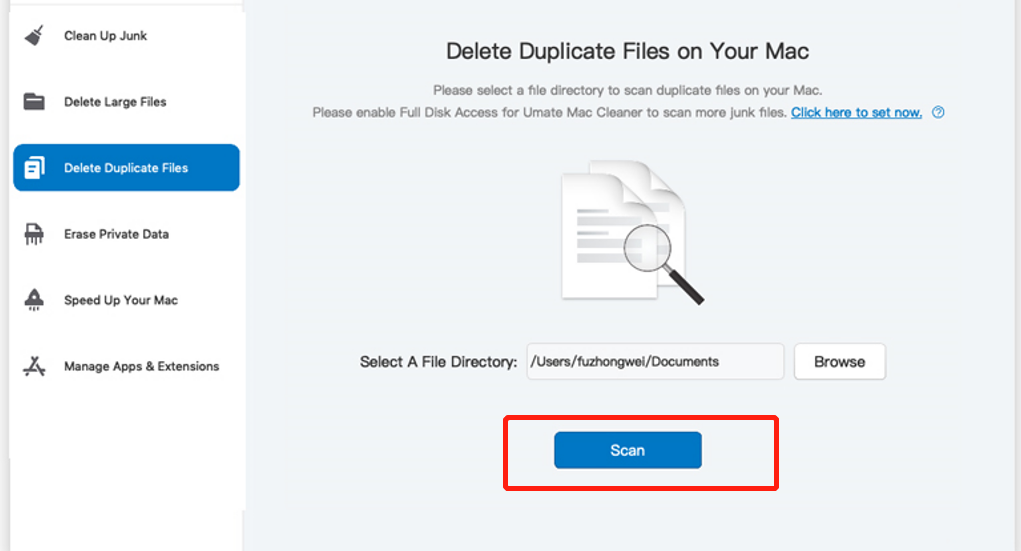
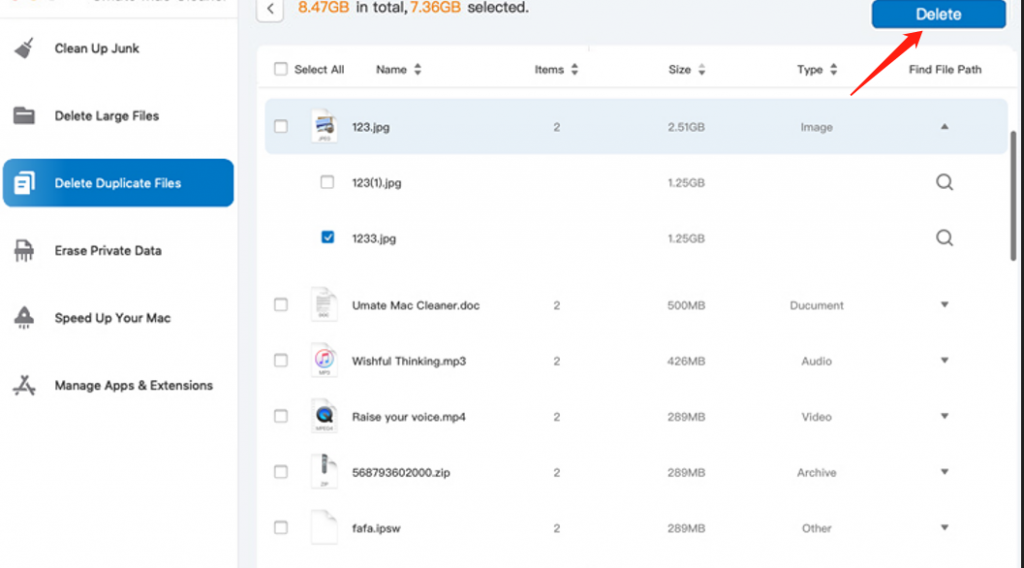
How to Delete Duplicate Photos with Mac Cleaner
- Download and install Mac Cleaner on your Mac.
- Launch Mac Cleaner and select the “Delete Duplicate Files” option from the left-hand menu.
- Choose the folder or disk that contains the photos that you want to scan for duplicates.

- Select “Images” from the “Select Files Types” dropdown menu to only scan for image files.
- Click the “Scan” button to start scanning for duplicate photos.
- Once the scan is complete, Mac Cleaner will display a list of duplicate photos.
- Review the list of duplicates and select the photos you want to delete.
- Click the “Clean” button to remove the selected duplicate photos.

You can also use Mac Cleaner to customize the search for duplicate photos based on file size, file format, and other criteria. This can help you narrow down the search and find the specific duplicate photos you want to remove.
It is important to review the list of duplicates carefully before deleting any photos, to ensure that you do not accidentally delete any important files. Additionally, you should always make a backup of your photos before using any third-party software to remove duplicate files.
Wrapping Up
In conclusion, organizing your photos on your Mac may seem like a daunting task, but with the right tools and methods, it can be a straightforward process. By following these six steps, you can get your photo library organized and under control, making it easier to find and enjoy your cherished memories.
Latest Articles