

iCloud is a great platform for storing photos, but over time, it can become cluttered with duplicate photos, taking up valuable space. If you have an iPhone or iPad, there’s a good chance that you’ve been using iCloud to back up your photos. But what do you do when you have multiple copies of the same photo?
Part 1: Why Do You Have Duplicate Photos in iCloud?
There are several reasons why you may have duplicate photos in iCloud, including:
- Importing photos multiple times: If you import the same photos from your camera or phone to your iCloud library multiple times, it can create duplicate copies.
- Syncing issues: Sometimes, syncing issues between your devices and iCloud can cause duplicate photos to appear in your library.
- Photo editing: When you edit a photo in iCloud, it creates a duplicate copy of the original.
- Backup issues: If there are issues with your iCloud backup, it can cause duplicate photos to appear.
- Software glitches: Occasionally, software glitches or bugs can cause duplicates to be created.
It’s important to regularly check and remove duplicate photos from iCloud to free up storage space and keep your library organized.

Part 2: How to Remove Duplicate Photos from iCloud
There are different methods to remove duplicate photos from iCloud, but one easy way is to use the “Photos” app on a Mac or PC. Here’s how to remove duplicate photos from iCloud.
Step 1: Log in to iCloud.com
The first step in removing duplicate photos from iCloud is to log in to iCloud.com using your Apple ID and password. Once you are logged in, click on the “Photos” icon.
Step 2: Select “All Photos”
Once you are in the Photos section, select “All Photos” from the menu on the left-hand side of the screen. This will display all of the photos that are currently stored in iCloud
Step 3: Identify duplicate photos
To identify duplicate photos, click on a photo to enlarge it. Then, click on the “i” icon in the upper right-hand corner. This will display information about the photo, including the date it was taken and the file size. If there are duplicate photos, they will have the same date and file size.
Step 4: Delete duplicate photos
To delete duplicate photos, select the photo you want to delete and click on the trash can icon in the upper right-hand corner. A pop-up window will appear asking you to confirm that you want to delete the photo. Click “Delete” to remove the duplicate photo from iCloud. Confirm the action and the duplicates will be moved to the “Recently Deleted” album, where they will be permanently deleted after 30 days.
Step 5: Repeat the process
Repeat this process for each duplicate photo that you want to remove from iCloud. It may take some time, but it’s important to remove these duplicates to free up space and keep your iCloud storage organized.

Part 3: Remove Duplicate Photos from iCloud with Mac Cleaner
Mac Cleaner is an all-in-one cleaner software that allows you to delete unnecessary files, including large files, duplicate files, junk files, and more. The software has six modules, and you can select one or more to use at a time. Mac Cleaner is a useful tool for cleaning up your Mac, you can follow these steps to remove duplicates from your iCloud Photo Library on your Mac:
Step #1: Launch Mac Cleaner on Your Computer
To download and install Umate Mac Cleaner software on your Mac computer, start by opening a browser and visiting the Umate Mac Cleaner download page. Click on the “Download Now” button to download the installer, then run it to complete the installation process. Once the software is installed, it should automatically open and be ready for use.

Step #2: Choose a Module
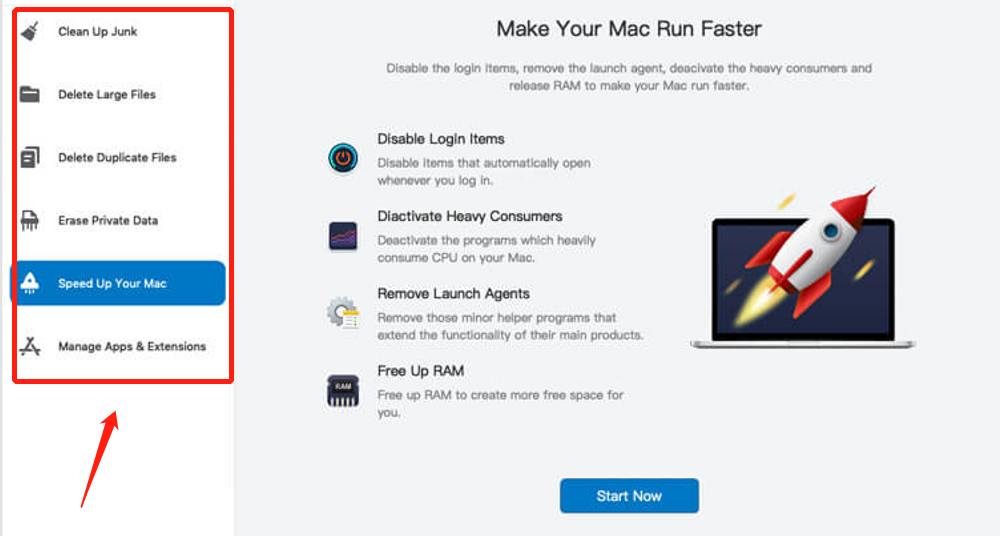
Mac Cleaner comprises several modules, each with unique functionalities, as previously mentioned. These modules are Clean Up Junk, Delete Large Files, Delete Duplicate Files, Erase Private Data, Speed Up Your Mac, and Manage Apps & Extensions. All these modules, except for Speed Up Your Mac, focus on clearing disk space on Mac. Here is a breakdown of what each module does:
- Clean Up Junk inspects your computer for junk files, such as System Junk, App Junk, Trash Bin, and iOS Junk, and deletes only unnecessary files, making it easy to use without any risk of data loss.
- Delete Large Files scans your computer for files larger than 50MB and deletes only unnecessary ones, making it simple to use without any risk of data loss.
- Delete Duplicate Files checks each file in a specific directory and identifies any copies elsewhere on the computer. It then allows you to delete these duplicates, effectively freeing up space.
- Erase Private Data scours your computer for any file that may contain private data, such as email attachments, browser history, and chat data, and effectively clears space on Mac.
- Manage Apps & Extensions displays a list of all apps or extensions on your computer and enables you to remove or uninstall them, freeing up disk space.
You can choose one module at a time and select the rest later, as there is no need to be conservative. To select a module, simply click on it on the left-hand side of the software.
Step #3: Scan for Files/Apps/Extensions
After selecting a module, the software will provide information on its features, which you can read to gain a better understanding of it. To proceed to the next step, simply click the Scan button located at the bottom of the software, except for Manage Apps & Extensions. In that case, you must first choose between Uninstall Applications and Remove Extensions, and then select View Items after choosing an option.
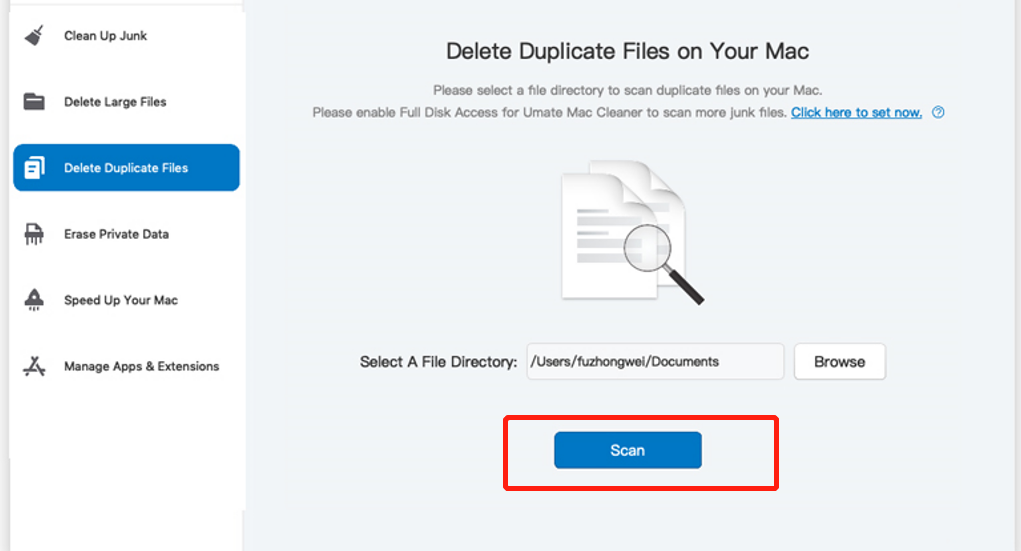
Clean Up Junk also requires you to choose between Quick Clean and Deep Clean before scanning your computer for various file types. You can find information on the types of files each option scans for within the software. Lastly, to use Delete Duplicate Files, you must first select a folder on your computer by clicking the Browse button in the interface and navigating to the directory you want to scan.
Step #4: Choose an Item/File
After selecting a module, the software will initiate a scan for specific types of files depending on your choice. Subsequently, you will be directed to a screen where you can choose the items or files you want to delete. For Delete Large Files and Delete Duplicate Files, all you have to do is select an item from the list of files presented. For Clean Up Junk and Erase Private Data, you will first need to choose a file category from the left-hand side of the interface.
Categories may include System Junk, Downloads, Chat Data, and more, depending on the module you chose. After selecting a category, you can then pick a file from the right-hand side of the interface. With Manage Apps & Extensions, no selection is necessary, and you can proceed to the next step. Click the “Scan” button to let the software scan your iCloud Photo Library for duplicates.
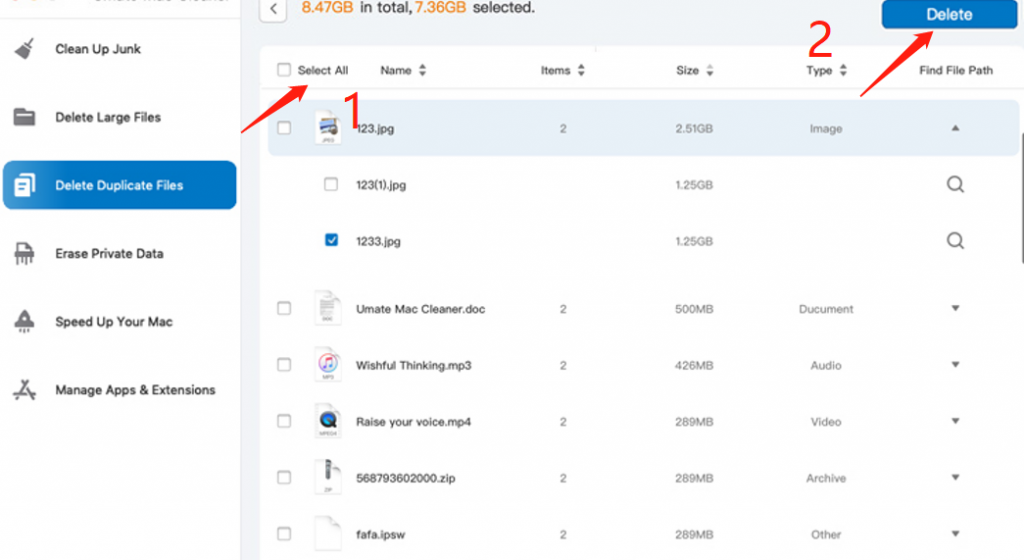
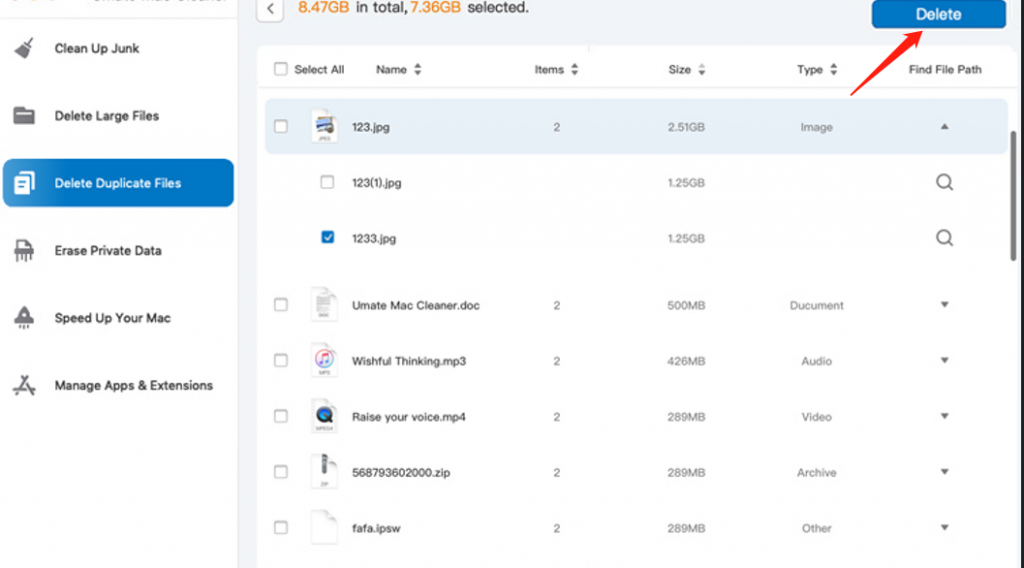
Once the scan is complete, select the duplicates that you want to delete from the right-hand side of the software interface. However, for the other modules, you can select the file you want to delete by clicking its checkbox. Alternatively, you can select all items at once by clicking on the “Select All” option.
Step #5: Click the Blue Button
The software will scan for different types of files based on the module you chose. Once the scan is complete, you will be presented with a screen where you can choose the item or file you wish to delete. For Delete Large Files and Delete Duplicate Files, you can simply select an item from the list, which will consist of files.
However, for Clean Up Junk and Erase Private Data, you will need to first select a file category from the left-hand side, such as System Junk, Downloads, Chat Data, etc. After selecting a file category, you can then choose a file from the right-hand side.
As for Manage Apps & Extensions, there’s no need to select anything, you can proceed to the next step. For the other modules, simply click on their checkboxes to select the files you want to delete. You also have the option to click Select All if you want to choose all items. Once the scan is complete, select the duplicates that you want to delete from the right-hand side of the software interface.
By following these steps, you can remove duplicate photos from your iCloud Photo Library on your Mac.
Part 4: How to Download Multiple Pictures from iCloud
As you clean up duplicate photos on iCloud, you may come across a few that you wish to download and store on your computer. Instead of downloading them one by one, it is more convenient to download several pictures simultaneously. Here are the steps to download all the pictures you need at once. You can download multiple pictures from iCloud using the following steps:
- On your Mac, open the Photos app.
- Click on “Photos” in the top menu and select “Preferences”.
- In the “Preferences” window, click on the “iCloud” tab and make sure that “iCloud Photos” is checked.
- Open a Finder window and go to “Pictures”.
- Create a new folder where you want to save the photos that you want to download.
- Go back to the Photos app and select the pictures that you want to download.
- Click on “File” in the top menu and select “Export”.
- In the “Export” window, choose the location where you want to save the photos and select the options you want for file type, size, and other settings.
- Click “Export” to save the photos to your computer.

Parting Words
Removing duplicate photos from iCloud is a simple process that can help you save space and keep your iCloud storage organized. By following these steps, you can quickly identify and delete duplicate photos, leaving you with a cleaner, more organized photo library.
Latest Articles