

It’s common knowledge that a computer’s hard drive will only get full if it contains a lot of files, which is why it may come as a surprise when you find out that it’s full even if you can’t find that many files inside it. While it may seem uncommon, this is actually a common problem where you’ll find Mac hard drive full for no reason. And though it may seem like it’s a problem that occurred for no reason, there actually is a reason, but it’s something you aren’t familiar with, hence the confusion.
If you’re struggling with this problem right now, and you’re not necessarily the best when it comes to these technical problems, this guide should help, as we go over everything you need to know about the issue. Let’s start with the causes of this issue.
Why Is My Mac Hard Drive Full for No Reason?
Most of the time, the issue concerning Mac hard drive full for no reason has to do with hidden files. In some cases, it has to do with features that you didn’t know existed. To give you a better understanding, here are the common reasons why the hard drive of your macOS computer might suddenly get full without warning:
- You don’t clear your system and app cache. Every device has a cache. The system cache files are basically files that were once useful but are now useless. They are the files that the system generates automatically whenever it needs to execute a task. Every app also has a cache. One similarity between the system and apps is that they usually don’t delete or clear the cache automatically, so you have to do it yourself. Otherwise, the hard drive will get full.
- You’re not taking care of app leftovers. Whenever you uninstall an application, you’re not actually getting rid of it in its entirety. Some of its files are left over. That means if an app has a total size of 1GB, and its app only takes up 100MB, once you uninstall the app, you’ll probably be left with 900MB since those files that are associated with the app might not get deleted automatically. Of course, this doesn’t always happen, but it explains why you may think that your hard drive is full for no reason despite regularly uninstalling unnecessary apps on your computer.
- Automatic backup is enabled. The two previous reasons have to do with files. This time, it has to do with both a feature and files. If you aren’t aware, macOS computers have a feature called Automatic backup where if enabled, the computer will automatically create backups of your hard drive regularly. Since backups are usually very large, it makes sense that when the computer generates a backup automatically, it’ll immediately deplete all your remaining space.
- Your iOS device is synced. Another feature that might be affecting your disk space is the iOS sync. It’s a feature that allows you to sync iOS files to your computer. What it does is it creates a copy of all your synced iOS files and transfers those copies into the Mac, thereby depleting its disk space. Its main difference with automatic backup is that it depletes your space slowly since it’s not like iOS files are tens of GBs in size, unlike backups.
The solution to the problem would often depend on its cause. So, in the following guides, we’ll look at the solution for each corresponding cause of the problem. Let’s start with the most common cause of the problem—the presence of junk files.

Solution #1: Try Mac Cleaner
Though the aforementioned methods are effective in their own ways, they can be time-consuming. You may spend hours or even days trying them out only to notice that you haven’t even freed up 10GBs of disk space. Thankfully, there is a way to free up disk space fairly easily and quickly, and it involves Mac Cleaner—a cleanup software that allows you to get rid of unnecessary files with just a few clicks. It takes only a few minutes, so it’s the most time-efficient method. Here’s how to use it:
Step #1: Download, Install, and Launch Mac Cleaner
The first thing you need to do is click this link. It should take you to the software’s download site, and there, you’ll find a Download Now button. Click that button to download a DMG file—the file extension for installers in macOS computers. Once the download is finished, open the DMG file to start the installation process. Follow the instructions on the installer from that point onward. Mac Cleaner will open automatically once the installation is complete.
Step #2: Select Clean Up Junk
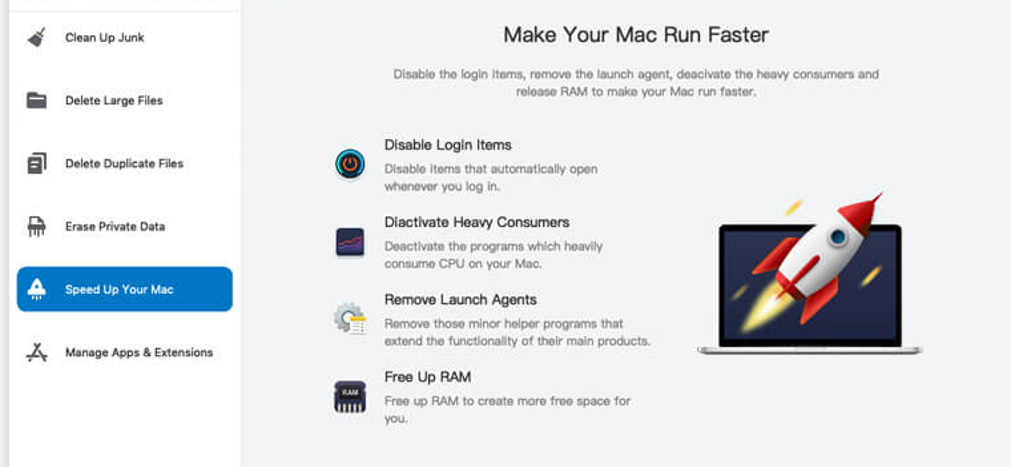
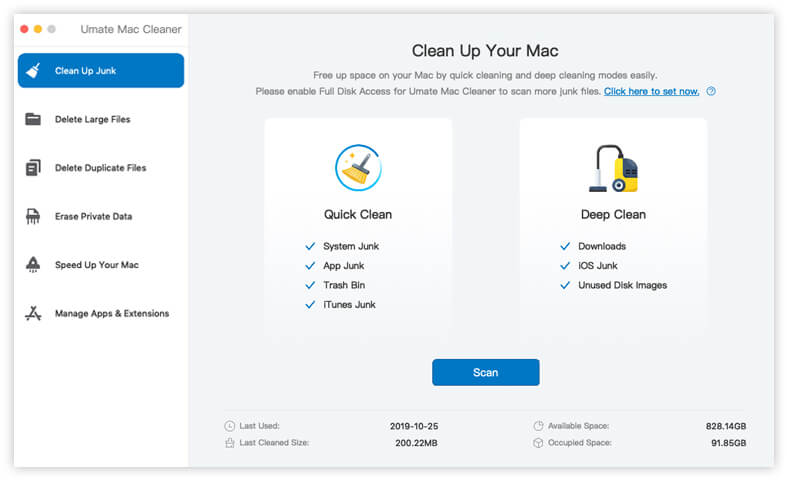
The second step is all about selecting the module you want to use. If you aren’t aware, Mac Cleaner consist of six modules, and these include (1) Clean Up Junk, (2) Delete Large Files, (3) Delete Duplicate Files, (4) Erase Private Data, (5) Speed Up Your Mac, and (6) Manage Apps & Extensions. Each one does different things, but you’ll mostly need the help of Clean Up Junk since it’s the one that can free up disk space in your hard drive. It can get rid of junk files like System Junk, App Junk, Trash Bin, iOS Junk, and iTunes Junk, among many things. You can select the module by clicking on it from the left sidebar.
Step #3: Click the Scan Button
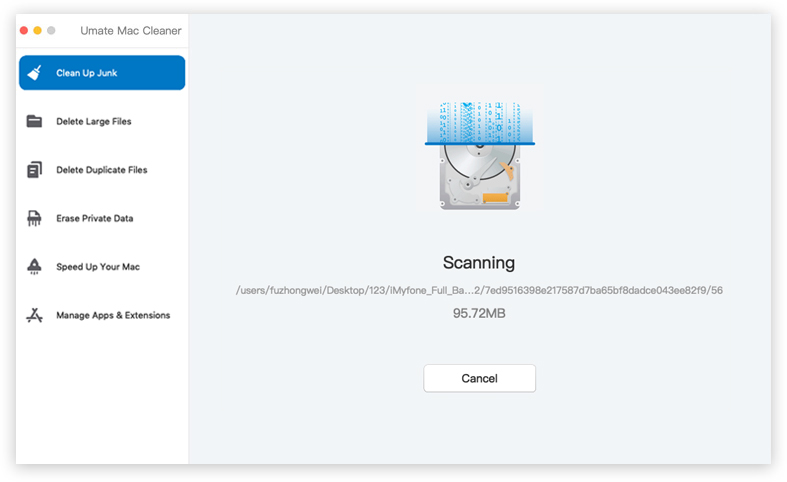
After you click Clean Up Junk, you’ll notice that the software splits into two sides. One side says Quick Clean while the other says Deep Clean. These are the scanning methods of Clean Up Junk. Quick Clean can perform the scan more quickly, but it only detects System Junk, App Junk, Trash Bin, and iTunes Junk. Meanwhile, Deep Clean takes more time to scan the computer, but it can scan additional file types like Downloads, iOS Junk, and Unused Disk Images. After selecting an option, click Scan.
Step #4: Pick a File Category and File/s
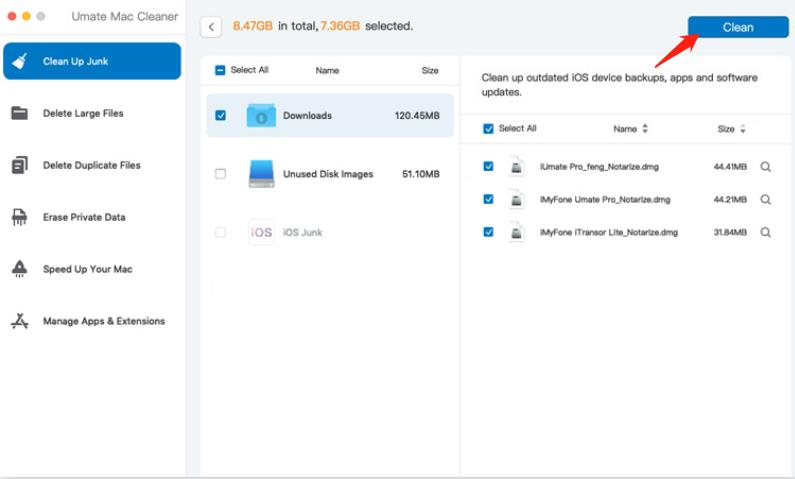
After the scan, the software will take you to the next page. On the left side of the next page, you’ll find a list that consists of file categories like System Junk, Downloads, Trash Bin, Unused Disk Images, etc. You must select a file category from this list. Upon doing so, a new list will appear on the right side which consists of actual files. Select the files you want to delete from that list by clicking their corresponding checkboxes. You can also click the Select All box if you want to delete all the items in the list.

Step #5: Delete the File/s
Finally, click the Clean button located at the upper right corner of the window. It may take a few minutes, but that should finalize the process. Though you have to remember that the speed may vary according to your computer’s performance.
This will ensure junk files are deleted from your computer. But if that still didn’t give you enough space, perhaps it has to do with the system and app cache.
Solution #2: Clear System And App Cache
Here are the steps to clear the system and app cache on macOS computers:
- Open the Finder app on your computer.
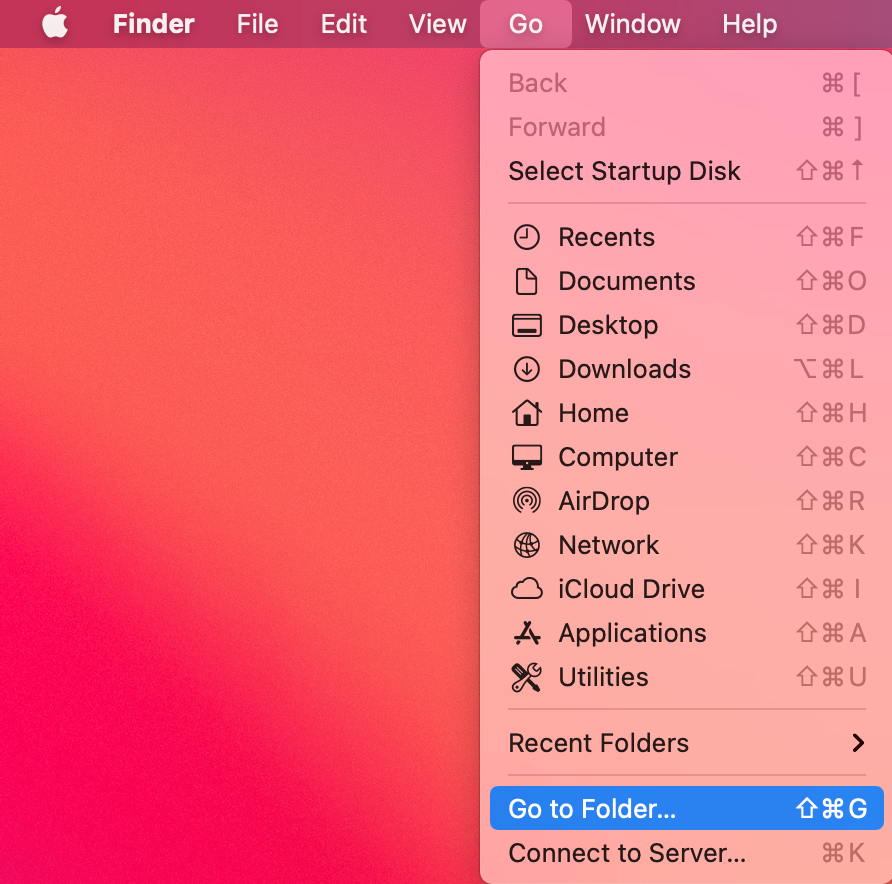
- Click Go from the top menu bar.
- Select Go to Folder… from the dropdown menu.
- A popup window will appear. On the text bar, type in /Library/Caches for the system cache and ~/Library/Caches for the app cache.
- Click Go to proceed.
- If you went to the system cache, just find the cache files you want to delete. If you went to the app cache, you must find the app you want to clear the cache of first, and only then can you delete the files you want to delete.
Solution #3: Use An App Uninstaller
If you don’t want to leave leftovers whenever you uninstall an application, you might want to use an uninstaller. An app uninstaller is a tool specializing in getting rid of applications completely. That means it wouldn’t leave any traces of the uninstalled app and you no longer have the need to look for the traces yourself.
Solution #4: Turn off The Automatic Backup Feature
To turn off the automatic backup feature on macOS computers, here are the steps you must follow:
- Go to your desktop.
- Click the Apple logo located at the top-left corner of the screen.
- Select System Preferences from the dropdown menu.
- A popup window will appear. Find and click the option that says Time Machine.
- Now turn it off. There should be a toggle somewhere in the Time Machine window.
With that, you can prevent Time Machine from creating backups automatically.

Solution #5: Turn off iOS Sync
This solution is a bit more complicated than the previous ones. That’s because for sync to work in the first place, you must have an iOS device with its sync feature currently enabled. Disabling that feature will disable the sync between the iOS and your Mac altogether. The same applies when you disable only the sync of your Mac. Moreover, the feature is only accessible via iTunes, so uninstalling that app should also do the trick.
Going Forward
This isn’t the only problem that you’ll think happened for no reason. There are other issues out there that can appear out of nowhere and catch you off-guard. Really, the only way to resolve this is to have countermeasures for these issues. The Mac hard drive full for no reason, for example, can easily be prevented if you maintain your storage properly.
Latest Articles