

Mac users who frequently take screenshots can greatly benefit from using keyboard shortcuts. Not only does it make the process quicker and more efficient, but it also eliminates the need for using the mouse or trackpad. In this blog, we will discuss the various keyboard shortcuts available for taking screenshots on Mac.
Part 1: How to ScreenShot on Mac Using Popular Keyboard Shortcuts?
Taking screenshots is a useful feature on any computer, and Macs have several keyboard shortcuts that make it quick and easy to capture screenshots. In this article, we will cover the most popular keyboard shortcuts for taking screenshots on Mac.
Full-Screen Screenshot: To take a screenshot of the entire screen on your Mac, press the following keys together: Command + Shift + 3. This will take a screenshot of the entire screen and save it to your desktop as a PNG file.
Screenshot of a Selected Area: To capture a screenshot of a selected area of the screen, press Command + Shift + 4. The cursor will turn into a crosshair. Click and drag the crosshair to select the area you want to capture. When you release the mouse button, the screenshot will be saved to your desktop.
Screenshot of a Window: To capture a screenshot of a specific window on your Mac, press Command + Shift + 4 + Spacebar. The cursor will change into a camera icon. Move the camera over the window you want to capture and click on it. The screenshot will be saved to your desktop.
Copy Screenshot to Clipboard: If you want to take a screenshot and immediately copy it to the clipboard, press Command + Control + Shift + 3 for a full-screen screenshot or Command + Control + Shift + 4 for a selected area screenshot. This will allow you to paste the screenshot into another application.
Screenshot of the Touch Bar: If you have a MacBook Pro with a Touch Bar, you can take a screenshot of it by pressing Command + Shift + 6. The screenshot will be saved to your desktop.
Keyboard shortcuts can save you a lot of time and effort, and with these simple shortcuts, you can easily take screenshots on your Mac.

Part 2: How to Easily Do Annotation to Your Screenshots
If you take a lot of screenshots on your Mac, you may want to annotate them to highlight important information or add additional context. Fortunately, there are several easy ways to annotate your screenshots on a Mac.
Using Preview: Preview is a built-in app on Mac that you can use to open and annotate your screenshots.
- Open the screenshot in Preview by double-clicking the file.
- Click on the “Markup” button in the top-right corner of the window.
- Use the toolbar to add shapes, text, and other annotations to your screenshot.
- Once you’re done, save your annotated screenshot by clicking “File” > “Export”.
Using Skitch: Skitch is a free app from Evernote that makes it easy to annotate and share screenshots.
- Download and install Skitch from the App Store.
- Take a screenshot using your preferred keyboard shortcut.
- The screenshot will automatically open in Skitch.
- Use the toolbar to add arrows, text, shapes, and other annotations.
- Once you’re done, save your annotated screenshot by clicking “File” > “Save”.
Using Snagit: Snagit is a paid app that offers more advanced annotation tools than Preview or Skitch.
- Download and install Snagit from the TechSmith website.
- Take a screenshot using Snagit’s keyboard shortcut (Command + Shift + 5 by default).
- Use the toolbar to add annotations, including arrows, text, shapes, and more.
- Once you’re done, save your annotated screenshot by clicking “File” > “Save”.

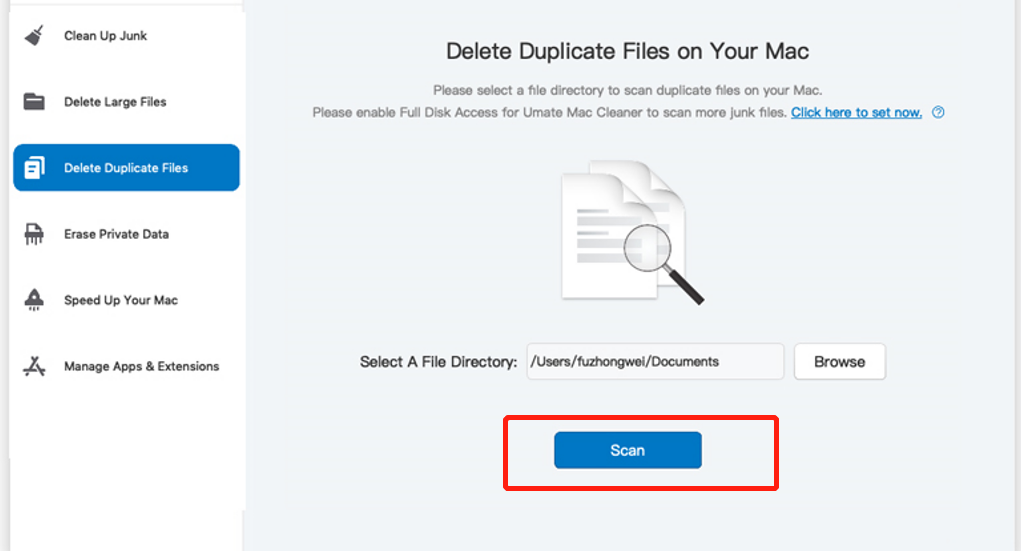
Part 3: How to Delete Screenshot with Mac Cleaner
Mac Cleaner is a modular program that enables you to locate and erase unnecessary files from your computer, including those in the Trash. You can use Mac Cleaner to delete screenshots on your Mac. Here are the steps:
Step #1: Download, Install, and Start Mac Cleaner
To use the software, you will first need to obtain it. Open your browser and go to the Mac Cleaner download site. Click the Download Now button on that page to obtain a DMG file. Then, open that file to begin the installation process. Follow the on-screen instructions from there, and the software will open automatically once it is installed.

Step #2: Pick Clean up Junk
For the second step, select the “Clean Up Junk” module from the left-hand side of the Mac Cleaner interface. This module is designed to scan and remove unnecessary files from your computer, including System Junk, App Junk, iOS Junk, and most importantly, the Trash Bin. It is the only module you need to empty your Trash, even if Mac Trash won’t empty.
Step #3: Click the Scan Button
You should click the Scan button. The interface has two different sides, one for Quick Clean and the other for Deep Clean. These two sides scan different types of files. Quick Clean scans System Junk, App Junk, iTunes Junk, and Trash Bin. Meanwhile, Deep Clean scans those files and Downloads, iOS Junk, and Unused Disk Images. We recommend choosing Deep Clean as it’s more thorough and less likely to leave any junk files behind. Once the scan is complete, Mac Cleaner will display a list of files that can be safely deleted, including screenshots.
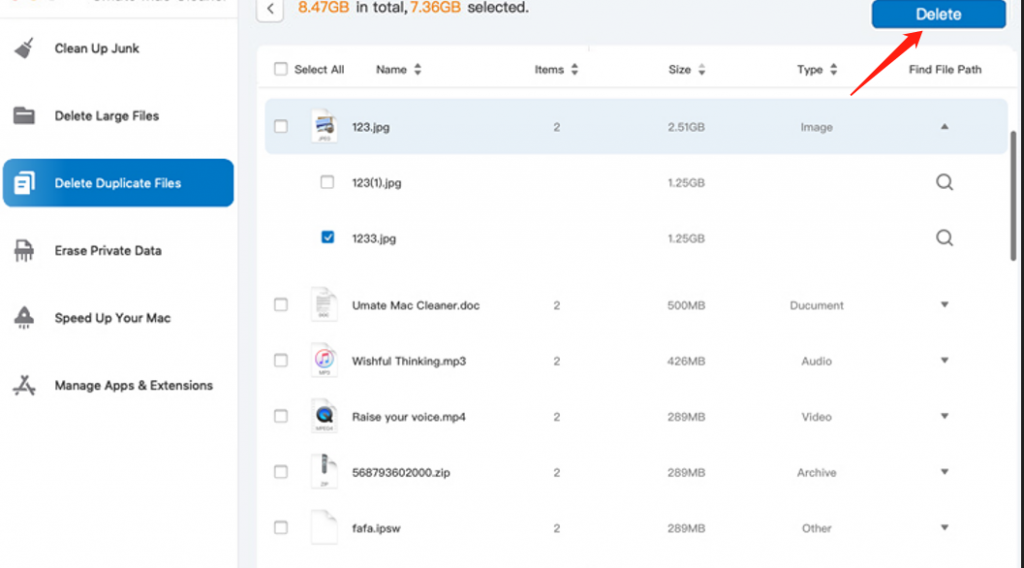
Step #4: Choose a File Category and File/s
On the left side of the software, you’ll see a list of items that correspond to the categories we discussed earlier, such as System Junk, App Junk, Trash Bin, Downloads, and more. Choose a category from this list, and a new list will appear on the right side of the interface showing the files that belong to that category. To select files for deletion, click the checkboxes next to their names. Select the screenshots you want to delete by checking the box next to each one. If you want to delete all items in the category, simply click “Select All.”
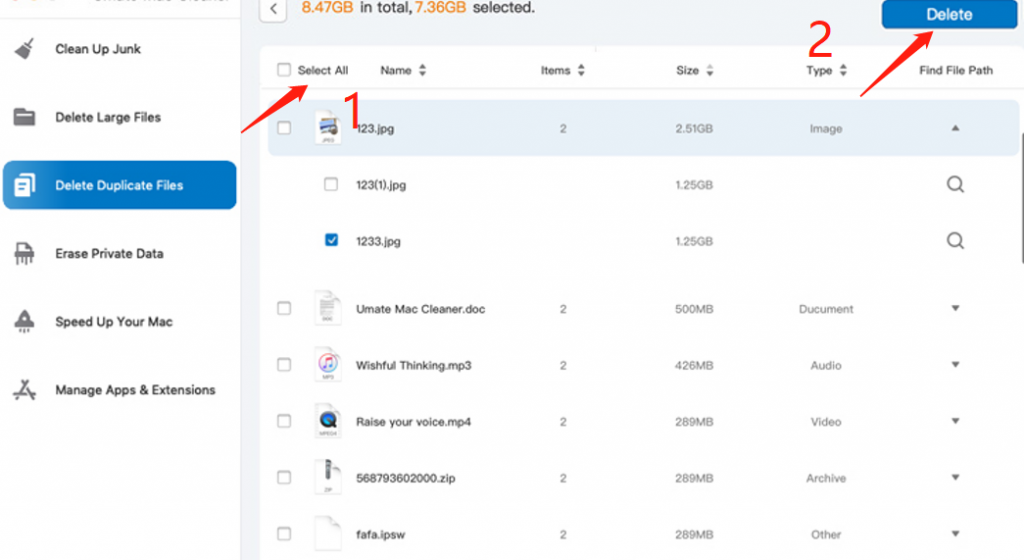
Step #5: Click the Clean Button
With the files you wish to delete now selected, all that remains is to remove them from your computer. To do this, simply click on the Clean button located in the upper-right corner of the window. Once you have clicked this button, please wait for a few seconds or minutes for the cleaning process to complete. Select the screenshots you want to delete by checking the box next to each one.
Mac Cleaner’s “Clean Up Junk“ feature automatically scans your Mac for files that are taking up unnecessary space and can safely be deleted. This includes screenshots that you may no longer need. By using this feature, you can free up space on your Mac and improve its overall performance.
Overall, mastering the various keyboard shortcuts available for taking screenshots on Mac can greatly improve productivity and efficiency. By taking advantage of these shortcuts, users can quickly and easily capture and share information without the need for using external tools or software.
Latest Articles