

It’s common knowledge that computers will always naturally slow down at some point. That’s why its user must take steps to optimize their computer to make sure it doesn’t happen too early or quickly. However, every now and then, you may notice that your computer isn’t performing as fast as you’d expect. But since there’s no metric that you can look at to confirm this suspicion, there’s no way of making certain whether it truly is slowing down or if it’s just your imagination.
This is particularly true for Mac users since macOS computers tend to have massive fluctuations in performance without any reason. This is where Mac performance testing—a common practice among macOS computer users, comes into play.

Method #1: Run Mac Performance Testing With Apple Diagnostics
Not many people know this, but there’s actually a rather useful feature in macOS computers that can help with Mac performance testing. Though we say it’s a feature, it would be more accurate to call it a tool as it has a whole set of features that you can use. It’s called Apple Diagnostics, and it’s designed to perform a health check on your computer. It can determine issues with both your firmware and hardware. Here’s how you can use Apple Diagnostics for Mac performance testing:
- Shut down your computer.
- Disconnect all external devices, like the mouse, monitor, and Ethernet cable, but leave the keyboard plugged in.
- Turn on the computer.
- Press and hold the computer’s power button while it’s booting up.
- A different window than usual will appear. Click the Options menu which is represented by a gear icon.
- Press Command + D on your keyboard to start the diagnostics.
- Wait for a few minutes.
- Once the diagnostics are complete, you’ll find a list of reference codes. These are codes that tell you what’s wrong with your computer. You can refer to this site to see what each code means and how you can resolve these issues.
If the Options menu didn’t appear, there’s a good chance it’s because you’re using a different type of macOS. If so, try turning on the computer without holding the power button, but instead while holding the D key on your keyboard.

Method #2: Run Mac Performance Testing Through Activity Monitor
The Activity Monitor is an app for macOS computers that allows you to monitor the apps and processes currently running on your computer. It shows different information about each activity, such as their CPU and RAM usage. For that reason, it’s the perfect way to check how well your computer is performing by looking at memory usage. Here’s how you can use it:
- On your computer, open the Finder app.
- Click Applications from the left sidebar of the app. This will take you to the Applications folder.
- There, find and double-click the Utility folder.
- In this folder, find and open Activity Monitor.
The Activity Monitor has five different tabs, and these include (1) CPU, (2) Memory, (3) Energy, (4) Disk, and (5) Network, and each of these provides different types of information. For the sake of testing your computer’s performance, you need to go to the CPU tab, where you can find all the apps and processes currently open on your computer. Take a look at the bottom area of this tab and find the part where it says System, User, and Idle. Each of these has a corresponding number to its right.
The system refers to how much CPU the system is using, User refers to how much CPU the user is using, and the Idle is the available CPU on the computer. A good performance is when the number to the right of Idle is over 70 to 90 percent.
This indicates that the computer has a lot of CPU to spare, meaning it’s not overworking itself.

Method #3: Run Mac Performance Testing Using An App
Your last option is to use an app specifically designed for Mac performance testing. Geekbench is an excellent example of such an app, though you can always choose a different one if you want. The app work similarly to Apple Diagnostics in that it directly provides you with insights into your Mac’s performance. Perhaps the main advantage of these apps is that it doesn’t require you to shut down your computer. You can run the application and test the performance while it’s open.
But on one hand, it doesn’t tell you the performance issues on your computer. Instead, it rates how your computer performs when only one core is working, and how it performs when multiple cores and working. However, it’s not the same for all apps.
You can also find apps that can provide information on what you can do to boost the computer’s performance. Either way, it’s up to you which app you choose, though you must choose one that can actually help with Mac performance testing.

BONUS: Speed up Your Mac With Mac Cleaner
As you can see, Mac performance testing is not that hard to do. It would take a few minutes at most, but the steps are rather simple. However, the only thing it’ll give you is information on what your Mac’s current performance is. While the performance test can potentially give you insights on how you can best speed up your Mac, it usually takes several hours to do so. If you wish to speed up your Mac with minimal effort, you’ll need the help of third-party tools like Mac Cleaner.
Mac Cleaner is software consisting of numerous modules. Though most of its features allow you to delete unnecessary files, it has a module that focuses on speeding up your Mac’s performance. Here’s how you can use this feature:
Step #1: Open Mac Cleaner on Your Computer
Open any browser on your computer and visit the Mac Cleaner download site. Click the Download Now button on that site to download a DMG file. Once downloaded, open the DMG file to start the installer, then follow the instructions that’ll appear on your screen. After the installation, the software should automatically open.

Step #2: Select the Speed Up Your Mac Module
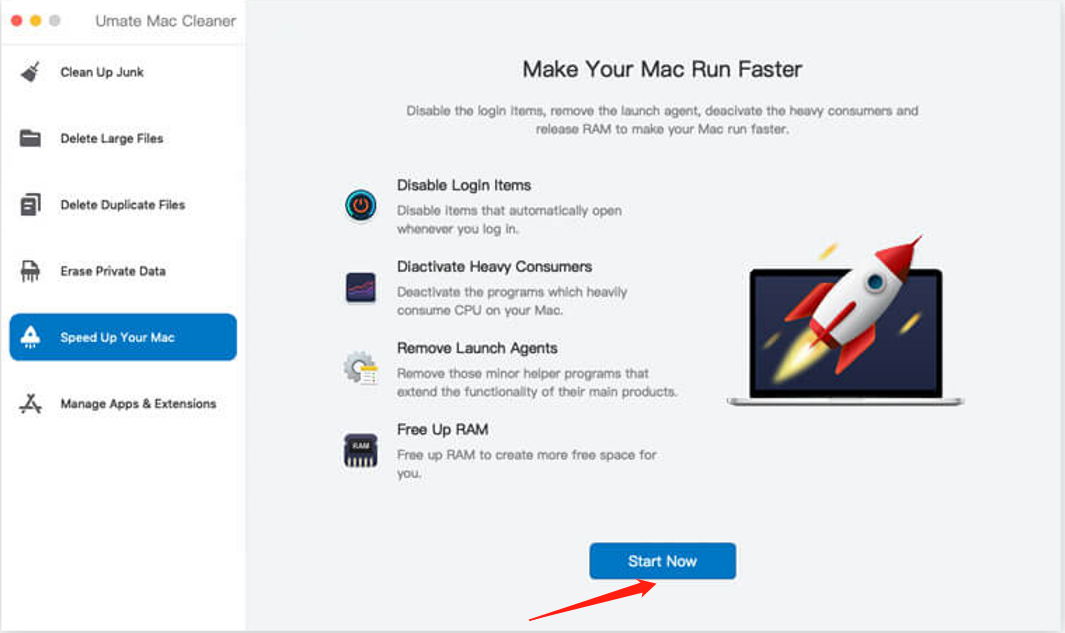
If you look at the left side of the interface, you’ll find six different options. These correspond to the modules the software has. Currently, it has a total of six modules, namely (1) Clean Up Junk, (2) Delete Large Files, (3) Delete Duplicate Files, (4) Erase Private Data, (5) Speed Up Your Mac, and (6) Manage Apps & Extensions. Since your goal is to boost the performance of your computer, the Speed Up Your Mac is the perfect module for your purposes. As the name suggests, it performs various actions that can speed up your computer. To select the module, simply click on it from the left sidebar.

Step #3: Click Start Now
Once you select the module, you’ll notice that blocks of text will appear at the center of the software. The text will explain how the module works and what its features are. You can read the text if you wish to learn more about the Speed Up Your Mac module. However, to proceed to the next step, you must click the button underneath the text that says Start Now.
Step #4: Choose an Action
The software will take you to the next screen where you can find four different options on the right side of the interface. These are the actions that you can take to speed up your computer. Here’s a look at what each action entails and how it works:
- Disable Login Items closes apps and processes that automatically start when you boot up the computer.
- Deactivate Heavy Consumers quits apps and processes that consume too much computing power.
- Remove Launch Agents eliminates unnecessary apps and processes that open alongside other programs.
- Free Up RAM gets rid of processes that consume your RAM needlessly.
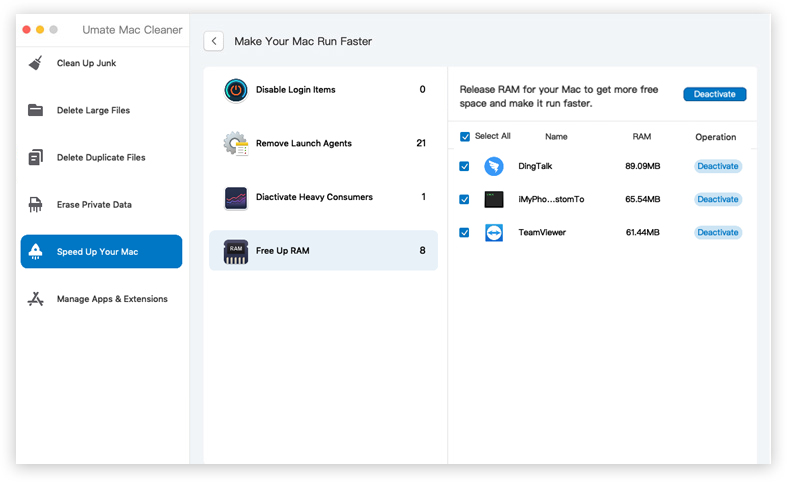
To select an action, you simply have to click on it from the left sidebar. After doing so, a new list will appear on the right side of the interface. The list will consist of apps and processes that you can deactivate or disable. Select items from this list by clicking their corresponding checkbox. If you want to deactivate all the items in the list, simply click the box for Select All.
Step #5: Deactivate the App/Process
Finally, regardless of the action, you chose to perform, there should always be a blue button at the top-right corner of the screen. It should say Deactivate, though the text may differ according to the version of the software. Anyway, t[o finalize the process, you simply have to click this button. The software will then execute the action, so you may have to wait.
With this, you should be able to notice a significant improvement in your performance. But then again, it’s not going to be obvious. Therefore, to confirm, you must do a Mac performance testing once again if the performance really did improve.
Final Words
It’s not unusual to see a macOS computer slowing down, but it can be stressful to see that but not have any idea whether it’s true or it’s just a product of your imagination. Thankfully, there are ways to test the performance of a Mac. Not only will this answer your question on whether your computer is slowing down, but it can also tell you by how much and help you determine what possible solutions you can take to speed it up. But of course, you must keep in mind that there will come a point where you can no longer speed up your computer.
Latest Articles