

This is a complete guide about OnyX for Mac review.
OnyX is regarded as one of the best toolkit software for macOS computers. It contains several features, most of which can be handy in many circumstances. It can clean files, optimize the operating system, eliminate viruses, and more. But despite its reputation, you’ll also often find negative OnyX for Mac review on the internet. Some say it’s too difficult to use, while others think it doesn’t work properly. Naturally, the mixed reviews can make it confusing to determine whether it’s worth it or not.
With that in mind, this article will go over several aspects of the software while providing only pure facts. That way, you can decide for yourself whether OnyX is suitable for your purposes. Let’s start by taking a look at an overview of the OnyX app.
Part 1: An Overview of OnyX
OnyX is a multi-utility software that can run various tasks that help you manage your computer in different ways. It was developed by Joël Barrièrehas in 2003 and it has been running well over the past two decades, so you can rest assured that it’s a safe app. There haven’t been any major issues in the past, unlike other apps that have been through several controversies within only a few years. Every Onyx for Mac review you’ll find on the internet will point towards the software being good.
Of course, while it’s generally good software, there are aspects that it can be lacking, such as simplicity. Other than that, you may face certain problems with the software that others haven’t encountered yet, hence why you must look for reviews.
With that in mind, here’s a look at the different factors of OnyX and how it fares well compared to other similar apps.

Part 2: OnyX for Mac Review: Accessibility
The easiest factor to judge regarding OnyX is perhaps the price. After all, it’s completely free, so there’s not much to judge there. It’s one of the very few tools that doesn’t charge you money in a way that’ll negatively affect you. Every feature available in the software can be accessed for free, and though you can technically pay for the app, it’s primarily as a support to the developers. It’s similar to how WinRAR or 7-Zip is free, but you can support the developers by paying a small amount.
It has been this way since it was released, which makes the fact that it’s free even more impressive. In addition to its price, it’s also incredibly accessible, as you can get it in almost every version of macOS since it’s been around forever.
Perhaps the only complaint we have about OnyX for Mac about accessibility is the fact that you must download the suitable version of OnyX for your macOS. If you downloaded a different version, it wouldn’t work, so you must match the package you download to your current macOS version. But it’s not that much of a problem since you only have to choose correctly.
Part 3: OnyX for Mac Review: User Interface
Our main problem with OnyX comes from the fact that its interface is incredibly confusing. Of course, it’s mainly because it has numerous features available, but due to the massive number of buttons and texts in the interface, you’ll often find it difficult to get started with the toolkit. Even a simple task like deleting a file can prove to be as difficult as modifying the registry, which says a lot about the user interface. The good news is while the learning curve is indeed steep, once you go through the hard part of the process, it’ll be smooth sailing from that point onwards since the interface is intuitive.
However, this takes us to yet another issue with the software, which is the ever-changing UI design. As stated earlier, whenever a new macOS version comes out, a new OnyX version also comes out to work specifically for that macOS.
Unfortunately, in addition to the new infrastructure, the design of the interface for each OnyX version also changes. Of course, while one may argue that every version is an upgrade of the previous one, it can still be confusing.

Part 4: OnyX for Mac Review: Features
It goes without saying that OnyX has a ton of features available, too many, in fact, that once you get to the interface, you’ll most likely get overwhelmed almost immediately. While the number of features is tempting to some, it can be a disadvantage to others. Thankfully, OnyX doesn’t try too hard to become an all-around toolkit. The developer doesn’t add more features, so the existing ones just keep getting better. So, not only are their numerous features, but each one is also already well-developed.
Part 5: OnyX for Mac Review: Support
While it’s a bit difficult to reach customer support for OnyX, it’s understandable since the software is completely free. It won’t be right to blame the staff if they don’t respond, but of course, it’s still much appreciated if there are people who can provide support. Fortunately, while customer support is not their best trait, they do have an FAQ page where you can look for answers to your questions. Furthermore, since the app is relatively popular, you can look for tutorial videos on the web.
Part 6: OnyX for Mac Review: Is It Worth It?
Overall, we can say it’s really worth it, though that may not mean much since the app is free anyway. However, even if it does cost a bit of money, we can still say it’ll be worth every penny since it can do things that other toolkits can’t.
Part 7: Best Alternative: Mac Cleaner
OnyX might be an excellent software, but its downside of being too complex is tremendous. If you haven’t used a toolkit before, the interface of the software may seem overwhelming. Furthermore, though it consists of numerous features, you’ll rarely find an opportunity to use some of them, so you’re basically installing software to use only a handful of its features. If that doesn’t seem suitable for your purposes, perhaps Mac Cleaner would be the more suitable app for you.
Mac Cleaner is modular software designed to help users delete unnecessary files from their computers. Apart from cleaning, it also consists of optimization features. If you wish to use the software, here’s what you need to do:
Step #1: Open Mac Cleaner on Your Computer
To start with, you need to get the software on your computer. To do that, you must go to this link. It should take you to the Mac Cleaner download page where you need to click the Download Now button. Doing so will download a DMG file, which you must then open to run the installer. Once the installer starts, you simply have to follow the onscreen instructions. The software will then automatically open once the installation is 100 percent complete.

Step #2: Select from Six Modules
Mac Cleaner currently has six modules. It may not be as many as the features of OnyX, but each module has several features and functionalities. Here’s a look at each module and how they can help you with your macOS utility needs:
- Clean Up Junk allows you to delete junk files like trash, system junk, app cache, and more.
- Delete Large Files can get rid of files with a size that exceeds 50MB. It’s an excellent way to free up disk space.
- Delete Duplicate Files eliminates files that already have an extra copy somewhere on the computer.
- Erase Private Data finds and deletes files that may contain private data, such as emails, browsing history, etc.
- Speed Up Your Mac can perform various actions that optimize the performance of a macOS computer.
- Manage Apps & Extensions help you uninstall applications and remove browser extensions.
Simply select the module that you currently need or want to use. You can select a module by simply clicking on it from the left sidebar of the interface where you’ll find all six options.

Step #3: Click Scan/Start Now/View Items
Upon selecting a module, you’ll notice that the software changes its appearance. In particular, the software will show you information about the selected module. You can read it if you want, but the main idea behind the third step is to scan your computer for files or things that the module can do. Here’s a look at how you proceed for each module:
- Clean-Up Junk: The software will be split into two. One side says Quick Clean while the other says Deep Clean. Quick Clean can scan for System Junk, App Junk, Trash Bin, and iTunes Junk, while Deep Clean scans all those in addition to Downloads, iOS Junk, and Unused Disk Images. Select between the two, then click the Scan button.
- Delete Large Files: Click the Scan button.
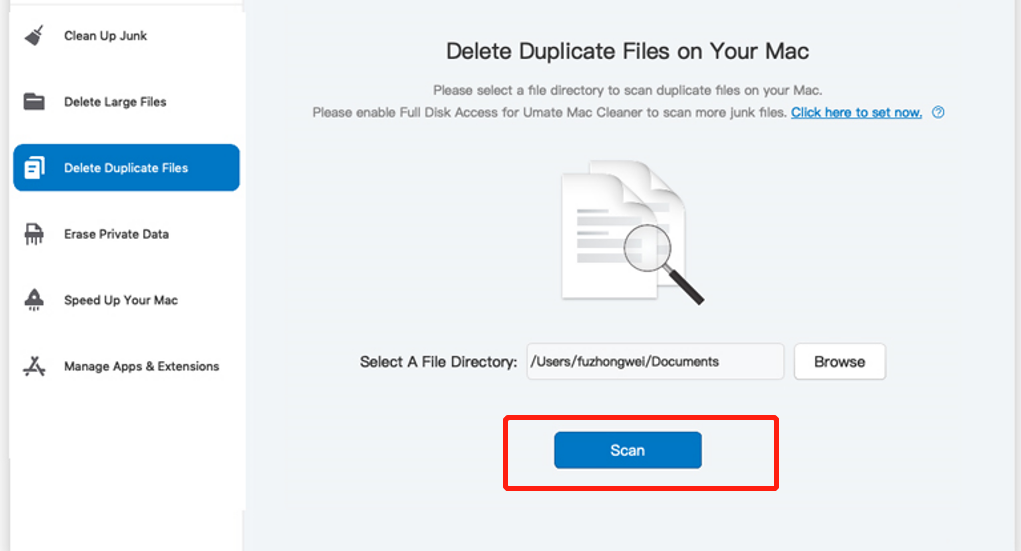
- Delete Duplicate Files: At the center of the interface, you’ll find a field that says Select a File Directory. On its left is the Browse button. Click that button, and use the popup window that’ll appear to navigate to the directory you want to scan for duplicate files. Once you’ve specified a directory you want to scan, click the Scan button below.
- Erase Private Data: Click the Scan button.
- Speed Up Your Mac: Click the Start Now button.
- Manage Apps & Extensions: Similar to Clean Up Junk, the software will be split into two sides. One says Uninstall Applications while the other says Remove Extensions. They do exactly what they say. Choose between the two, but don’t click anything yet. You simply have to click the View Items button on the option you chose.
Step #4: Pick Item/s
The next step is all about selecting items according to the module you chose. For most modules, it’s about selecting files you want to delete, but for some, it’s selecting the action you want to take. Anyway, here’s what you need to do for each module:
- Clean-Up Junk: There will be a list on the left side of the interface. From there, you’ll find file categories like System Junk, Downloads, Trash Bin, Unused Disk Images, etc. Select a category from this list. After doing so, a new list will appear on the right side of the interface. From there, you’ll find actual files that belong to the selected category. Select files from there by clicking on their checkboxes. You can also click Select All to include all items.
- Delete Large Files: Select an item (e.g., file, folder, disk image, archives, etc.) from the list.
- Delete Duplicate Files: Select an item (e.g., image, document, audio, video, etc.) from the list.
- Erase Private Data: The selection process is the same as with Clean Up Junk, except the list on the left consist of only four items, namely Online Traces, Usage Traces, Chat Data, Photo Junk, and Mail Attachment.
- Speed Up Your Mac: The selection process is the same as with Clean Up Junk, except the list on the left consist of only four items, namely, Disable Login Items, Deactivate Heavy Consumers, Remove Launch Agents, and Free Up RAM. Moreover, the list on the right will consist not of files but of apps and processes that you can deactivate.
- Manage Apps & Extensions: If you selected Uninstall Application, the list will consist of apps that you can uninstall. You don’t have to do anything other than wait for step 5. If you selected Remove Extensions, you must select a browser from the list on the left side. Then, a new list will appear on the right side consisting of extensions.
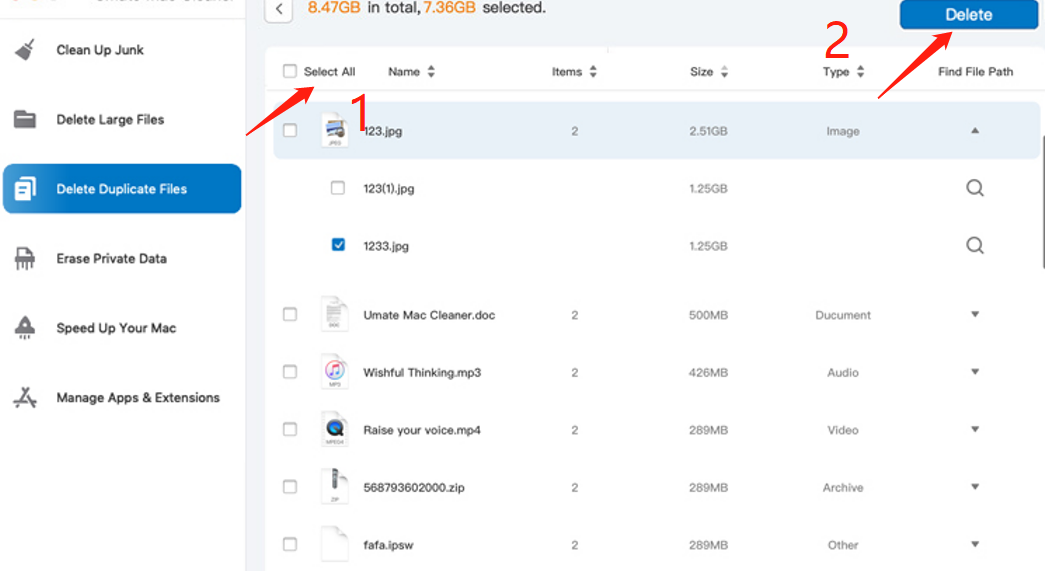
Step #5: Click the Blue Button
At the upper right corner of the window, you’ll find a button that says one of the following: Clean, Delete, Erase, Deactivate, Uninstall, Remove. It depends on the module. Regardless, to finalize the process, click that button.
It may not be the fanciest and most comprehensive software you can find on the internet, but its simplicity has proven to be quite effective. You don’t have to spend hours learning to use the software, and due to the minimal number of elements on the interface, it runs fairly quickly. That’s the charm of Mac Cleaner, and why we consider it the best alternative to OnyX.
Conclusion
While you may argue that all the features of OnyX and other tools like Mac Cleaner can be accomplished without software, it requires you to spend a lot of time and effort. Cleaning your computer, for example, typically takes hours to complete. With a tool, however, you only need to spend a few minutes and you’re good to go. That’s the main idea behind these pieces of software. So, while they might be difficult to use at first, once you’re used to these tools, you’ll find it easier to use your macOS computer.
Latest Articles