

What is other volumes in container?
If you consider yourself a techie, you should know the importance of file cleanups. Basically, it’s when you delete files on your computer that you think is longer necessary. It allows you to free up some space on your computer, which almost always produces positive results. Not only will it make space for more important files, but it can also boost the performance of your computer. However, before you engage in this activity, it’s important to first check your storage breakdown.
Part 1: How to Check Your Computer Storage
It’s common practice to first check the storage of your computer before you engage in any activity that can affect said storage. That applies to all operating systems, including Mac. In this case, here’s how you check your computer storage:
- Click the Apple icon found at the top-left corner of your screen.
- Select About This Mac from the resulting dropdown menu. This should open a new window.
- In the new window, you’ll find a menu bar at the top. Simply click the Storage tab from this menu.
On the Storage tab, you can find a breakdown of the computer’s storage. It’ll show you the distribution of files on your storage. It also displays how much of your storage is occupied by system files, photos, and other file types. The storage breakdown makes sense until you find that there’s a part of the breakdown that says Other Volumes in Container.
Unfortunately, it doesn’t say exactly what file type that includes or if it corresponds to a specific directory. For that reason, you may wonder, “What data types does the Other Volumes in Container category represent on your computer?”

Part 2: An Overview of Other Volumes in Container
Basically, the Other Volumes in Container is a category that represents all the invisible volumes of your computer that it needs to operate properly. There are exactly three volumes included in this category. Here’s a look at each one of them:
- Preboot Volume is where you can find the files that the Mac computer needs to boot up properly, hence the name of the volume. Compared to other volumes, the Preboot Volume is quite small since the files needed to boot up are not that many. For that reason, there’s no need to worry about this volume taking too much space on your computer.
- Recovery Volume is where you can find files that are necessary for the maintenance and repair of your Mac computer. Again, it shouldn’t consume too much space, similar to Preboot Volume. However, there are cases where it does consume a lot of space, but that’s often the result of an underlying issue in your computer that you must resolve.
- VM Volume, also known as the Virtual Memory, is the backup to RAM. If your computer’s RAM runs out of space, rather than malfunctioning, the operating system instead relies on the VM Volume in the meantime. Similar to the RAM, it should get cleared when you restart the computer. Clearing the RAM often resolves issues pertaining to the VM volume since it no longer needs to work on behalf of the RAM.
Do keep in mind that you won’t always find this category in the storage breakdown. It only appears in certain macOS versions. Specifically, it only appears in macOS versions that use the Apple File System, or APFS.

Part 3: How to Check The Individual Storage Space of Each Volume in Other Volumes in Container
As stated earlier, there are exactly three volumes under the Other Volumes in Container category. If you look at the storage breakdown in the About This Mac Storage area, you can only view the total storage space of the three volumes combined.
Though it does give us a bit of information said volumes, it’s not much. Fortunately, there’s a way to figure out the exact storage space that each of the three volumes consumes on your computer. Below are the steps you need to follow to pull it off:
- Click the Launchpad icon from the Dock, which should look like a rocket.
- Click the Terminal icon from the Launchpad, which should look like a black box with >_ on it.
- On the Terminal, type in this text: diskutil
- Press Enter or Return on your keyboard.
The Terminal will then display a storage breakdown similar to the one you see in the About This Mac Storage area. This time, however, it’s completely made of text. However, you should be able to find a text that says APFS Container Scheme. Under this text, you’ll find the different parts of the APFS Container Scheme, including the following:
- APFS Volume Macintosh HD
- APFS Volume Preboot
- APFS Volume Recovery
- APFS Volume Data
- APFS Volume VM
To the right side of each volume, you can see the size that they consume. This is how you can check the individual storage spaces allocated to each of the three volumes under the Other Volumes in Container category, giving you more accurate data.

Part 4: Can You Delete Other Volumes in Container?
As previously mentioned, the Other Volumes in Container consists of invisible volumes that your computer needs to function properly. Therefore, you cannot and should not attempt to delete these volumes since they would lead to issues and malfunctions. You can, however, delete a few files inside these volumes that are mostly unnecessary, but that would require you to use specialized cleaning software. Fortunately, that’s what we’ll be discussing in the next section.
Part 5: Free up Space on “Other Volumes In Container” Using Mac Cleaner
By now, you should have already realized that the Other Volumes in Container is unlike any partition on your computer. You cannot easily access it, much less clear it, yet you must still do so to ensure your Mac is in peak performance. Though you have the option to go with the traditional methods, they often require you to have a basic understanding of how partitions work on the system. If you’re not exactly the best at managing partitions, we suggest using Mac Cleaner instead.
Mac Cleaner is a modular software that allows you to clean various files on your computer. It may not have the capability to target a specific partition, but it has a module that can help deal with problems pertaining to Other Volumes in Container. If you wish to use the software, here’s a user guide to help you throughout the process:
Step #1: Launch Mac Cleaner on Your Computer
Before you can start, you must first download the Mac Cleaner installer from its website by simply clicking the Download Now button. You must then install it using the downloaded file and then open it afterward.
Step #2: Choose the Speed up Your Mac Module
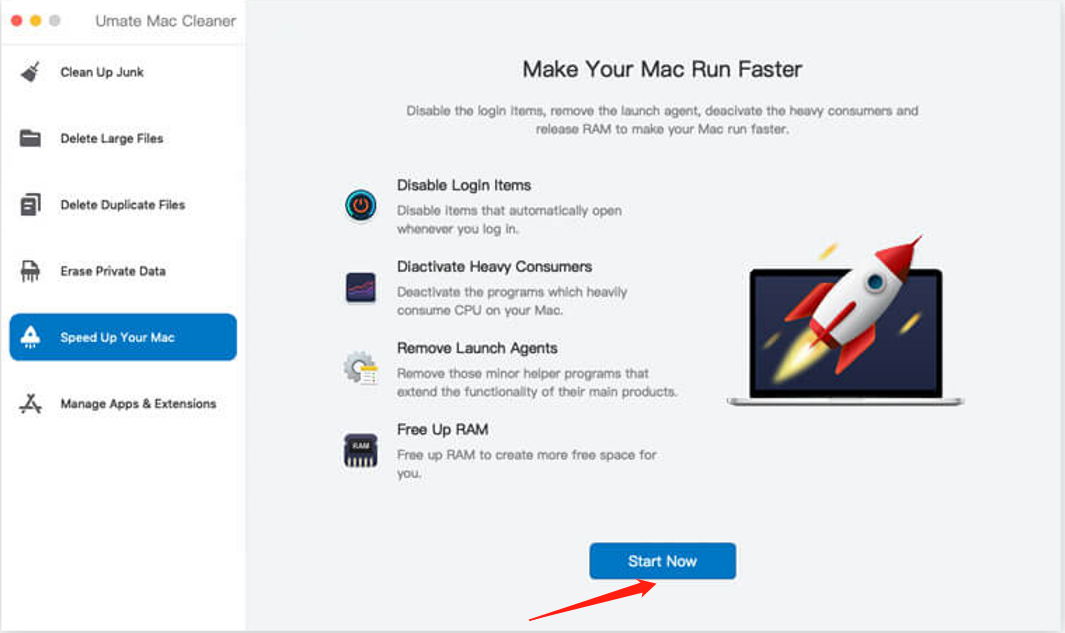
On the main interface, you’ll notice the left sidebar contains six options, namely (1) Clean Up Junk, (2) Delete Large Files, (3) Delete Duplicate Files, (4) Erase Private Data, (5) Speed Up Your Mac, and (6) Manage Apps & Extensions. These are the different modules Mac Cleaner has to offer. For our purposes, we’ll be using the Speed Up Your Mac. This is because the partitions included in Other Volumes in Container store some of their files in your computer’s RAM.
Therefore, by clearing your RAM, you can basically free up space on the Other Volumes in Container, and the Speed Up Your Mac module has that exact feature. To select the module, simply click on it from the left sidebar of the software.

Step #3: Click the Start Now Button
Upon selecting a module, the software will display information pertaining to its features. You can learn more about the module by reading them, though you don’t have to. Regardless, the next step would be to click the Start Now button.
Step #4: Select Free Up RAM
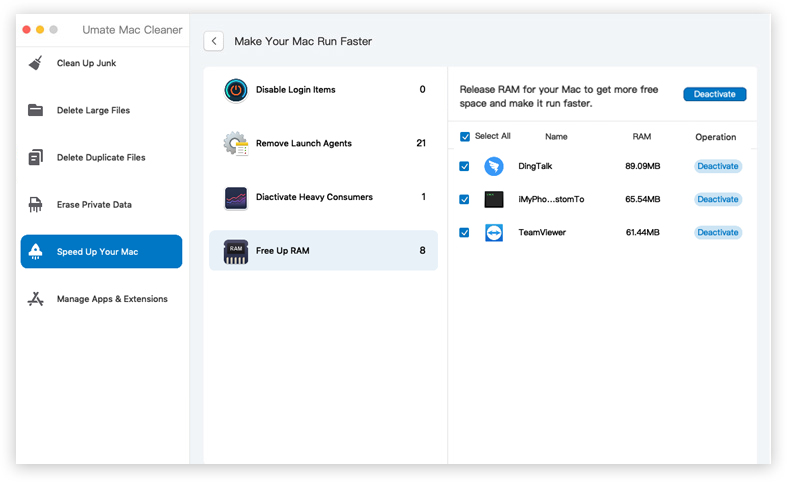
The Speed Up Your Mac module has exactly four features, namely (1) Disable Login Items, (2) Deactivate Heavy Consumers, (3) Remove Launch Agents, and (4) Free Up RAM. Since your goal is to free up space on the partitions in Other Volumes in Container by clearing the RAM, you should naturally select Free Up RAM.
Step #5: Deactivate Apps and Processes
You’ll notice on the right side of the software that there are several items. These are the applications and processes that you can deactivate in order to reduce RAM usage. Simply select an item by ticking their corresponding checkboxes and click the Deactivate button at the upper-right corner of the window. You can also choose to click the checkbox of Select All to include all items at once.
Keep in mind that this will not completely clear the space consumed by Other Volumes in Container. Some of the items in these partitions are crucial and are therefore not to be deleted. Nevertheless, with these steps, you can at least free up some space for other important files.
Closing Thoughts
If you look closely at your storage breakdown, you’ll notice that the Other Volumes in Container doesn’t exactly consume the most amount of storage space. The System volume has it beat in that regard. However, it still takes up a considerable amount of space. Hence, as ambiguous as it is, it’s your task to clear it every now and then if you wish to maintain healthy storage. Alas, the Other Volumes in Container is often the most difficult to manage since, unlike other volumes, you know nothing of the files that comprise it. But with this guide, you now have a good idea of what it contains and how to deal with it.
Latest Articles