

photo management software mac
In today’s digital age, we capture and store countless photos on our Mac devices. While it’s great to have a digital record of our memories, it can quickly become overwhelming to manage all of those files. That’s where photo management software for Mac comes in. In this blog, we’ll explore some of the best options for organizing and managing your photos on a Mac.

#1: Apple Photos
First on the list is the default photo management software for Mac – Apple Photos. This app comes pre-installed on all Mac devices and is a great option for basic photo management. It allows you to organize your photos by date, location and even recognizes faces in your photos for easy sorting. You can also create albums and folders to further organize your photos. Additionally, Apple Photos has some basic editing tools for quick touch-ups.
#2: Adobe Lightroom
For more advanced photo editing and management, Adobe Lightroom is a popular choice. It has a robust set of features, including advanced editing tools, presets, and filters. It also allows you to organize your photos into collections, tag them with keywords, and rate them for easy sorting. With Lightroom, you can even create slideshows and web galleries to share your photos online.
#3: Google Photos
If you’re looking for a cloud-based photo management solution, Google Photos is a great option. It offers unlimited storage for photos up to 16 megapixels and videos up to 1080p resolution. Google Photos automatically organizes your photos by date, and location, and recognizes faces. It also has a powerful search function that allows you to find photos based on keywords. Additionally, you can create albums, collages, and movies directly from the app.
#4: ACDSee
ACDSee is another popular photo management software for Mac that offers a variety of features. It allows you to organize your photos by date, keyword, and rating. You can also add tags and captions to your photos for easy sorting. ACDSee has a range of editing tools, including basic adjustments, filters, and effects. It also has a built-in file converter, so you can easily convert your photos to different file formats.
#5: Mylio
Mylio is a newer photo management software that is gaining popularity among Mac users. It offers a unique feature that allows you to sync your photos across multiple devices, including your Mac, iPhone, and iPad. Mylio also has advanced organization features, such as facial recognition, geotagging, and custom tags. It even allows you to merge duplicate photos and automatically removes duplicates from your library.
Best photo management software for Mac: Mac Cleaner
While Mac Cleaner is not specifically designed as a photo management software, it does have some features that can help with organizing and managing your photo library. For example, it can scan your Mac for duplicate files, including duplicate photos, and help you delete them to free up space. It can also help you locate and delete similar photos, which can be especially useful if you have a lot of similar shots that are taking up unnecessary space.
Additionally, Mac Cleaner can help you free up space on your Mac by identifying and deleting large files, such as videos or high-resolution photos, that may be taking up valuable storage space. This can help you optimize your Mac’s storage and ensure that you have enough space to store all of your photos. Mac Cleaner is a user-friendly cleaning app that simplifies the process of removing unnecessary files. With three cleaning modules, it helps achieve your goal with minimal effort.
Step #1: Open Mac Cleaner on Your Laptop
Begin by launching Mac Cleaner on your laptop, which requires you to download the software first. To download the software, click on this link that will redirect you to the Mac Cleaner download site. On the site, you’ll see a “Download Now” button, which will download a DMG file. Once the download is complete, open the DMG file to launch the installer, and then follow the onscreen instructions to proceed further.

Step #2: Choose a Cleaner Module
The Mac Cleaner interface offers six different options on the left-hand side, corresponding to its six different modules: (1) Clean Up Junk, (2) Delete Large Files, (3) Delete Duplicate Files, (4) Erase Private Data, (5) Speed Up Your Mac, and (6) Manage Apps & Extensions. For Mac cleaning purposes, you will mostly need the first three modules, which are commonly referred to as the cleaner modules. These modules help to clean your Mac by removing unnecessary files. Here is a brief overview of what each of these cleaner modules can do:
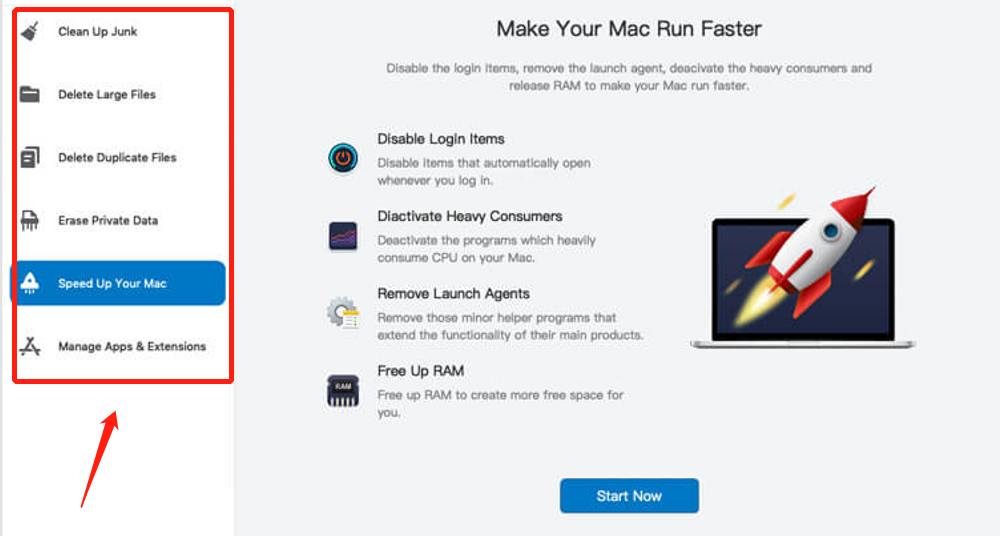
- Clean Up Junk: scans for and eliminates junk files such as System Junk, App Junk, Trash Bin, iOS Junk, iTunes Junk, Unused Disk Images, and Downloads. This module is useful in freeing up disk space on your Mac.
- Delete Large Files: searches for files larger than 50MB and allows you to delete them.
- Delete Duplicate Files: detects and deletes any files that have extra copies stored on your laptop.
To select a module, simply click on the desired option on the left-hand side of the interface.
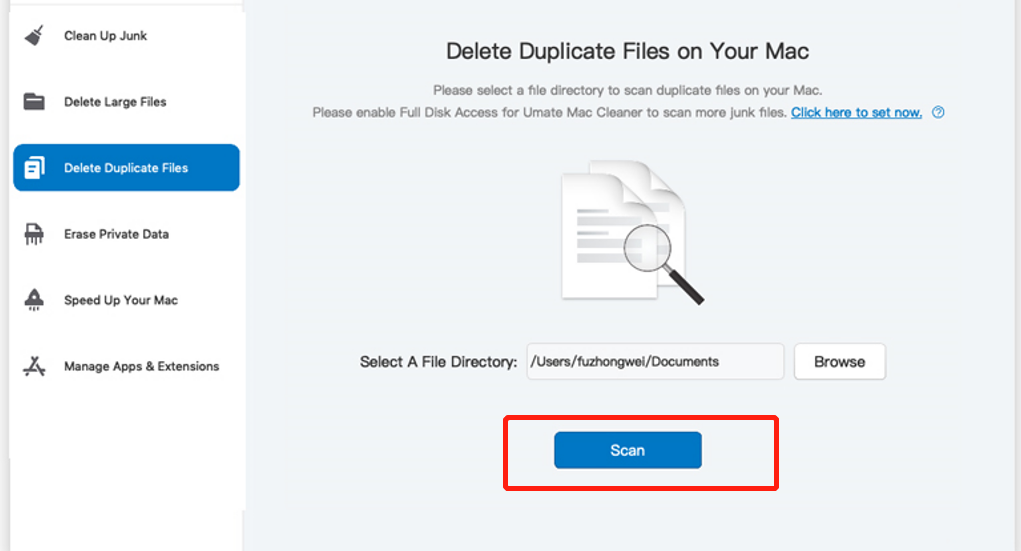
Step #3: Scan Your Mac for Files
Your next task is to scan your laptop for files, but the steps required will vary depending on which cleaner module you’ve selected. Here are the steps to scan your Mac for each of the three cleaner modules:
- Clean-Up Junk: This module is divided into two parts, Quick Clean and Deep Clean. For a quick scan of System Junk, App Junk, Trash Bin, and iTunes Junk, select Quick Scan. For a more comprehensive scan that includes Downloads, iOS Junk, and Unused Disk Images, choose Deep Clean. After making your selection, click the Scan button.
- Delete Large Files: To scan for large files, simply click the Scan button.
- Delete Duplicate Files: In the center of the interface, you’ll find a field labeled “Select a File Directory” with a Browse button to its left. Click the Browse button, navigate to the folder you want to scan for duplicate files, and then click the Scan button.
With these simple steps, you can easily scan your Mac for unnecessary files and delete them with Mac Cleaner.
Step #4: Pick a File/s
After the scan, the Mac Cleaner interface will display a list of items found. To proceed, you’ll need to select the file/s you want to delete, which varies depending on the module. In the case of Delete Large Files and Delete Duplicate Files, you can select the items to delete by checking the corresponding checkbox beside them, while Clean Up Junk requires you to choose a file category such as Downloads or Trash Bin first. Select all files by clicking the Select All option.
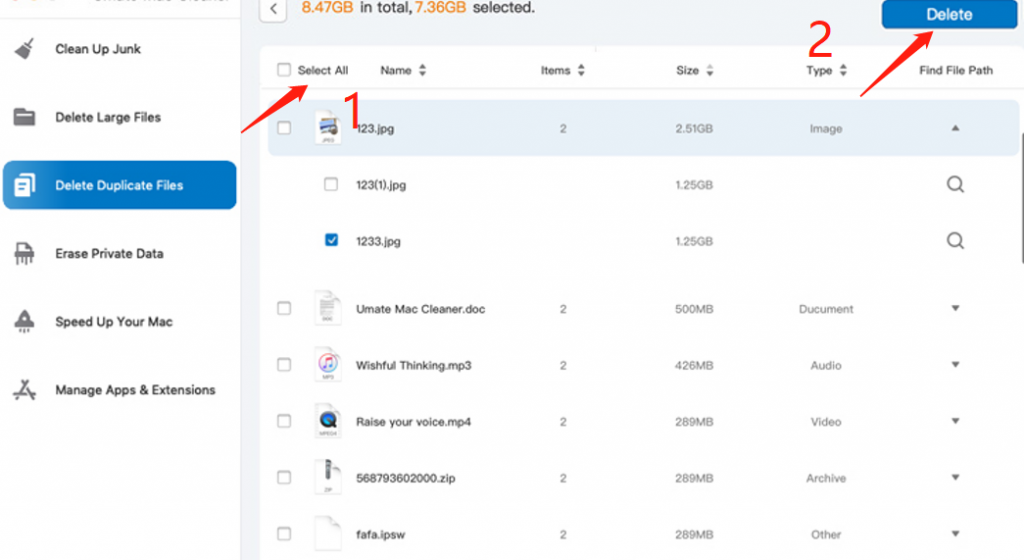
Step #5: Delete the File/s
You need to delete the file/s that you have selected in Step #4. At the top-right corner of the window, you will see a blue button that either says Clean or Delete, depending on the module you selected. Click that button to finalize the process and delete all the selected items. Mac Cleaner makes it easy and efficient to clean up your Mac, but it’s important to double-check to ensure you won’t accidentally delete important files, even though the software mostly scans for unnecessary ones.
Closing Thoughts
In conclusion, there are a variety of photo management software options for Mac users, each with its own unique features and benefits. Whether you’re looking for a basic solution like Apple Photos or a more advanced tool like Adobe Lightroom, there’s something out there for everyone. With the help of these software tools, you can easily organize and manage your photo library, so you can enjoy your memories for years to come.
Latest Articles