

This is a complete guide to tell you how to remove unnecessary file on Mac. It’s not unusual to run out of space on your computer. After all, every device has a maximum storage capacity. When it reaches that capacity, or at least gets close to reaching it, you can feel its effects just by looking at the performance of the computer.
It would slow down considerably and operations will take longer, among many things. That’s why it’s important that macOS users know how to remove unnecessary files. Unfortunately, that can prove to be difficult if you’re a beginner at using macOS devices. If that’s the case, then perhaps this guide can help. Read on to learn how to remove unnecessary file on Mac.
Part 1: What Files Are Unnecessary?
macOS users often make the mistake of deleting files that they think are unnecessary, when in reality, those files are important to the operation of your computer. If you delete these files, then naturally, the operating system may cease to function properly. That’s why it’s important to first ensure the file is actually unnecessary, rather than just delete the files indiscriminately. Interestingly, there are a category of files that you can delete, and these include the following:
- Apple mail attachments
- Trash files
- Duplicate files
- iOS backup files
- App leftovers
- System and app cache
Keep in mind that these are just a few examples of unnecessary files you can delete. There are a lot more files that should be purgeable on your computer, but it’s best to stick to these ones first since they take up the majority of the purgeable space.
That being said, here’s how you can delete them, starting with Apple mail attachments.

Part 2: Remove Apple Mail Attachments
Whenever you open a mail from the Apple Mail app, the operating system automatically generates the files that the mail contains, meaning it downloads its attachments. The reason it’s unnecessary is that even if you delete the downloaded attachments, you can download them again, as long as you have access to those emails. Anyway, here’s how to remove them:
- Open the Finder app on your computer.
- Click Go from the top menu bar.
- Select Go to Folder… from the resulting dropdown menu.
- When a popup window appears, type in the following text: ~/Library/Mail
- Click the Go button to proceed.
- Finder will take you to the Mail folder. Once you’re there, find the ones you want to delete.
- Select them, then press the Delete key on your keyboard.
Make sure you empty the Trash afterward so the deleted files wouldn’t take up disk space on your computer.
Part 3: Empty The Trash
It’s pretty self-explanatory why the Trash files are unnecessary. You already deleted them once, which is why they’re in the Trash, so why not delete them again? Here’s how you can empty the Trash and delete its files:
- Find the Trash icon on the Dock or the taskbar. The icon looks like a literal trash can.
- Click on the icon while holding the Ctrl key on your keyboard.
- Select Empty Trash from the resulting dropdown menu.
Keep in mind that this will make it so you won’t have a way to retrieve the deleted files, so it’s best to check it first to see if the Trash doesn’t contain files that you might potentially need in the near future.

Part 4: Delete Duplicate Files
Duplicate files are basically extra copies of existing files on your computer. You can delete them because they’re just extra copies anyway. Deleting them wouldn’t do you any harm since you can just copy the original if it turns out you need multiple copies of the file. Unfortunately, macOS computers and laptops don’t have a way to automatically find and delete duplicate files. Rather, you have to do it manually. You can also install third-party tools that specialize in deleting duplicate files.
Part 5: Get Rid of iOS Backup Files
Whenever you sync your iOS devices like iPhone and iPad into your macOS computer, the system automatically creates a copy of the backups from the iOS device into the computer. These are what we call the iOS backup files. Though it can be handy, particularly old backup files are typically unnecessary since you wouldn’t want to recover from a backup so old it will probably result in data loss. Here’s how you can get rid of iOS backup files.
- Open the Finder app on your computer.
- Click Go from the top menu bar.
- Select Go to Folder… from the resulting dropdown menu.
- When a popup window appears, type in the following text: ~/Library/Application Support/MobileSync/Backup
- Click the Go button to proceed.
- Finder will take you to the Backup folder. Once you’re there, find the ones you want to delete.
- Select them, then press the Delete key on your keyboard.
Make sure you empty the Trash afterward so the deleted files wouldn’t take up disk space on your computer.
Part 6: Take Care of Uninstalled App Leftovers
Whenever you uninstall an app, it actually doesn’t get completely eliminated. There are typically leftovers of that app that you can find in different places on your computer. Those are unnecessary since the app is gone anyway. Here’s how you can take care of them:
- Open the Finder app on your computer.
- Click Go from the top menu bar.
- Select Go to Folder… from the resulting dropdown menu.
- When a popup window appears, type in the following texts one by one:
- ~/Library/Preferences
- /Library/Preferences
- ~/Library/Application Support/[App or Developer name]
- /Library/Application Support/[App or Developer name]
- ~/Library/Containers/[App name]/Data/Library/Preferences
- ~/Library/Caches
- /Library/Caches
- ~/Library/Containers/[App Name]/Data/Library/Caches/[App Name]
- ~/Library/Saved Application State
- Click the Go buttonto proceed.
- Finder will take you to these folders. Once you’re there, find the files that are related to the apps you have uninstalled in the past. Those are the only ones you must delete since the rest are usually still necessary for your computer.
- Select them, then press the Delete key on your keyboard.
Part 7: Clear The System And App Cache
The system and app cache corresponds to the files that the operating system or app needed in the past but is no longer necessary now as they have served their purpose. It’s common practice to clear these cache files. Here’s how you can do that:
- Open the Finder app on your computer.
- Click Go from the top menu bar.
- Select Go to Folder… from the resulting dropdown menu.
- When a popup window appears, type in the following text:
- ~/Library/Caches if you want to clear the system cache
- ~/Library/Application Support/[App Name]/Caches if you want to clear the app cache
- Click the Go buttonto proceed.
- Finder will take you to the Backup folder. Once you’re there, find the ones you want to delete.
- Select them, then press the Delete key on your keyboard.

Part 8: BONUS: Remove Unnecessary File Quickly With Mac Cleaner
As much as you’d like to use the aforementioned methods to remove unnecessary file on your computer, they’re often not that time-efficient. It can take several minutes or even hours to get rid of files, and you may not even free up 1GB of space.
Mac Cleaner is a cleanup software that can do things much easier by scanning the computer and automatically finding the unnecessary files for you. It’s great since it specializes in unnecessary files. Here’s how you can use this software:
Step #1: Download, Install, and Open Mac Cleaner
The process starts with getting the software, and to do that, you must click this link. It should take you to the software’s download page where you’ll find a button that says Download Now. Click it to download a DMG file that corresponds to the software’s installer. Once it’s downloaded, open it promptly to start the installation. There will be instructions on the installer, so simply follow them from that point. The Mac Cleaner software will open automatically once the installation is done.

Step #2: Select Clean Up Junk
Mac Cleaner has six modules, and these include (1) Clean Up Junk, (2) Delete Large Files, (3) Delete Duplicate Files, (4) Erase Private Data, (5) Speed Up Your Mac, and (6) Manage Apps & Extensions. Select the Clean Up Junk module.
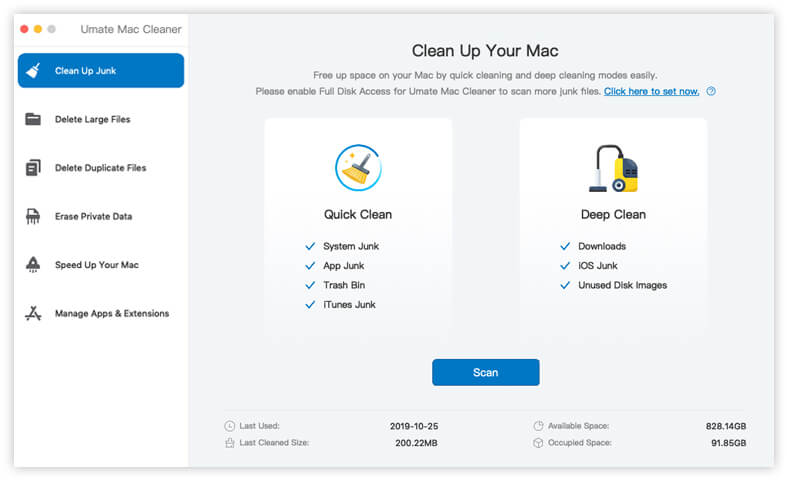
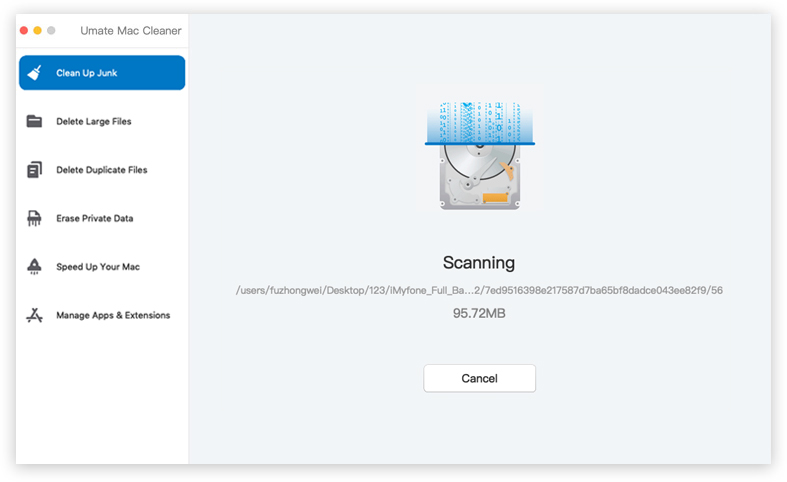
Step #3: Click the Scan Button
Upon selecting the module, the software will change its appearance. The main idea for this step is to scan your computer for files to delete. To do that, you must first select a scanning method, which is either Quick Clean or Deep Clean, the click Scan.
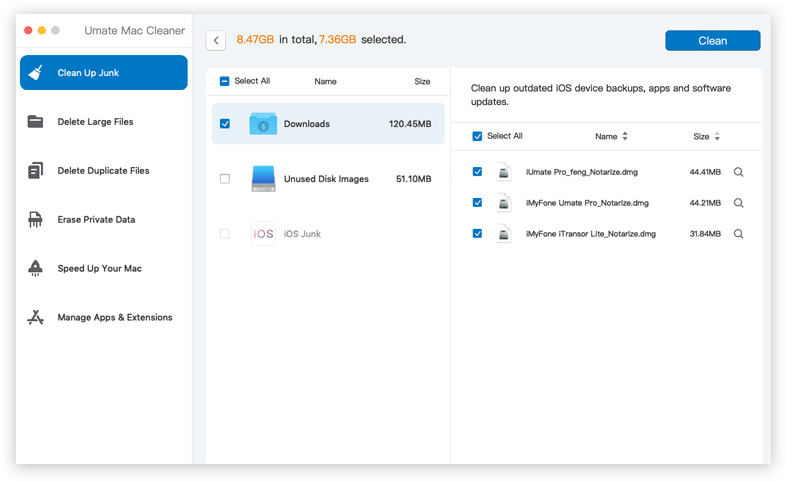
Step #4: Pick a File Category and File/s
Once the scan is complete, you must select the files you want to delete. For that, you must first select a file category from the list on the left side of the interface. After doing so, a new list will appear on the right side, and you must select from that list.
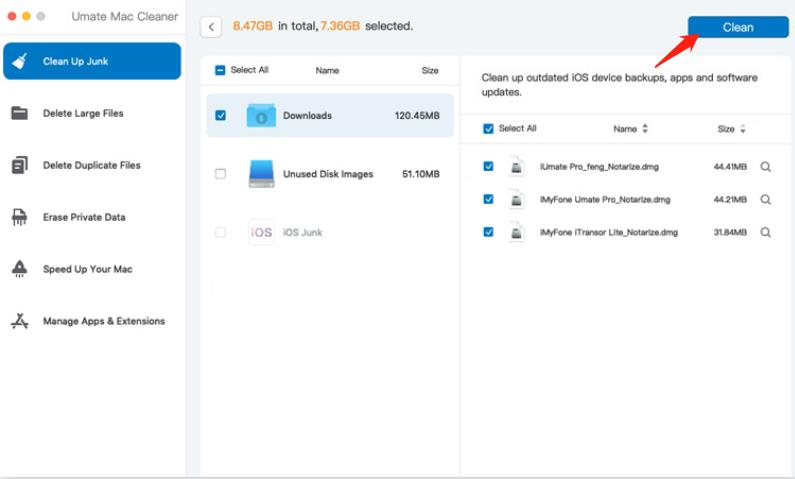
Step #5: Remove the File/s
Click the Clean button located at the top-right corner of the window to finalize the process.
Going Forward
As you may have realized, the issue with deleting unnecessary files isn’t the process of deleting them, but rather the process of finding where they are. However, with this guide, not only were you able to learn how to find unnecessary files efficiently, but you now also know the importance of removing them in the first place. Make this a habit to ensure your computer doesn’t encounter any severe storage issues.
Latest Articles