

Optimizing the performance of a macOS computer, or any device, for that matter, is relatively easy. You have to make sure to clean up unnecessary files so there’s enough disk space, use the virus scans regularly, and most importantly, perform updates whenever they’re available. With these steps, the computer should perform really well even if they’re relatively old. Though you can do the first two steps for Mac El Capitan, the third step which involves performing updates is most likely not going to be plausible. After all, ever since Apple released macOS Sierra, Mac El Capitan is no longer supported with updates.
Therefore, speeding up Mac El Capitan is much harder than optimizing the performance of newer macOS versions, but it’s not impossible by any means. Read on as this guide goes over five ways to optimize your Mac El Capitan computer’s performance.
Method #1: Update The macOS
A macOS update has several purposes, one of which is to optimize the resources of the computer. That’s why whenever you update to the latest macOS, it almost always makes the device run a lot faster. With that said, here’s how to update the macOS:
- Click the Apple icon from the top-left corner of the screen.
- Select System Preferences.
- When a window appears, click Software Update.
- On the next window, there should either be an Update Now or an Upgrade Now button.
- Click either one.
- Follow the onscreen instructions.
The problem with this method is it has clear limits. As stated earlier, the macOS El Capitan is no longer supported by Apple, meaning computers with the model no longer receives any update. Of course, you can upgrade the operating system instead to turn it from macOS El Capitan to macOS Sierra or High Sierra, but that’s only applicable to certain models. If your computer is already at the latest version, then you clearly can’t use this method, so here’s one you can use regardless of the macOS version.

Method #2: Uninstall Unused Apps
Certain apps have a feature called Open Upon Startup. It basically allows the app to open as soon as the computer boots up, and though it’s convenient, not only is it annoying, but it can also affect the performance of the computer. After all, each app consumes a certain amount of RAM and CPU, and if it runs out, the computer will slow down. That’s why it’s advisable to get rid of applications if they’re no longer necessary. Here’s how to uninstall apps for the purpose of speeding up Mac El Capitan:
- Click the Launchpad icon from the Dock. The icon is either a rocket or a square with nine other squares inside.
- While you’re on the Launchpad app, hold the Option key on your keyboard until the apps start jiggling.
- There should now be an X icon on the corner of the uninstallable apps. Find the ones you want to uninstall.
- Click their corresponding X icon.
- Click Delete to confirm your action.
Make sure you really don’t need that app. Otherwise, you may lose all the files you made using the app, which can be a bummer since those files cannot be restored from the Trash even if you reinstall the app.

Method #3: Clear The System And App Cache
Whenever you do something on your computer, the operating system automatically generates the necessary files. The same applies to applications. Whenever you do something while you’re on your app, it generates the needed files. These generated files are what people call the cache, and they not only take up considerable disk space from the computer but also affect the performance of the computer when they pile up. That’s why you must regularly clear the system and app cache on your Mac.
Here’s how you can do that:
- Open the Finder app on your computer.
- Click Go from the top menu bar.
- Select Go to Folder… from the dropdown menu.
- When a popup window appears, type in ~/Library/Caches/ if you want to go to the system cache folder, or /Users/[YourUserName]/Library/Caches if you want to go to the app cache folder.
- Once you’re on the folder, find the files you want to delete, and drag them over to the Trash.
Make sure you empty the Trash after doing this so the files don’t take up disk space on your computer.

Method #4: Run A Virus Scan
Though it may not necessarily be the case, there’s a good chance the reason why your computer is slowing down is that there’s a virus or malware plaguing your computer. In that case, you need to do a virus scan. The process is quite simple. You install anti-virus software, open it, then click whatever the button that corresponds to Scan is. It should take a few minutes to complete, depending on the size of your storage space. When the software detects any virus or malware, you naturally need to get rid of it by clicking whatever button stands for delete. It’s a quick but effective way to speed up your computer.
Method #5: Utilize Mac Cleaner
One of the main selling points of macOS computers is that they have built-in features that allow you to optimize their performance. That selling point applies to most macOS versions, including Mac El Capitan. However, as it’s a relatively old macOS version, its features aren’t as refined as the more recent models. That’s why you may find it a bit more difficult to optimize your computer. If it takes too much time and effort, then perhaps you might consider Mac Cleaner.
Mac Cleaner is an app originally intended to delete unnecessary files, hence its name. But in addition, it can also do other things, like optimization. Read on for a step-by-step guide on how you can start speeding Mac El Capitan with the app:
Step #1: Set Up Mac Cleaner on Your Computer
Your first task is to get the software into your computer. For that, you need to go to the Mac Cleaner download site, and you can do so by clicking this link. Once you’re there, click the Download Now button, and that should download a DMG file that you must then open as soon as it’s downloaded. It should open the installer, and you have to follow the onscreen instructions from that point onwards. The software should open automatically once it’s successfully installed.
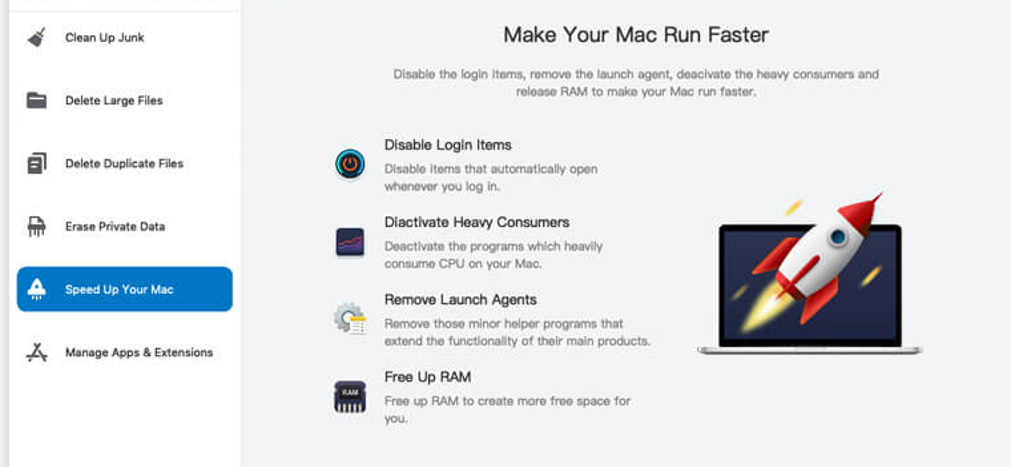
Step #2: Pick the Speed up Your Mac Module
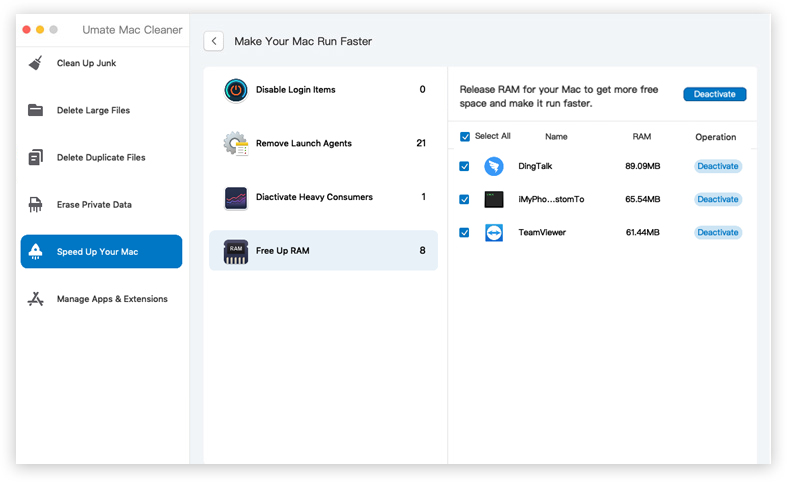
If you look at the left side of the interface, you’ll find six different options. These correspond to the modules Mac Cleaner has, and these include (1) Clean Up Junk, (2) Delete Large Files, (3) Delete Duplicate Files, (4) Erase Private Data, (5) Speed Up Your Mac, and (6) Manage Apps & Extensions. You must pick Speed Up Your Mac as it allows you to perform various tasks that can optimize the CPU, GPU, and RAM usage of your computer. Select the module by clicking on it from the left sidebar.

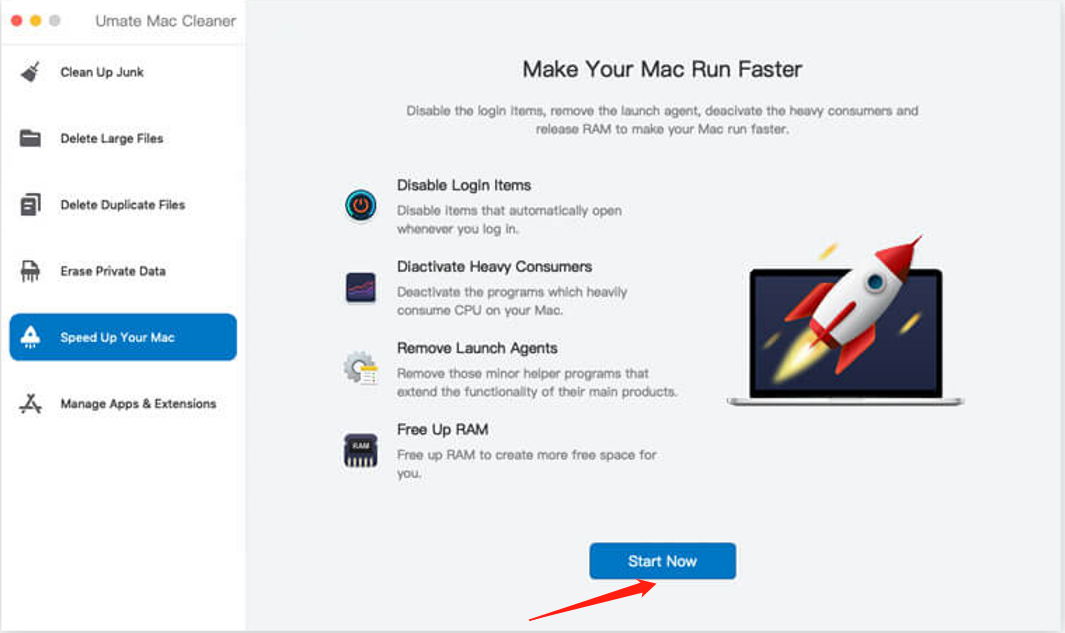
Step #3: Click Start Now
When you select the Speed Up Your Mac module, you’ll find blocks of text at the center of the interface. It explains how the module works, so you can read that if you want to learn more about the module. But to proceed, you must click Start Now.
Step #4: Choose an Action
The fourth step is when you select which action you want to perform using the Speed Up Your Mac module. The module currently has four actions available on the software. You can find them on the list on the left hand side of the interface.
Read on for more information on what each of the actions does:
- Disable Login Items force quits the apps and processes that automatically open upon boot up.
- Deactivate Heavy Consumers force closes the programs that consume CPU excessively on your computer.
- Remove Launch Agents temporarily disables the programs that open alongside other apps and processes.
- Free Up RAM minimizes the computer’s RAM usage by deactivating programs that consume too much RAM.
Select one action from the list. After doing so, you’ll find a new list on the right side of the interface, where there are apps and processes. Select the items you want to deactivate by clicking their checkboxes. You can click Select All to include all items.
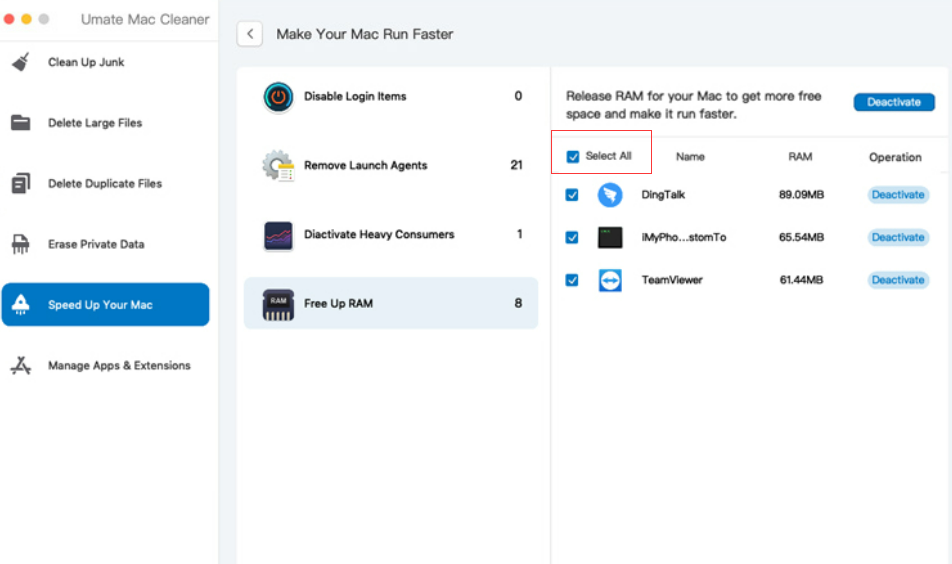
Step #5: Deactivate the App/Process
At the top right corner of the window, you’ll find a button that says Deactivate. Click that button to finalize the process. That should get rid of the apps and processes you selected in the previous step, and it’s also the last thing you need to do.
Keep in mind that all the apps and processes you see in the list in step 4 are the ones that aren’t vital to the operating system of your computer. That means even if you deactivate them all at once, it shouldn’t lead to any major issue in the computer.
Going Forward
Mac El Capitan might be one of the older versions of macOS, but it’s still relatively good in terms of performance. Therefore, speeding up Mac El Capitan should be possible, though you must keep in mind that there’s a limit to how much you can optimize your computer. At first, the aforementioned methods may work tremendously, but at some point, those exact same methods would become less and less inefficient. When it no longer has any effect, that’s the time you get a new computer.
Latest Articles