

It’s common practice for iOS users to create a backup of their iPhone and store it on their Mac computers. These backups are called iTunes as it was created through the iTunes app. The backup folder typically consists of numerous files that are most likely important to your iPhone, but since the backup is usually in an encrypted form, it’s difficult to determine what the backup truly contains. This, of course, can be frustrating especially if you want to free up space by deleting certain parts of the iTunes backup. However, as you have no idea what the iTunes backup includes, that wouldn’t be possible.
With that in mind, this article will answer the question, “What does iTunes backup include?” so you know how to interact with the backup folder. But first, it might be best to look at a brief overview of iTunes backup and what it entails.
What Is An iTunes Backup?
An iTunes backup is basically a large folder that contains the copies of certain files of an iOS device. It’s what you’d use when you want to revert your iPhone or iPod to a certain point in time. iTunes backup is also what makes it possible to recover files when you lose them after data loss. Unfortunately, when you create an iTunes backup, you cannot see its contents very easily since you’ll only find a bunch of folders with letters and numbers as their names. Moreover, it doesn’t tell you much about whether this file is an image or this file is a video since most of the files are encrypted, so it’s difficult to determine their file types.
That’s why people tend to ask the question, “What does iTunes backup include?” since they don’t know how to figure out what kinds of files the backup contains, or rather, they can’t. But why exactly do you need to know about it in the first place?

Why Do You Need to Know What iTunes Backup Includes?
There are several reasons why one might want to create an iTunes backup. Data recovery is one reason, but one of the most common reasons is that the iOS user simply wants to free up space in their iPhone or iPod by transferring their files into a different device or storage drive. Once they create an iTunes backup, they then delete what was included in the backup since they know they can recover it if they ever need those files again. But as you might imagine, you cannot do that if you don’t know what kinds of files iTunes backup includes, hence the need to know. So, what does iTunes backup include?
What Does iTunes Backup Include?
The main types of files iTunes backup include are local files or files that you can only find on that device. These include:
- Local files from apps like the pictures you take with the Paper app or your chat history from WhatsApp
- The current settings and preferences on your iOS device
- Photos, contacts, and messages from the native apps on iOS devices
- Call logs
- Keychain data
Keep in mind that depending on your iTunes settings, the contents of the backup may vary. For instance, when your iTunes is currently syncing the photos, songs, contacts, and call logs to your iOS device, those files won’t be included in any iTunes backup you create. Of course, that won’t be an issue since being synced basically means it’s creating a copy of those files in real time, so iTunes basically has a copy of all those specified files at all times. Also, keep in mind that while the iTunes backup includes your iOS device’s settings, it shouldn’t include the Face ID, Touch ID, and your Apple Pay settings as they’re typically associated with your Apple ID, meaning you don’t have a backup since there already is on one your account.
How to Create An iTunes Backup
There’s generally only one way to create an iTunes backup of your iOS device using a macOS or Windows computer. It involves using the iTunes app, of course, so make sure you have that installed. Then, you must follow these instructions:
- Connect your iOS device to the computer.
- Open the iTunes app on the computer.
- At the top-left corner of the window, you’ll find a button that looks like an iPhone. Click that button.
- Select Summary from the left sidebar of the interface.
- Click Back Up Now near the bottom-right corner of the software.
- Follow the onscreen instructions.
It’s relatively easy to create an iTunes backup, though it may take a few minutes since backups are generally large with sizes that exceed 10GB.
BONUS: Erase Unneeded iTunes Backup With Mac Cleaner
It may not have been your goal coming to this article, but it’s always advisable to delete unneeded iTunes backups since they take up a considerable amount of storage space. If you leave them be, then they’ll eventually consume hundreds of GBs worth of your disk space, which is basically saying you no longer have enough for other more important files. But since these backups are connected to your iOS and the iTunes app, they can be difficult to delete since you may either find that they’re encrypted or you have no administrative privileges to do so. But you should be able to delete them using Mac Cleaner.
Mac Cleaner is a modular software that allows you to delete all kinds of files from your computer, including iTunes junk which should include unneeded iTunes backups. With that said, here’s how you can use the software:
Step #1: Download, Install, and Open Mac Cleaner
Before anything else, you must first download and install the software. To do so, you must visit the Mac Cleaner download site through your browser. Click the Download Now button on that site to download a DMG file, which should be the installer. Open that file to run the installer then follow the onscreen instructions from start to finish.

Step #2: Pick Clean up Junk
Mac Cleaner has a total of six modules, and these include (1) Clean Up Junk, (2) Delete Large Files, (3) Delete Duplicate Files, (4) Erase Private Data, (5) Speed Up Your Mac, and (6) Manage Apps & Extensions. Each module has different functionalities, but for the purposes of this guide, you only have to select the Clean Up Junk module. This is because it can look for and delete all kinds of junk like iOS and iTunes junk, which hopefully should also include iTunes backups. To select the module, you simply have to click on the module from the left sidebar which consists of six options.
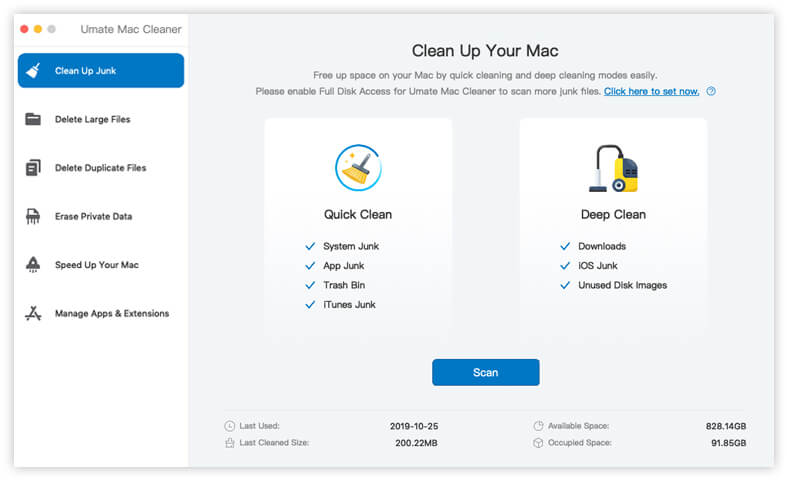
Step #3: Click the Scan Button
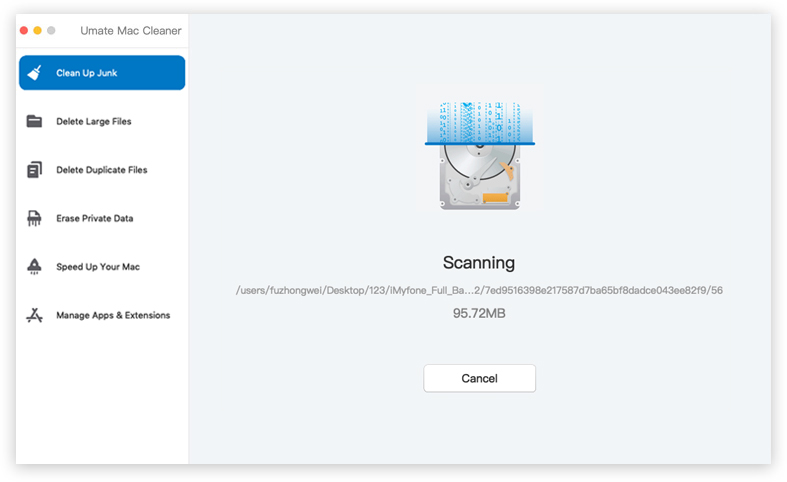
Next, you need to scan your computer for the files you wish to delete. On the software, you’ll find that there are two sides, one says Quick Clean and the other says Deep Clean. Quick Clean scans the computer for System Junk, App Junk, Trash Bin, and iTunes Junk. So, theoretically, you can settle for Quick Clean. However, we suggest choosing Deep Clean since it has more accuracy and can scan for files in exchange for longer scanning times. Click Scan after you choose an option.
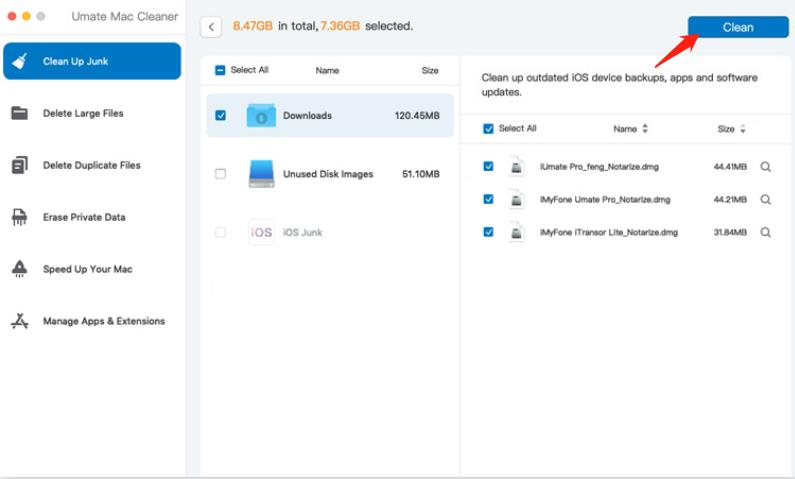
Step #4: Select a File Category and File/s
The software will then take you to the next page, where you can find a list on the left side of the interface. That list consists of different file categories that were mentioned earlier, like System Junk, Downloads, Trash Bin, Unused Disk Images, etc.
Since your goal is to delete the iTunes backups, you simply have to select the iTunes Junk category as it should include the iTunes backup you wish to delete. Upon selecting the category, another list will appear on the right side which should consist of files and folders that belong to the selected category. Simply select the items you wish to delete by clicking their corresponding checkboxes. You may also click the Select All checkbox if you’re not sure which corresponds to the backups.
Step #5: Click Clean
Once you select the appropriate files and folders, you now only have to click the Clean button located at the top-right corner of your screen. Doing so will finalize the process and you only have to wait as the software deletes the selected files.
It’s not easy to delete iTunes backups without the help of software. Not only will you spend hours just looking for the backups, but you may also delete the incorrect folder. Mac Cleaner shows you some information about the files, such as the date modified and name, so that’s not likely going to happen if you use the cleaner app.
Going Forward
Creating a backup is always an excellent idea. Not only does it allow you to create an extra copy of your files in case its original copy is compromised, but it also gives you a way to transfer your files from one device to another. In other words, it’s excellent for both file transfer and recovery. However, one must keep in mind that backups are typically encrypted, and iTunes backups are no exception. Therefore, it’s typically not possible to find out what does iTunes backup include, but if you’ve read through this guide, then you should know exactly what it includes and what you must do with it.
Latest Articles