

This is a complete guide on how to clear cache on Mac.
While using a browser on your MacBook, you may notice that when visiting a website for the very first time, it loads slightly slower than when you go to a site you frequently visit. This is because upon successfully loading a page, the browser, or in some cases, the MacBook itself, automatically saves the contents of that page as files which we call cache.
The browser then uses these files to load up the page a bit faster the next time you visit the site. Mac computers also have this feature. It creates a cache for files it deems to be necessary. And yes, it’s quite convenient as it saves you time.
However, one must keep in mind that browsers automatically create a cache for the website you visit. Therefore, while cache indeed allows browsers to load pages much faster, these files may pile up and come to a point where they slow down your Mac considerably. With that in mind, you probably have one question you desperately need answering.
Is It Possible to Clear Cache on Mac?
Yes, it is completely possible to clear the cache on Mac, though you must be careful in doing so as you might accidentally delete files that are essential to the device. Generally, there are three ways to go about this, and it depends on the type of cache you wish to clear. And yes, there are different types of cache on Mac, or any device, for that matter. Depending on the type, the steps involved will differ. Let’s start by discussing how to clear cache on Mac via your browser.
Method #1: How to Clear Cache on Mac Via Browser
As stated earlier, there are several types of cache, one of which is browser cache. Basically, it’s the cache that browsers create, so web pages load faster the next time the user visits them. Naturally, if you wish to clear the browser cache, you must use the browser in question. Though there are countless browsers out there, we’ll only discuss the steps on how to clear cache on Mac on three different browsers. These include Safari, the default browser of Mac, Chrome, and Firefox. Let’s start with Safari.
Safari
- Open the Safari browser.
- Click the Safari icon at the top bar of your Mac screen.
- Select Preferences from the resulting dropdown menu. This will open the Preferences window.
- On the Preferences window, go to the Advanced tab by pressing on it in the top menu bar.
- Check the box for the Show Develop menu in menu bar.
- Close the Preferences window and go back to the Safari window.
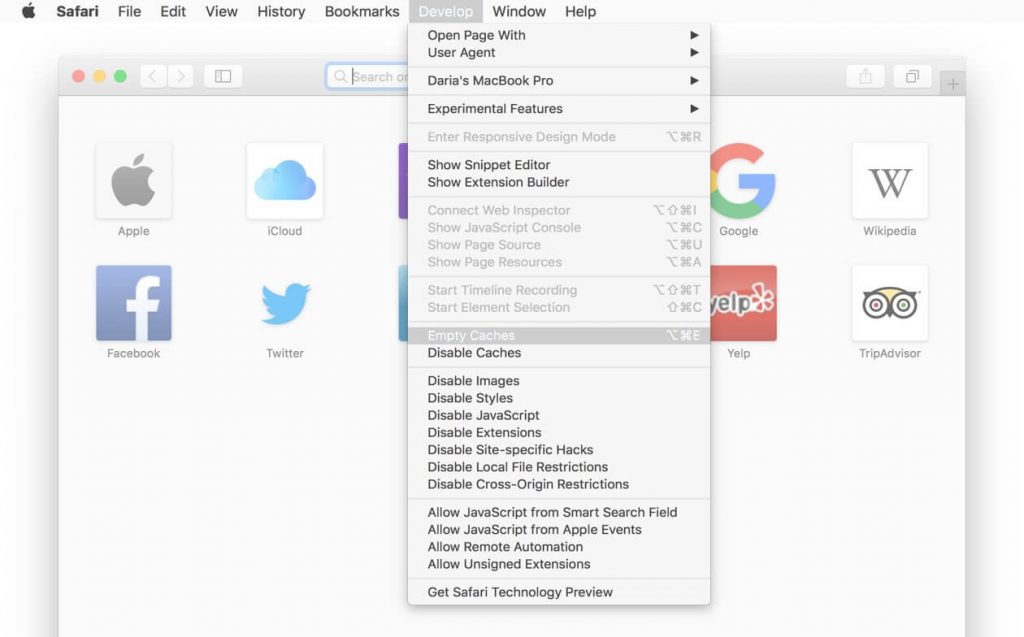
- You should now find a new item in the menu bar named Develop. Click this menu option.
- Select Empty Caches from the resulting dropdown menu.
Chrome
- On your Mac, open the Chrome browser.
- Click the Menu button, which should look like a vertical ellipsis (⋮).
- Click More tools.
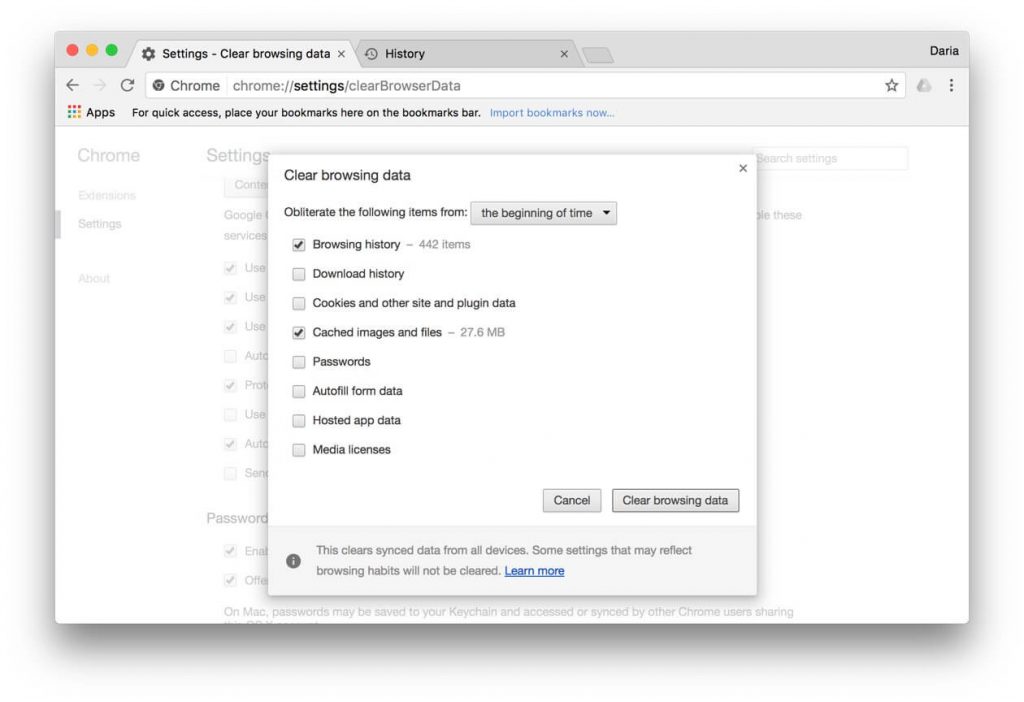
- Select Clear browsing data… from the resulting options.
- You’ll then be taken to a new page where you’ll be met with a popup menu. From this menu, you can configure several things. First things first, make sure you uncheck Browsing history and Cookies and other site data. Only the Cached images and files must remain checked.
- Set the Time range field to All time.
- Click Clear data.
Firefox
- Open the Firefox browser.
- Click the Menu button from the top-right corner of the page. This time, it should look like three horizontal bars (≡).
- Select Preferences. This will take you to a new page.
- On the page, you’ll find a sidebar to the left. Click Privacy & Security from this sidebar.
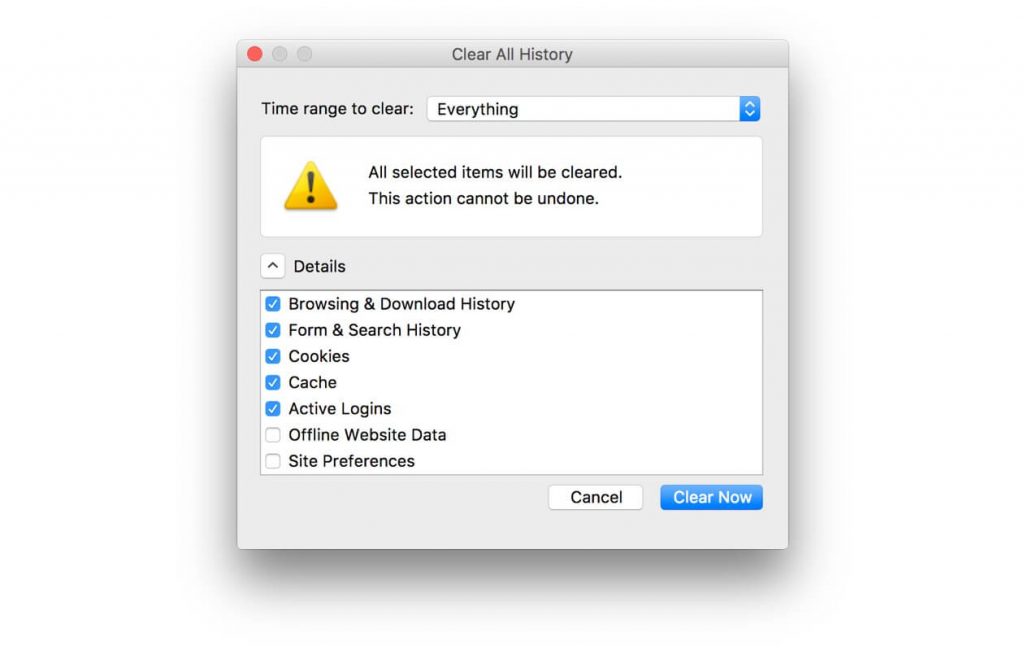
- Under the Cookies and Site Data section, click the Clear Data… button.
- Remove the checkmark on the box for Cookies and Site Data. This should ensure you only clear the cache.
- Click the Clear button.
- Finally, close the page. Doing so will finalize the changes you’ve made.
This is pretty much how to clear cache on Mac via your browser. Keep in mind that you must follow the instructions on the specific browser your Mac currently uses. It’s important that you follow the steps closely since you might delete other data that you probably need, like browsing data or cookies. Again, these are just for three browsers. If you use lesser-known browsers, it’s best to look up the instructions for clearing up their cache yourself via the internet.
Method #2: How to Clear Cache on Mac With Finder
System cache is yet another type of cache you can find in a Mac computer or any device, for that matter. Much like the browser cache, this type of cache contains files that the system most likely needs regularly. Since there are myriads of files that fit the bill, it’s quite common for the system cache to pile up in Mac devices. If you wish to clear up such data, you’ll have to find the directory and delete it from there. To do so, you must use Finder, the file explorer app on Mac devices.
Below are the steps you must follow to clear the system cache on Mac devices with Finder:
- Open the Finder app.
- Click Go from the top menu bar.
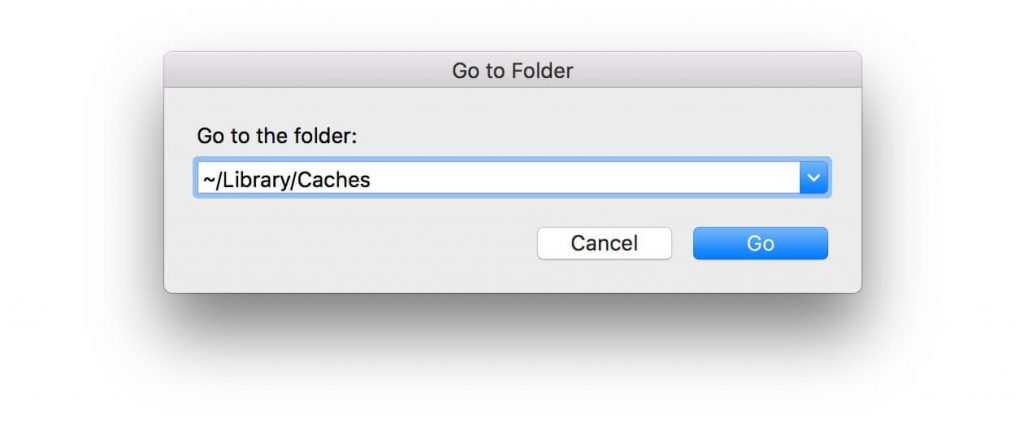
- Select Go to Folder from the resulting dropdown menu. This will open a popup menu on your screen.
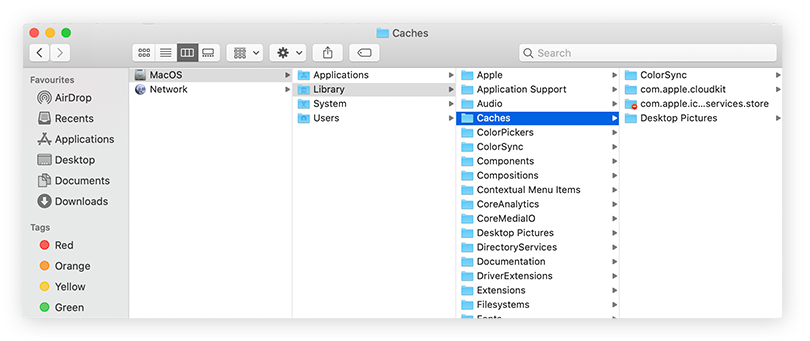
- On the popup menu, you can type in a directory that you wish to go to. Simply copy and paste ~/Library/Caches/ into the field.
- Click Go to proceed.
- The Finder will automatically take you to the directory you specified. Here you’ll find the Cache folder. Simply open the folder and find the files you want to delete. Of course, you mustn’t delete all files.
Another type of cache is the application cache, which is, as the name suggests, app-specific. You can find the application cache in the file path: /Users/[YourUserName]/Library/Caches. You can access this folder using the fourth step.
There will be a folder for each app. Simply delete the files you want to clear.
Method #3: How to Clear Cache on Mac Using Mac Cleaner
Though cache does have a huge part in why Mac devices operate more slowly than they used to, it’s not the only data type that affects a device’s speed. There are also other files that might be slowing down the device which you can afford to delete, such as system junk, iTunes junk, and unused files. However, it’d take several hours to find each and every one of these files, especially if you’re already struggling with how to clear cache on Mac. This is where Mac Cleaner comes into play.
Mac Cleaner is a software that allows you to clean your Mac computer or laptop more easily and quickly with just a few buttons. It’s able to detect files itself and clear them out accordingly, which saves you a lot of time and effort.
Of course, it would still take some time and effort to learn how to use the software, but that’s what this guide is for. Here’s how you can use Mac Cleaner to clear cache and other unnecessary data and files on your Mac device.
Step 1. Set up Mac Cleaner
Download and install the Mac Cleaner software on your computer. Upon successful installation, launch the program.
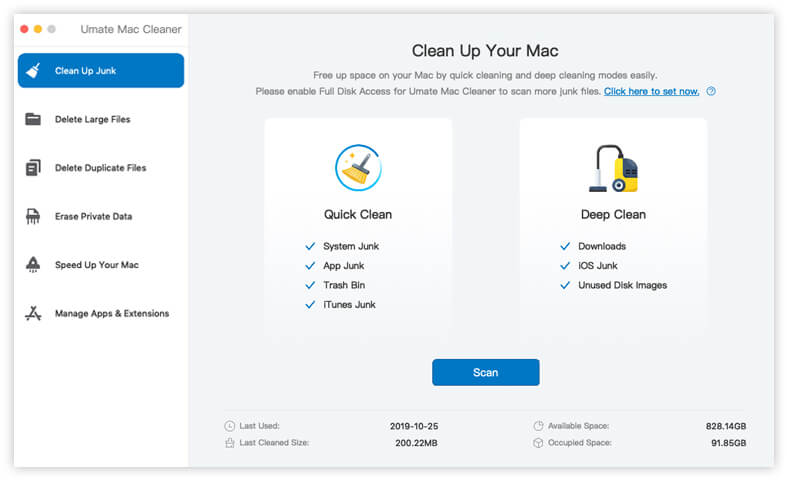
Step 2. Select An Option
Once the program starts, you’ll be met with a screen with several options on its left sidebar. Simply select the type of files you wish to delete or clear. Your options include Clean Up Junk, Delete Large Files, Delete Duplicate Files, and Erase Private Data. Though there are two more options, we suggest sticking to the first four as those are a bit more than clearing cache.
Step 3. Scan for Files
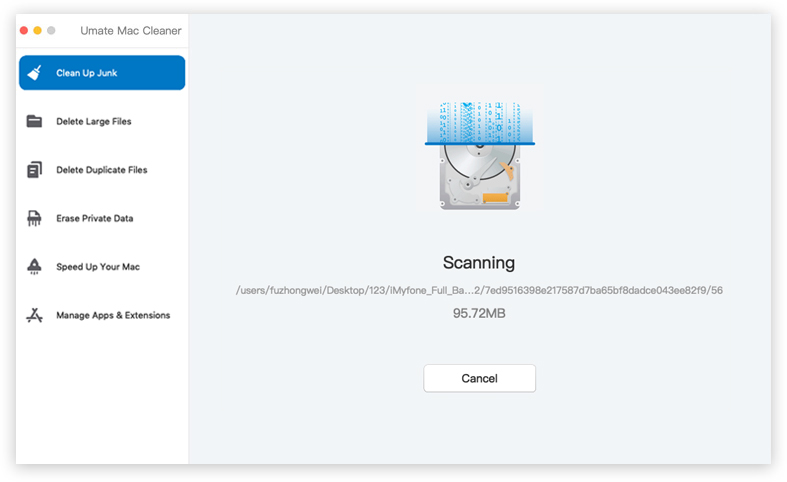
After selecting an option, the next screen will show you the type of files that option will include. The Clean Up Junk, for instance, includes System Junk, App Junk, Trash Bin, iTunes Junk, Downloads, and more. The screen may also show several other pieces of information about the option. Once you’ve read all the information, click the Scan button to initialize the scan. Afterward, wait for it to finish. It may take a couple of minutes, depending on your Mac’s maximum storage capacity.
Note: The Delete Duplicate Files option will ask you to specify a directory first before scanning.
Step 4. Select Files to Delete
Once the scan is finished, the next screen will then display all the files that the software has successfully scanned. Simply find the cache on your Mac and select them. Similarly, you can select other files you wish to delete by clicking on their corresponding boxes. You can also click the box for Select All to include all the items in the deletion process.
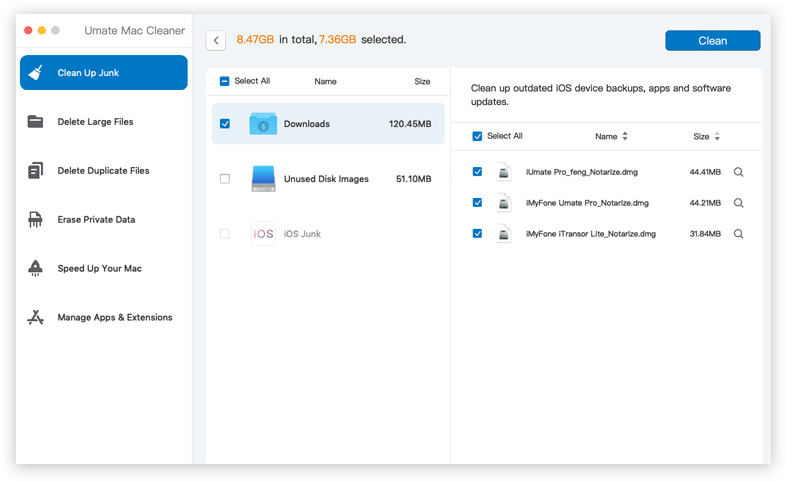
Step 5. Delete The Select Files
Once you’re done selecting the files, click the Delete button to finalize the process. Again, the software may take a few minutes to completely delete all the selected files.
With this, you’d have already deleted the cache on your Mac and possibly a couple more unnecessary files as well.
Wrapping up
There are several merits to learning how to clear cache on Mac. One, by clearing cache, your Mac computer or laptop will boot up much faster than it used to. Two, it reduces the likelihood of spontaneous lags and even crashes. And three, you’re essentially increasing the storage space for your other files. Therefore, it’s only fitting that you put a lot of effort into learning how to clear cache on Mac. Perhaps the only thing stopping you is the fact that it’s a bit difficult, but that shouldn’t be much of an issue now that you have this guide.
Latest Articles