

It’s no secret that devices like smartphones and desktop computers slow down as they age. And unfortunately, nothing can be done to halt the aging progress. That’s often why rather than preventing the computer from slowing down, users would perform various remedies to speed up Mac instead. Of course, it’s not easy, but it’s not impossible either, though you must first understand how Mac performance works to figure out the best method to speed up Mac. With that in mind, this article will discuss everything you need to know to speed up Mac, starting with the reasons why it slows down in the first place.
What Is Slowing Down Your Mac?
As fast as your Mac was in its prime, there will come a time when it’ll slow down considerably. Though age has a lot to do with it, there are many other factors that contribute to this decrease in performance. These may include the following:
- There are processes running in the background
- You’re using an intensive app
- You’re running an incompatible or outdated application
- The macOS is not up-to-date
- Your computer doesn’t have much available disk space anymore
These are five of the most common reasons why your Mac is performing poorly. There are many other reasons, but we won’t into much detail about them as they’re often unavoidable. These five, however, can be dealt with, and that’s why you’re here.
Below are six methods that would allow you to circumvent these five issues.
Method #1: Force Quit Unnecessary Processes
When you look at your screen, you can clearly see on the Dock how many apps are currently open and what these apps are. You’d assume that they’re the only ones running on your computer, but there are what we call background processes.
Background processes are essentially pieces of software that run on your Mac without showing up on the screen. This is where the “background” part of the name comes from. Though they don’t consume as much computing power as regular apps, a handful of them can consume a ton of RAM, CPU, and GPU. You may not be aware of these three terms, but they’re essentially resources that, when not enough, can cause performance issues, like lags, crashes, and even errors.
For that reason, it’s important to keep these numbers in check. One way to do that is by deactivating processes that aren’t exactly needed. But for that to happen, you must use the Activity Monitor, which you can access by following these steps:
- On your Mac computer, head to the Applications folder.
- Navigate to the Utility folder.
- Select Activity Monitor.
Once you’re in the Activity Monitor, you should be able to find all of the processes currently running on your computer. This includes the processes running in the foreground and background. You can also find all sorts of information about each process, such as their name, GPU consumption, CPU consumption, and more. Since your goal is to speed up Mac, you must eliminate processes that are hoarding GPU and CPU. In short, you must find the processes that have high values on % CPU and % GPU, and deactivate them. Below are the steps you must follow to eliminate a demanding process:
- Select the process you wish to stop or kill.
- On the Activity Monitor window, find and click the ⦻ icon to stop the process.
With these two simple steps, you can very easily kill/stop any process you want. However, keep in mind that Mac requires certain processes to operate properly. Hence, you must be cautious when choosing which processes to force quit.
This should address issues #1 and #2, as it allows you to eliminate unnecessary and intensive applications and processes.

Method #2: Update Your Applications
System patches and updates are designed to solve problems in the system. Similarly, application updates exist to solve bugs or any issue that might impact its performance. For that reason, if you hold off on updates for long enough, chances are you’ll encounter an issue that should’ve already been solved. Though there are countless types of problems applications may have, it’s not unlikely for an app to affect the entire computer, specifically, its performance and speed. So, just to be on the safe side, you must always update your applications to avoid these potential issues. Here’s how you can do this:
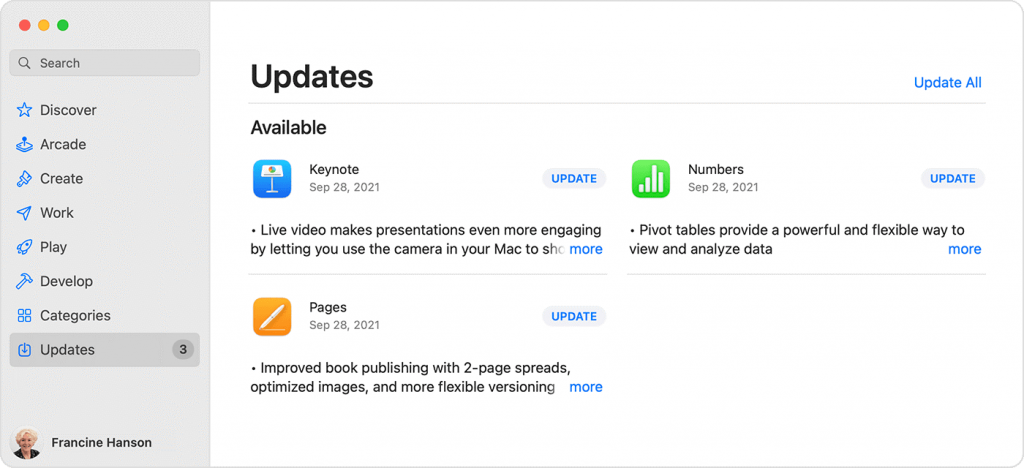
- On your Mac computer, open the App Store by clicking on its icon from the Dock.
- Click Updates from the left sidebar of the interface.
- On the Updates section, simply click the UPDATE button on the right side of the app you wish to update. If your app isn’t in this section, it’s most likely already up-to-date.
If you wish to speed up Mac, your goal must be to make sure the Updates section is always empty.
Method #3: Perform a System Update
The next issue has to do with your macOS being outdated. Naturally, the obvious solution to this would be to update your operating system. In other words, you must perform a system update. Here’s how you can pull it off:
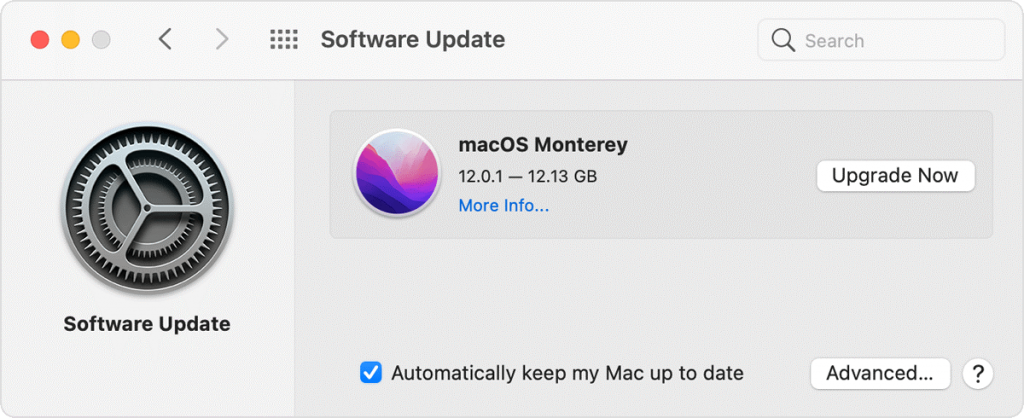
- On your Mac computer, click the Apple icon from the top-left corner of your screen.
- Choose System Preferences from the resulting menu.
- Click the Software Update option. This will open the Software Update window.
- On the Software Update window, you’ll find details about your operating system, such as its version, size, and many more. You’ll also find a couple of buttons on the window, though it’s not always the case. If there’s an update available, there will be an Update Now button. If an upgrade is due, the button should say Upgrade Now. Simply click this button to update or upgrade your macOS.
Note: Update Now and Upgrade Now is not one and the same. Upgrade Now installs small to large patches that change certain aspects of your computer, but not the macOS version itself. Upgrade Now changes the macOS version entirely and performs an overhaul of the system. For instance, if your version is macOS Big Sur before the upgrade, it may become Monterey after. For that reason, an upgrade would always take longer than an update.
Keep in mind that when you perform an update or upgrade, the system automatically fetches the file from the internet, downloads the file, and installs it into the computer. Hence, if you have insufficient disk space, the update/upgrade will be interrupted midway, and you’ll end up wasting time. It’s also possible that you won’t be able to initiate the update/upgrade in the first place. That’s why you must ensure you have sufficient storage capacity, which takes us to the next section.
Method #4: Clear Your System Cache
The last issue that you must solve to speed up Mac is the lack of storage disk. Basically, you must free up the storage disk on your computer. Unlike the first three issues, this one is quite interesting as there are different ways to free up storage disk, though, in this section, we’ll discuss one of the best ways to increase available disk space. It involves a system cache, which is essentially a folder that contains a lot of files that are often not needed. Here’s how you can clear your system cache:
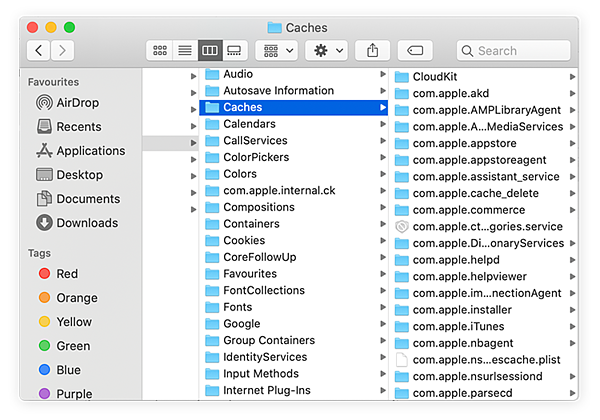
- On your Mac, open the Finder app.
- Click Go from the top-left corner of the screen, beside the Apple icon.
- Select Go to Folder… from the resulting dropdown menu. This will open a popup menu.
- Simply copy and paste the following text to this popup menu: ~/Library/Caches.
- Click Go to redirect Finder to the specified file directory.
- On the resulting directory, double-click the Cache folder to open it.
- Find and delete the files you think aren’t necessary.
This should free up a considerable amount of storage disk since cache files are typically large.
Method #5: Empty The Trash
Another way to free up space is by emptying your Trash since it really only contains unnecessary files, yet still takes up disk space from your computer. Below are the steps you need to follow to empty your Trash:
- Find and click the Trash icon from the Dock.
- On the Trash window, click the option that says Empty all of the Trash. This particular should be at the menu bar.
You can also simply right-click on the Trash icon and select Empty Trash for a faster process. Keep in mind that you may have important files in the Trash, so make sure you retrieve them first if you don’t want them permanently deleted.

Method #6: Mobilize Mac Cleaner [RECOMMENDED]
There are many ways to speed up Mac, too many even. And as eager as you might be, it’s virtually impossible to perform all these methods since a single one already requires a considerable amount of time and effort. However, that might not be the case if you use Mac Cleaner—a software that specializes in cleaning a Mac computer from unnecessary files.
Mac Cleaner also has a functionality that allows you to speed up Mac by performing various actions that may boost a computer’s performance. Unlike most methods, it only takes a few clicks to initiate these operations. Therefore, if there’s any way to speed up Mac in as many ways as possible in a short period of time, it would be through the use of Mac Cleaner. With that in mind, here’s how you can use Mac Cleaner to boost your Mac’s performance:
Step #1: Start Mac Cleaner
On your Mac, open a browser and navigate to the Mac Cleaner website. On that site, click the Download Now button to download the installer. Afterward, use the downloaded to install the software. Finally, open the software on your Mac.
Step #2: Select the Speed Up Your Mac Module
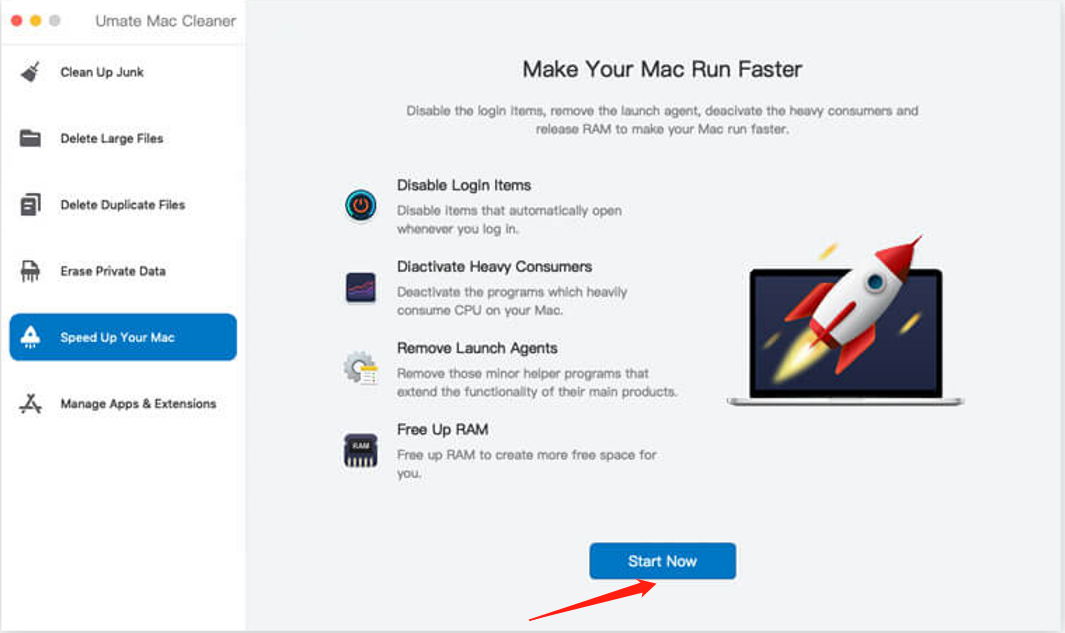
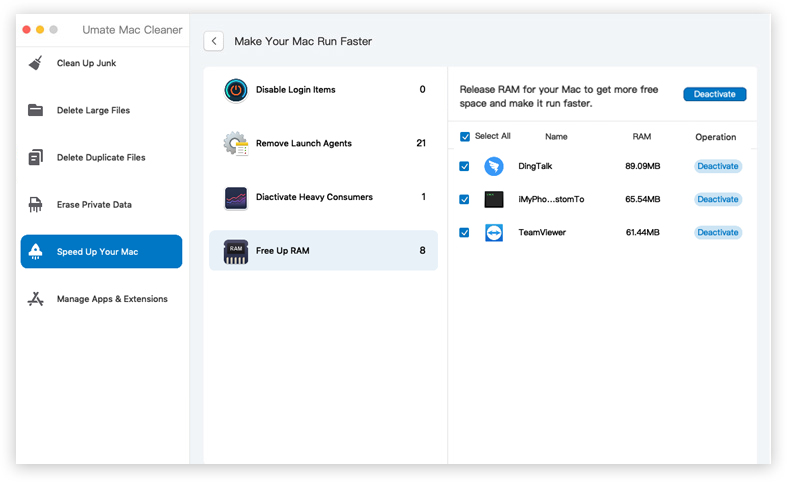
Mac Cleaner is a modular program, meaning it consists of different modules that each have different features. As of now, the software has six different modules, namely (1) Clean Up Junk, (2) Delete Large Files, (3) Delete Duplicate Files, (4) Erase Private Data, (5) Speed Up Your Mac, and (6) Manage Apps & Extensions. Your goal right now is to speed up your Mac, so obviously, the module you must select should be Speed Up Your Mac. Simply click the option from the left sidebar to select.

Step #3: Click the Start Now Button
Selecting a module will prompt the software to display information about its features. You can read the information if you wish to learn more about the Speed Up Your Mac module, though we’ll get into its features later. For now, you simply have to click the Start Now button to proceed to the next step of the process.
Step #4: Choose an Item/s
The Speed Up Your Mac module consists of four different features. Here’s a look at what each feature does:
Disable Login Items allows you to close items that automatically open when you log in to your Mac computer.
Deactivate Heavy Consumers allows you to force quit programs and processes that consume too much CPU.
Remove Launch Agents allows you to force close programs and processes that aren’t necessary.
Free Up RAM simply clears your RAM by eliminating processes that consume RAM needlessly.
Simply click on an item if you wish to perform that operation.
Step #5: Click the Button
Regardless of the item, you select from the four options, you’ll always find a list of items on the right side of the menu. These are items that you can disable, deactivate, or remove, depending on the option you chose in the previous step. Simply select which items you want to deal with by clicking on their corresponding checkboxes. You can also click the checkbox for Select All to include all items. Finally, click the button at the top-right corner of the window to finalize the process. Keep in mind that the caption may vary according to the option you chose. It can be Deactivate, Disable, or Removed.
With these five steps, you can boost your Mac’s performance by a considerable amount. However, you must remember that there’s a limit to how much you can speed up Mac. Hence, you shouldn’t expect to bring it to its peak performance.
Closing Thoughts
No one wants their computer to slow down, but unfortunately, it’s not something you can prevent. That’s even more of a case if your Mac is over five years old, as it’ll most likely experience issues and errors that would affect its performance. But while you can’t prevent the aging of your Mac, you can at least minimize the effects of aging on the computer. It may not be easy, but it’s completely possible, especially with this guide, as it tackles different ways to speed up Mac computers.
Latest Articles