

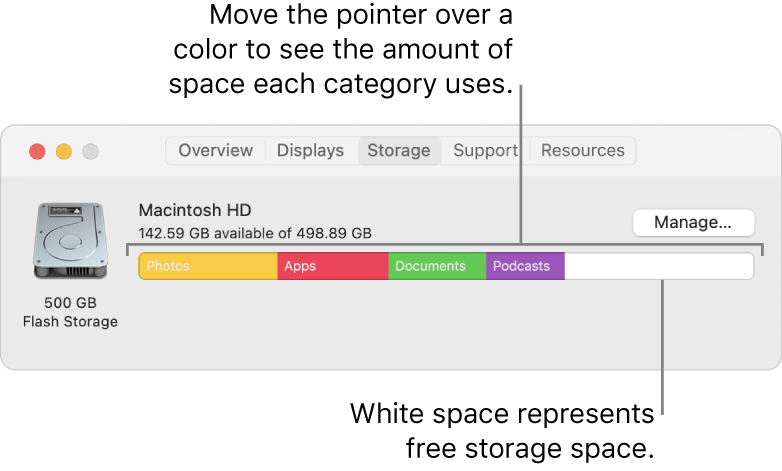
When you initially bought your Mac, it most likely had over 90% free disk space. However, during the computer’s entire lifespan, it will slowly accumulate all kinds of files that aren’t necessarily crucial to the device. Eventually, the available disk space will become lower and lower, until it reaches the point where your Mac experiences all sorts of issues because of it.
That’s why experts advise users to have a Mac storage cleaner prepared for these types of predicaments. With such a tool, you can very easily prevent issues or problems that full disk space can cause to your Mac computer.
Unfortunately, it can be difficult to manage any sort of storage cleaner, especially if you have zero experience using such a tool. With that in mind, this article will discuss everything you need to know about Mac storage cleaners.
Part 1: What Is A Mac Storage Cleaner?
A storage cleaner is basically any tool that allows you to clean your storage in any way. It can be through deleting files, clearing your RAM, or uninstalling apps and extensions. A Mac storage cleaner is the same, except it specializes in Mac storage.
However, though the main idea behind storage cleaners is the same, that is, to clean storage systems, their specializations may vary from software to software. For instance, one storage cleaner may focus on the system storage, while others might specialize in cleaning the RAM. Their functionalities would also vary, with some offering numerous features, while others have rather simple mechanisms. For that reason, it’d be best if you take a long time deliberating which Mac storage cleaner you should use. But before we get into that, why must you use a Mac storage cleaner in the first place?
Part 2: Why Should You Use A Mac Storage Cleaner?
The main idea behind Mac storage cleaners is to allow users to regularly perform disk cleanups. And as luck would have it, there are actually numerous benefits to disk cleanups. Here’s a look at some of these supposed benefits:
1. Storage cleaners can boost computer performance
It’s a well-known fact that a computer’s disk space is often tied to its performance. The more disk space you have available, the greater the computer’s performance. Since storage cleaners essentially increase your free disk space, you can argue that it’s a tool that basically boosts your computer performance to some extent.
2. They make it easier to organize files
Storage cleaners also reduce the population of your storage. With a lower file population, it becomes easier to organize your files, as there are fewer things you have to worry about.
3. Storage cleaners free up space for more important files
Another obvious benefit of storage cleaners is the fact that it frees up space in your store where you can store actual important files rather than just junk files that only take up space needlessly.
4. They can eliminate problematic files
There are two types of files, those that are problematic, and those that pose no issue to the computer. Problematic files can be anything from virus-ridden files to corrupted files. No matter the type, these files often cause issues to a computer’s operating system. In most cases, it may cause the computer to crash constantly. Fortunately, storage cleaners can eliminate these files through their functionalities, and that’s one of its main benefits. After all, its main purpose is to delete unwanted files.

Part 3: How to Choose The Best Mac Storage Cleaner
Not all Mac storage cleaners are created equal. Some are objectively better than others, and there’s no shame in looking for the best product there is. With that in mind, if you wish to find the most suitable Mac storage cleaner for your purposes, here are some of the considerations you must take:
- Price: Right away, you must ensure the price isn’t too high that it’s reasonable, but also not too low that it becomes too good to be true, though keep in mind that some top-notch Mac storage cleaners offer free trials.
- Features: Storage cleaners can either have one feature or multiple. Usually, those with more features have more functionality. Make sure you choose a storage cleaner not based on the number of features it has but based on the usefulness of these features. After all, you wouldn’t want to use a storage cleaner with a thousand features but only one is actually useful. That would only overwhelm you as you struggle to understand how the software works.
- Speed: Though it’s not as important as the previous two considerations, if you don’t exactly have a lot of time to spare, it’d be best if you choose a storage cleaner that can scan for files and clean your storage rather quickly.
- User-Friendliness: A user-friendly software usually has a rather simple interface that you can easily understand from a single glance. This is the type of storage cleaner you must look for.
By taking these four factors into consideration, you’re more likely to find a top-notch storage cleaner than you are to find a bad one.
Part 4: Mac Storage Cleaner Recommendation: Mac Cleaner
If you’re struggling to find a Mac storage cleaner that fits your criteria, we recommend Mac Cleaner. Mac Cleaner is a modular software with numerous features. Though its main function is to clean your Mac storage, its different modules offer interesting features that allow you to target specific data types. It normally takes a while to get used to its functionalities, but that’s where this section comes in handy. Below is a guide on how to use Mac Cleaner.
Step #1: Launch Mac Cleaner on your Computer
On your computer, open a browser. Then, head towards the Mac Cleaner website. Here, click the Download Now button to download the installer. Afterward, install the software by running the downloaded file. Finally, launch the software.
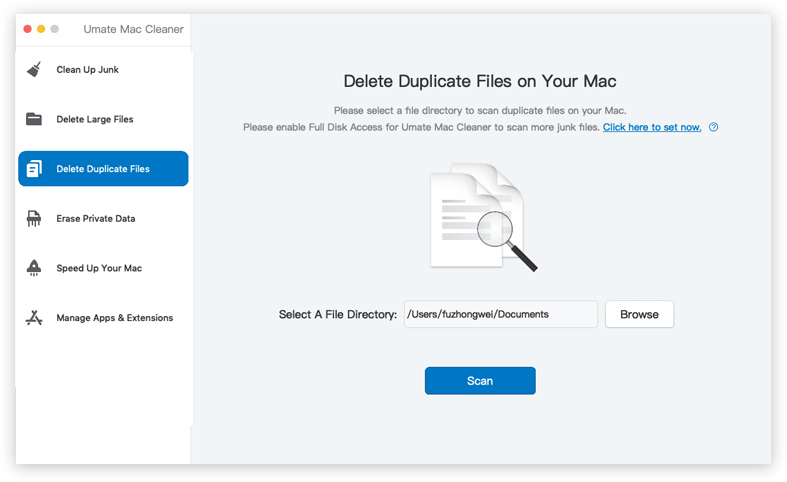
Step #2: Choose from Six (6) Modules
Upon opening Mac Cleaner, you’ll see an interface with several options at the left sidebar. These are the six modules you can use to clean your Mac storage. Simply select the appropriate module for your purpose.
Here’s a look at what each module does:
- Clean Up Junk scans your Mac for files that are no longer necessary, aka “junk” files. These may include System Junk, Trash Bin, App Junk, and more. It then gives you the option to delete these junk files.
- Delete Large Files scans your Mac for files that are 50 MB in size or larger. It only detects unnecessary files, so you can rest assured that it wouldn’t include files you may need. Again, it also gives you the option to delete these files.
- Delete Duplicate Files scans your storage for any file that has an extra copy somewhere on the computer. It includes all kinds of files, regardless of whether that file is necessary or not. Hence, you should be careful when deleting the copies of your files since you may have made a copy intentionally to serve as a backup.
- Erase Private Data scans your Mac for files that can be categorized as “private” data. These may include chat data, online traces, and emails. The main purpose of this module is to prevent cyberattacks, though it’s also handy since these private data files often take up a considerable amount of storage space.
- Speed Up Your Mac performs various actions that aim to boost Mac’s performance.
- Manage Apps & Extensions allows you to uninstall or remove apps and extensions from the computer.
Though there are a total of six modules, we suggest using only the first four modules, since the other two don’t really have much impact on your Mac storage. They’re more on the side of Mac optimization. Simply click the module from the left sidebar to choose it.
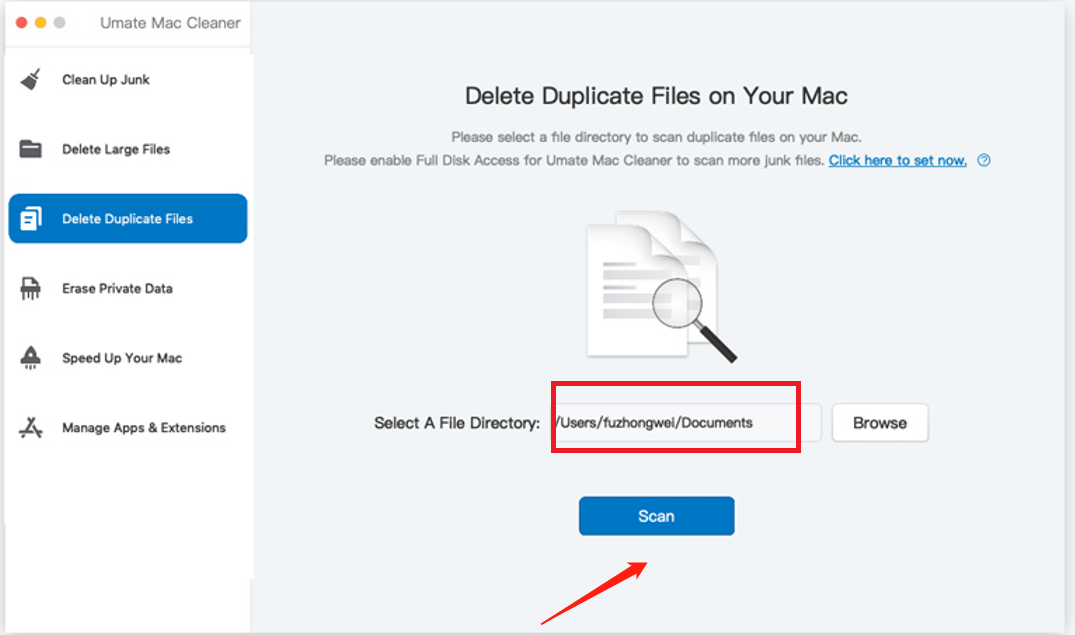
Step #3: Click the Scan Button
After selecting a module, the interface will display information on that particular module. You can read the information if you wish to learn more about its function. Once you’re done, click the Scan button at the center of the interface.
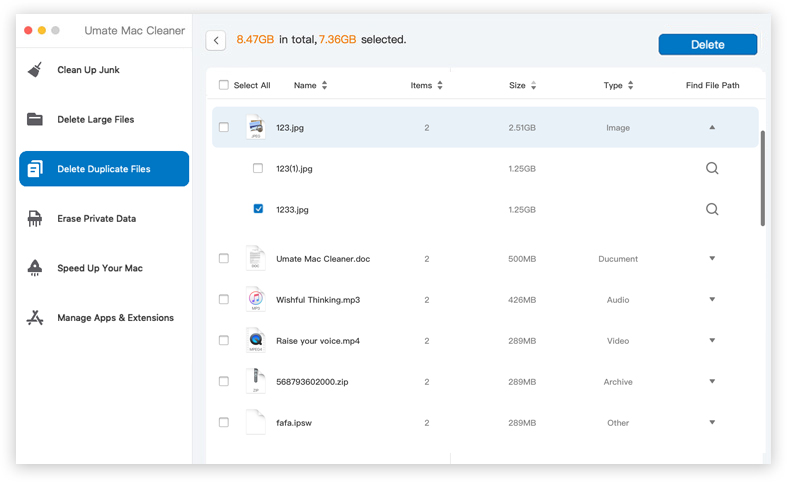
Step #4: Choose a File
It will take a while for the scan to complete, but once it’s done, you’ll find a list of files on the next screen. Simply select the file you wish to delete from your storage. You can also click the Select All button if you want to delete all files.
Step #5: Delete the File
With the file selected, you can very easily delete the file by clicking the rectangular blue button at the top-right corner of the program. It should have a caption that says Erase, Delete, or Clean. This should finalize the cleanup process.
After following these five steps, you’d have successfully performed a cleanup on your Mac storage. As you can see, it’s quite easy and takes several minutes at most. This explains why Mac Cleaner is recommended by many experts.
Closing Thoughts
Due to the increase in the number of viruses throughout the years, people seem to forget that virus infections aren’t the only reason why a computer may encounter issues. The storage also has a lot to do with these issues, especially when it comes to Mac computers as they often have small disk space. Fortunately, unlike virus infections, it’s rather easy to solve storage issues. You simply need a Mac storage cleaner, and you’re good to go. However, it shouldn’t be just any storage cleaner. It should have the capabilities to maintain the computer’s peak potential, and Mac Cleaner should fit the bill.
Latest Articles