

Deleting files on your computer is arguably one of the best ways to maintain its performance. After all, storage space affects a device’s performance considerably. And while there are all kinds of files you can delete, pictures are perhaps the best target.
They may be relatively small compared to other files, with sizes ranging from 100KB to 10MB, but computers typically have hundreds if not thousands of pictures lurking in their numerous folders. Naturally, the total size of these pictures might as well reach the 10GB mark. Another reason to delete pictures delete on Mac is the fact that most of them are unnecessary. After all, some of the photos might’ve been for one-time use. Moreover, you can very easily store your pictures on the cloud or the internet.
With that said, if you want to free up some storage space on your Mac computer, you might want to prioritize the pictures first. Now, you might wonder, is there a way to specifically search for pictures on your computer? Read on to find out.
Method #1: Delete Pictures on Mac Manually Using The Photos App
The Photos app allows you to manage all the photos within the storage of your Mac computer. As time-consuming as it may be, your first option, and perhaps the simplest method, is to delete photos manually using the Photos app. Of course, the process is not completely manual, though it would still take a lot of time since you have to find and select the photos individually and delete them accordingly. With that in mind, here’s how to delete pictures on Mac using the Photos app:
- Open the Photos app from the Dock. Alternatively, you can also open the Photos app via the Launchpad.
Note: The Launchpad is the app manager for Mac where you can find all your apps, including the Photos app.
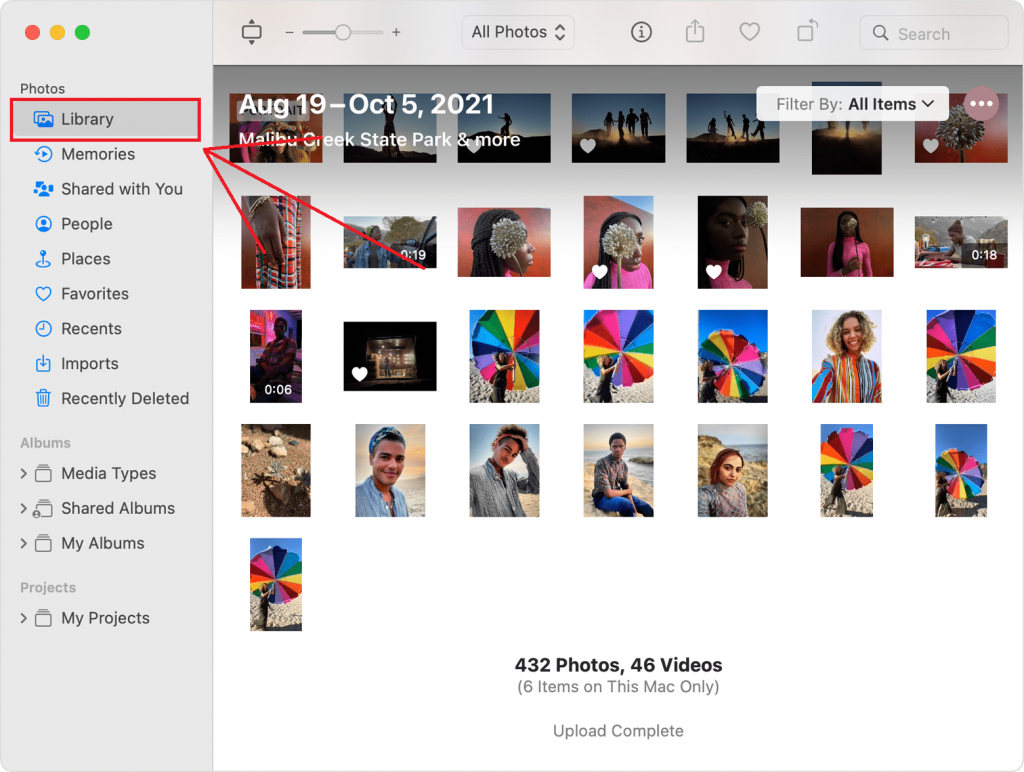
- If you look at the left side of the window, you’ll find several options. Select Photos under the Library section. In some versions of Mac, it’s the opposite, since you have to select Library under the Photos section, as shown above.
- On the Photos window, you simply have to select the photos you wish to delete. If you want to select all at once, you can simply press Command + A on your keyboard as a shortcut.
- Once you’ve selected all the photos you want to delete, simply right-click on any of those photos.
- Select Delete [number of photos] items fromthe resulting dropdown menu.
Note: Alternatively, you can press the Delete key on your keyboard as a shortcut to delete the selected photos.
- The selected photos will then get deleted, although, in reality, they will actually move into the Recently Deleted directory. If you don’t plan on recovering those files, simply click Recently Deleted from the left pane of the window.
Note: The Recently Deleted directory automatically deletes its contents after 30 days, so if you’re not in urgent need of storage space, you can simply wait until it reaches that point.
- Click the Delete All button at the top-right corner of the window to delete all recently-deleted photos.
Keep in mind that this is the most time-consuming method in this guide. After all, you have to select the photos individually and there’s no going around it. While you can indeed always select all photos and delete them at once, you never know when you’ll need a specific photo. Hence, it’s not advisable. However, if you only need to delete the photos in a specific album that you no longer need, there’s a much easier and more convenient method, and that’s going to be our next topic.
Method #2: Delete All Pictures In A Specific Album
Apart from individual photos, you can also create albums in which you can store photos. For instance, if you wish to separate photos pertaining to your studies from the photos about your work, you can simply create a School and a Work album. This not only allows you to distinguish photos according to the category, but it can also help with deleting photos since you can delete an entire album if you no longer have a need for it, like if you no longer need the work photos, for example. Here’s how you can do this:
- Open the Photos app.
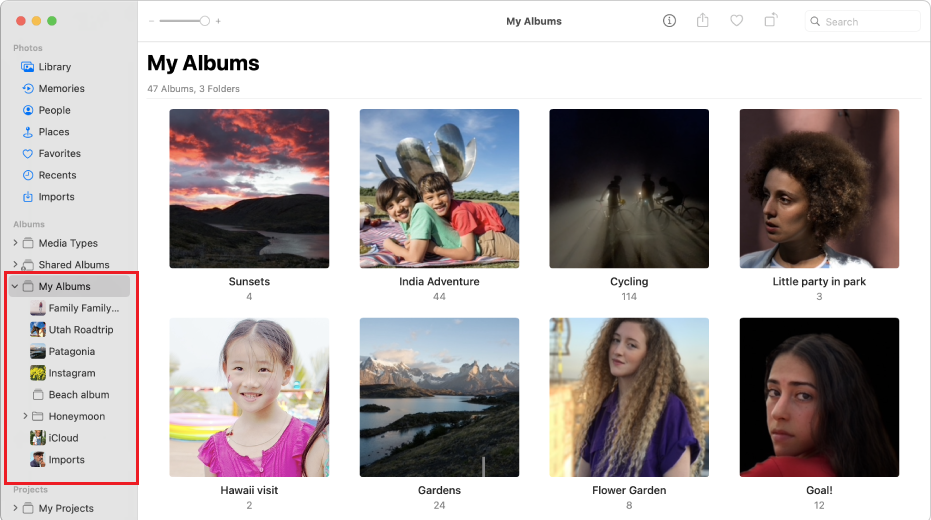
- Rather than looking at the Library section, this time, pay close attention to the My Albums section.
- You’ll notice that there are a few items under this section. These are the albums currently on your computer. Hover your mouse on the album you wish to delete and right-click on it.
- Select Delete Album from the resulting dropdown menu.
With this, you can delete an entire album with just a few clicks.
Method #3: Delete Pictures from About This Mac Storage
Though the Photos app is indeed designed to detect all the photos on your computer and display them in the app interface accordingly, it’s not perfect. In some cases, the app may miss a few photos on your computer. This usually happens if the folder is hidden, the file extension isn’t compatible, or if the Photos app is simply malfunctioning. If you don’t want to miss any photos you may want to delete, you can head to the About This Mac Storage—a place where you can find files of different types and display the unnecessary files under that file type. Here’s how to delete pictures on Mac with this method:
- Click the Apple icon at the top-left corner of your screen.
- Select About This Mac from the resulting options.
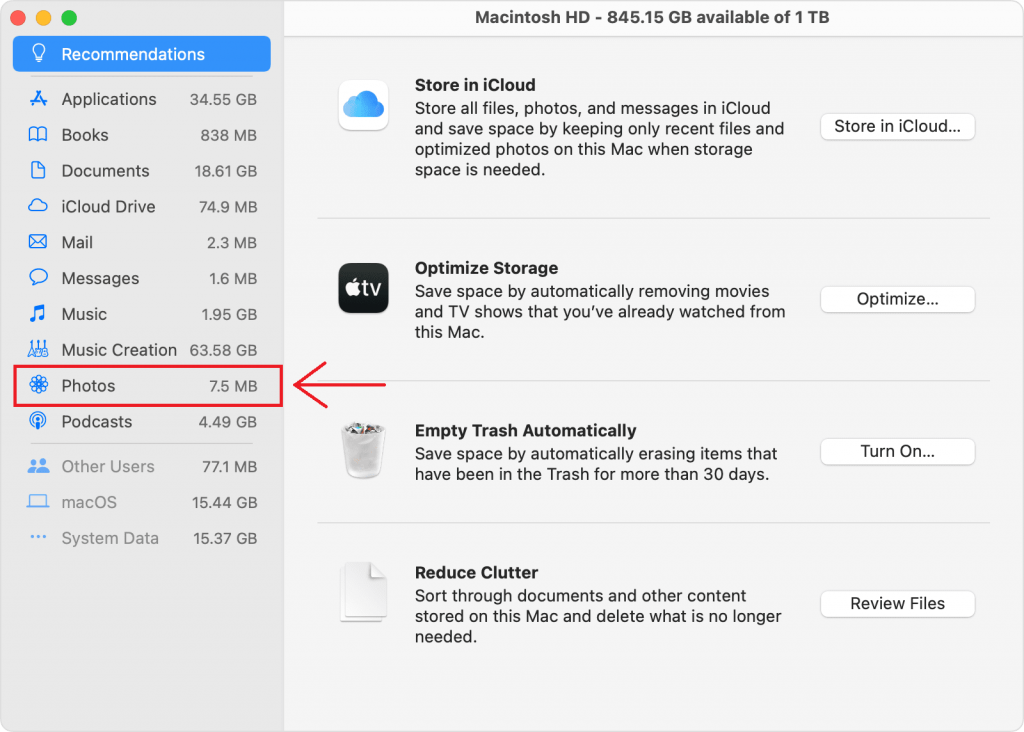
- Navigate to the Storage tab by clicking on it from the menu bar at the top.
- Select Photos from the left pane.
- You’ll then get a list of items, which should correspond to photos you likely no longer need. Simply right-click on the photos you wish to delete and select Delete.
Using this method, you should be able to find pictures that weren’t detected by the Photos app.
Method #4: Delete Pictures on Mac Automatically With Mac Cleaner
Though the fact that there are often too many pictures on a computer is indeed frustrating, it’s not the most problematic part of pictures. The worst part about this specific file type is the fact that even if you did manage to delete all pictures on your computer using the aforementioned methods, there will still be remnants of those photos. This is what experts call photo cache, and it’s essentially data about the images that the Photos app uses when displaying the pictures.
The photo cache may not be as big as the photos themselves; they still consume a ton of storage space. That’s why it’s advisable to also get rid of the photo cache. To do this, we suggest you use the Mac Cleaner software.
Mac Cleaner is a cleaner software consisting of several modules. One such module is capable of deleting the photo cache without searching for the directory manually. If you want to use this software, here’s what you need to do:
Step #1: Download, Install, and Launch Mac Cleaner
Open a browser and head to the Mac Cleaner website. Click the Download Now button, wait for the download to complete, then open the downloaded file to install the software. Afterward, open the software on your computer.
Step #2: Choose the Erase Private Data Module
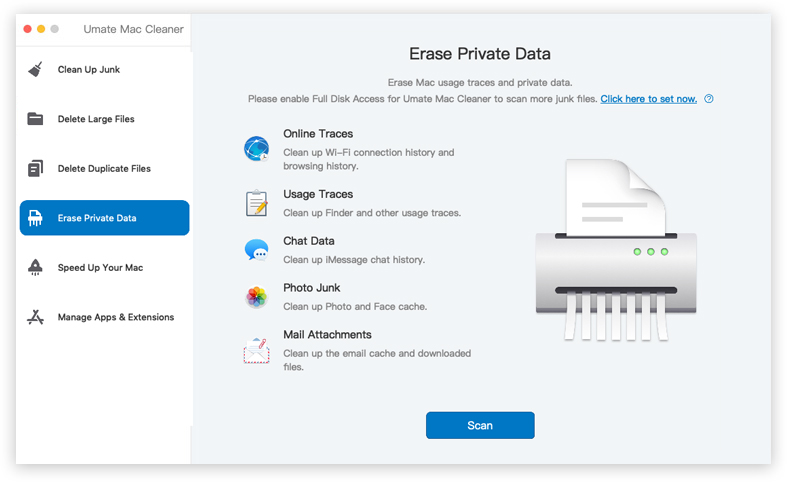
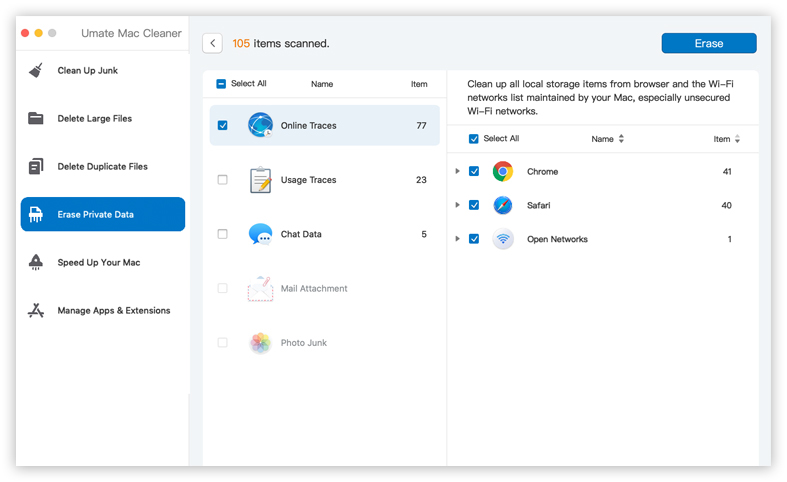
On the left side of the interface, you’ll find a sidebar that consists of six options. These are the six modules Mac Cleaner has to offer. It includes (1) Clean Up Junk, (2) Delete Large Files, (3) Delete Duplicate Files, (4) Erase Private Data, (5) Speed Up Your Mac, and (6) Manage Apps & Extensions. For our purposes, we will be using the fourth module, Erase Private Data, which essentially scans your computer for files that the software considers private data. These may include (1) Online Traces, (2) Usage Traces, (3) Chat Data, (4) Mail Attachment, and most importantly, the (5) Photo Junk.
The Photo Junk corresponds to the photo cache on your computer, which aligns with your goal to erase the photo cache. In that regard, make sure you choose the Erase Private Data module by selecting it from the left sidebar of the software.
Step #3: Click the Scan Button
Upon selecting the module, you’ll find a ton of information about its features in the center area of the software. You can read it to learn more about the module, though it’s not necessary. After that, you simply have to click the Scan button.

Step #4: Select Photo Junk
After activating the module and scanning for files, the software will redirect you to the next screen, which should have a list of five items, which include the five features mentioned earlier. Simply select Photo Junk from this list of items. Next, on the right side of the interface, you’ll find yet another list of items. These are files that belong to the Photo Junk category. Select the files you wish to delete by clicking on their corresponding checkboxes. You can also click Select All to include all items.
Step #5: Erase the Files
Once you’ve selected all the files under the Photo Junk category, simply click the Erase button at the top-right corner of the software. This should delete these files completely, though it may take a while.
Using this module on Mac Cleaner, you can very easily get rid of the remnants of the photos you’ve recently deleted on your Mac computer. This, too, should further increase the available disk space on your computer.
Takeaways
Pictures might be small in size, but since computers typically have hundreds of them, their total size can pile up to GBs. But fortunately, there are several ways to delete pictures on Mac. You can do it manually, semi-automatically, or completely automatically. Of course, each method has its corresponding pros and cons, so it’s important that you take these into consideration if you plan to delete your pictures. Regardless, deleting pictures should yield positive results.
Latest Articles