

This is a complete guide on how to delete messages on MacBook.
Unlike desktop computers and laptops with a Windows OS, macOS devices such as MacBook has a built-in messaging app named Messages. The app allows you to send and receive messages from contacts saved on the device. It also synchronizes with the Messages app on your iOS devices, allowing you to pick up on conversations where you left off. At first glance, it may seem convenient, but it rarely comes in handy. After all, who would prefer chatting via MacBook over mobile devices?
Of course, you can always simply ignore the Messages app on your MacBook. But as you may have come to realize, once set up, the Messages app on macOS devices would automatically sync messages from any connected iOS mobile device.
It may seem inconsequential, but it actually has several downsides, the biggest one being the fact that the messages take up a huge portion of your available space. If this has been plaguing your mind, worry not, as this article will discuss how to delete messages on MacBook. But is it possible to do so without deleting your messages on your iOS? Read on to find out.
Can I Safely Delete Messages on MacBook?
You can, without a doubt, delete messages on MacBook. The only argument to be made is whether you can or cannot do it safely without deleting the copy on your iOS devices as well. Fortunately, the answer is the same—you can safely delete messages on MacBook without interfering with the copies on your iOS devices. You don’t have to follow additional steps either. You simply delete the messages like you normally do, and it should only delete the copy on your MacBook. However, to ensure that the deleted messages won’t come back, you must first disable the Messages sync on your Mac.

How to Disable Messages on MacBook
When your MacBook and iOS devices are in sync, even after deleting all the messages on the Mac device, it’ll likely come back very soon. To avoid this issue, you must desynchronize the Messages app on your iOS and Mac. Here’s how you can do this:
- On your MacBook, open the Messages app.
- On the top menu bar, click Messages.
- Select Preferences from the resulting dropdown menu. This will open the Preferences window.
- On the Preferences window, go to the iMessage tab from the top bar.
- Uncheck the box for Enable Messages in iCloud to disable the feature.
- Close the Preferences window to save the changes you’ve made.
With this, if you delete messages on your MacBook, it shouldn’t go back as it’s no longer synced to your Apple account. Now, it’s time to figure out how to delete messages on MacBook. For this, you have four options. Let’s start with the easiest one.
Method #1: Delete Messages on MacBook Via The Messages App
Of course, the easiest way to delete messages on MacBook is by using the Messages app itself. It only takes a few steps, and you can clearly see which messages you’re about to delete. Below are the steps you must follow for this method:
- Open the Messages app on your MacBook.
- Select the conversation you wish to delete.
- Click File from the top menu bar.
- Select Delete Conversation.
Note: You can also select a conversation, right-click, then choose Delete. You can achieve the same result if you select a conversation and press the Delete key on your keyboard. Whatever suits your fancy.
Similarly, you can choose to delete only certain messages within the conversation. You can do this by opening a conversation, selecting a message, then pressing the Delete key. If you wish the delete all messages but not the conversation itself, you can click the Edit option from the top menu and select Clear Transcript. By doing this, the conversation remains in the sidebar, but it will no longer contain any message. As you may notice, this requires you to delete conversations manually. If that’s not something you want to do, you can instead automate the process using Terminal.

Method #2: Delete Messages on MacBook Using The Terminal
The Terminal is a built-in app in Mac devices that is essentially the MacOS counterpart of the Command Prompt. It allows you to perform or execute certain commands of different applications without actually opening the app in question. In this scenario, you can use Terminal to execute the Delete command from the Messages app without actually opening it. To do so, you must enter a certain code on the Terminal app. Here’s how you can use this particular method:
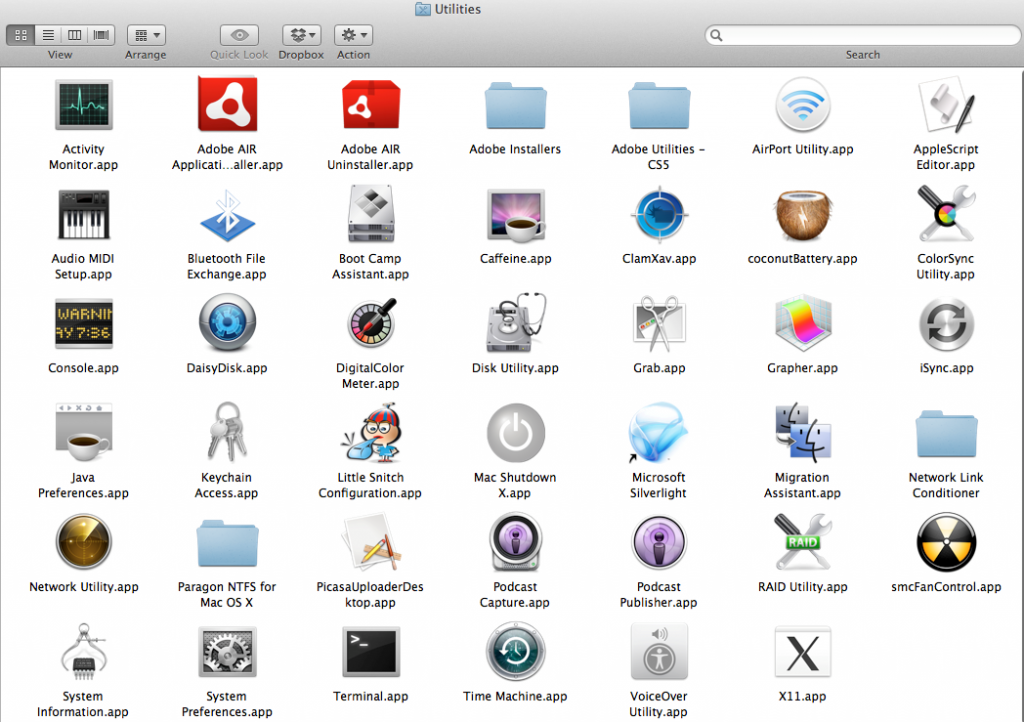
- On your MacBook, go to the Applications section.
- Find and open Utilities.
- In the Utilities category, launch the Terminal app.
- On the app, copy and paste this line of code and press Enter: rm –r ~/Library/Messages/chat.
This will automatically locate all the messages on your Mac and delete them accordingly. This is particularly useful if you wish to delete all messages on your MacBook at once, though it can be risky.
If you want to delete the attachments as well, you can type in this line of code: rm –r ~/Library/Messages/Attachments/??
Unlike the first method, this is a bit risky and not user-friendly. After all, not only will this permanently delete your messages, but you also cannot figure out whether you’re deleting the right messages since you can’t visually see them. Nevertheless, it’s particularly handy if you don’t care which messages are deleted, as long as all of them can be cleared.
Method #3: Delete Messages on MacBook With Finder
If you don’t like to manually delete your messages like the first method, but you also prefer not to go too technical like the second method, the Finder method is for you. If you’re not aware, Finder is the file manager app for Mac. It’s basically the macOS counterpart of Windows Explorer on Windows PCs. It allows you to delete files en masse, but it doesn’t require much coding knowledge, unlike the Terminal method. Here’s how you can delete messages on your MacBook with Finder:
- On your MacBook, open a session of Finder.
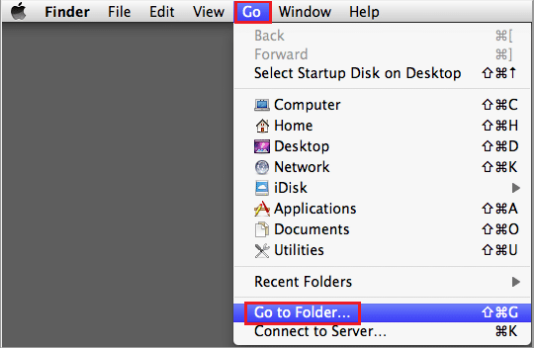
- Click the Go option from the top bar menu. This will open a popup window.
- Select the Go to Folder… option.
- On the popup window, copy and paste the file path: ~/Library/Messages.
- Click Go to head to that file path.
- Locate the three files named:
- chat.db
- chat.db-wal
- chat.db-shm
- Delete these files.
These three files correspond to your messages and their respective attachments. By deleting these files, you’re basically deleting your messages. Perhaps the only problem with this is that you can’t visually see what you’re deleting, similar to the second method. However, again, if you simply intend to delete your messages, this is a good method. If you need a perfect method, however, the following section should suffice.
Method #4: How to Delete Unnecessary Messages on MacBook With Mac Cleaner
Mac Cleaner is a handy tool that allows users to scan for unnecessary files and delete them accordingly. Its main purpose is to speed up Mac devices by deleting a couple of files that it no longer needs. Of course, messages are among the file types it can scan, though it would only be included if those messages are either considered junk or duplicated. Here’s how you can use Mac Cleaner to scan and consequently delete unnecessary messages on your MacBook.
Step 1. Download And Install Mac Cleaner
First off, you must download the Mac Cleaner installer from its website. You must then use the downloaded executable to install the software on your computer. Afterward, open the tool on your MacBook.
Step 2. Select An Appropriate Module
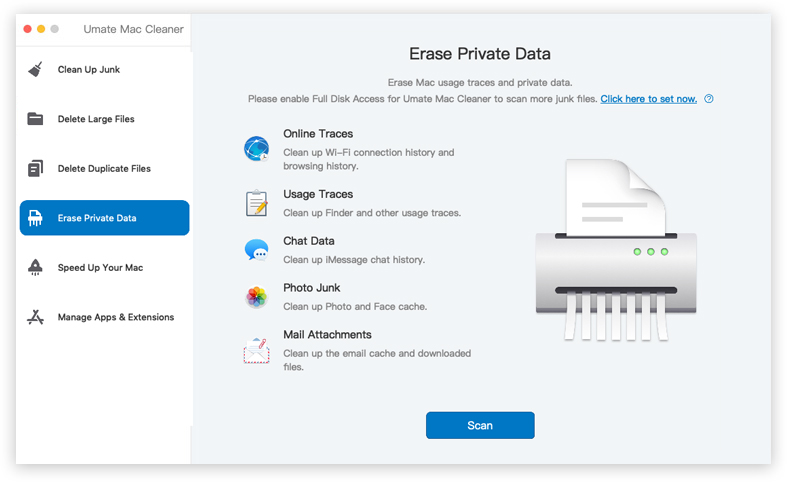
Upon opening the software, you’ll be met with an interface that consists of a left sidebar. This sidebar consists of six options, which are the modules of the software, each having different functionalities. For the purpose of this guide, you must only choose between Clean Up Junk, Delete Duplicate Files, and Erase Private Data. These are the only modules that can scan for messages and allow you to delete them, though we suggest selecting Erase Private Data.
Step 3. Scan for The Messages
After selecting a module, the software will show its respective screen, which should consist of information about that particular module. It will explain how it works, what kind of files it scans, and so on. In the case of Erase Private Data, it will take your Wi-Fi connection history, Finder data, Photo junk, Mail junk, and most importantly, iMessage chat history. To start the process, click the Scan button at the bottom-middle part of the screen.
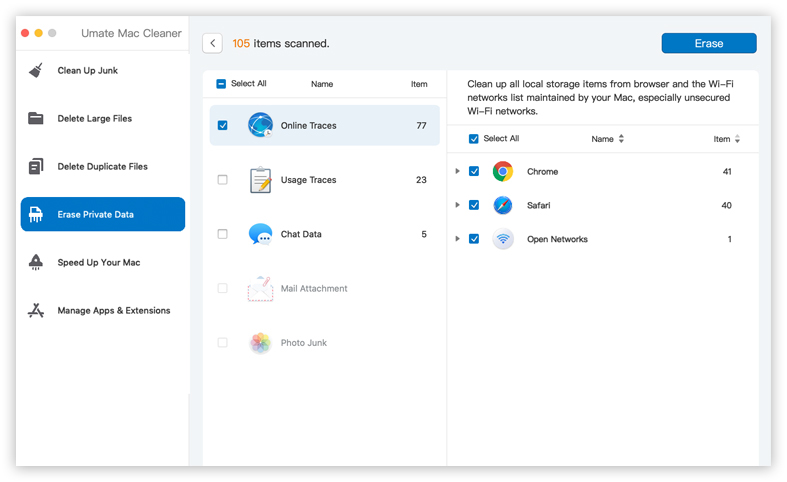
Step 4. Select Chat Data
Once the scan is finished, the software will take you to the next screen, from where you’ll find several items. Make sure the checkbox for Chat Data is ticked. You can also select it first to check its contents.
Step 5. Erase The Chat Data
Finally, you must click the Erase button at the top-right corner of the page to finalize the deletion process.
With this, you can very easily delete messages on your MacBook without going too technical. The best part about this is that it also detects hidden messages that you won’t find otherwise using normal means.
Wrapping Up
The Messages app may bring convenience to MacBook users, but it’s often not to the extent that you’d sacrifice your storage capacity. Therefore, it’s important to know how to delete messages on MacBook. Unfortunately, unlike other file types, messages are often synced to your other iOS devices via the iCloud account. Hence, if you delete your messages on your MacBook, there’s a chance it may also delete the messages on your other devices. With this guide, however, you should be able to easily delete messages on MacBook without impacting copies of your messages on other Apple devices.
Latest Articles